
There’s nothing more annoying than snapping the greatest picture ever taken only to later find a stranger looming in the background. Luckily for you, there are free and premium tools to easily crop that pesky photo bomber right out of the frame.
Below, we’ve put together a comprehensive guide on how to crop a photo, whether you prefer Windows, MacOS, or mobile platforms. While you’re it, take a look at our picks for the best free photo editing software and our detailed guide on how to remove a background image.
Windows 10
Use the Photos app
While Windows 10 still provides the legacy Microsoft Paint tool we’ve come to know and love since 1985, the Photos app is now the default viewer and editor. Cropping an image is easy, and here’s how.
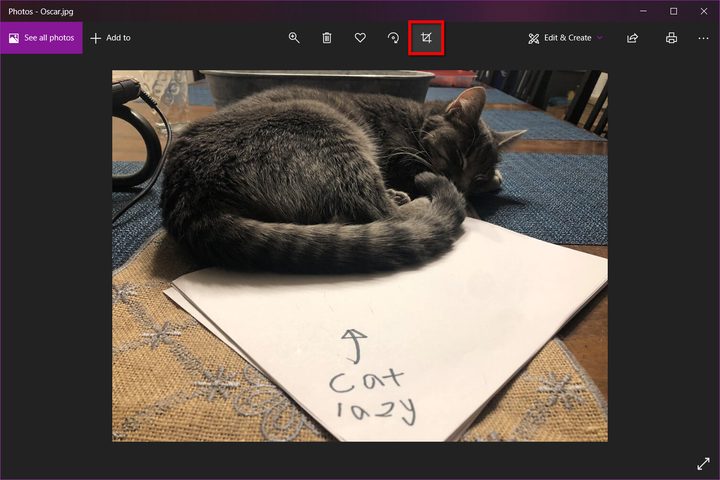
Step 1: Right-click on the image you want to crop and select Open With on the pop-up menu, followed by Photos. If the Photos app is still your default viewer, then you can simply double-click on the image instead.
Step 2: With the image loaded in the app, click the Crop button located on the toolbar, as shown above.
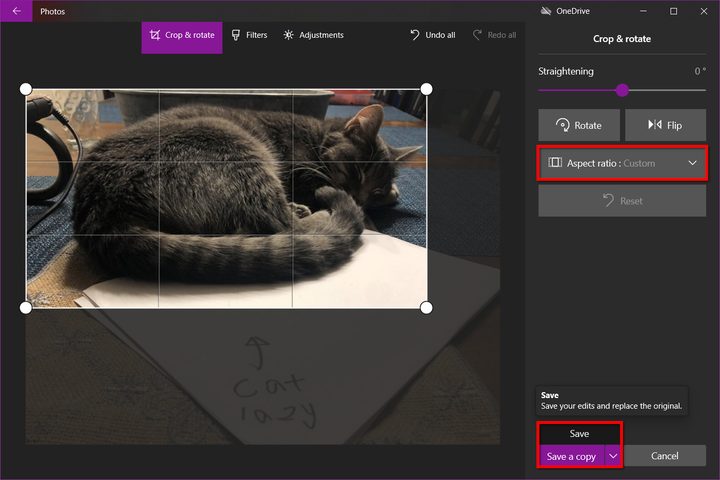
Step 3: Use your mouse to drag the borders and set the crop window. Alternatively, click the Aspect Ratio button to set a specific crop ratio, like widescreen or square.
Step 4: Click the Save a Copy button or click the Down Arrow and select Save to make changes to the original photo.
Use Paint
Microsoft Paint isn’t exactly robust. It’s not laden with advanced tools or impressive capabilities, but it still lingers in Windows 10 after Microsoft threatened to depreciate the long-standing tool in 2017. It’s a favorite go-to application for creating artwork from scratch to making simple edits to photos, like cropping.
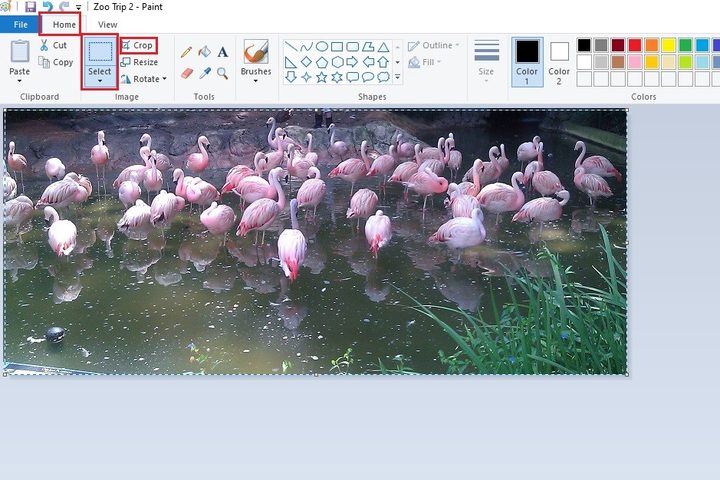
Step 1: Right-click on the image and select Open With on the pop-up menu, followed by Paint.
Step 2: Click the Select button and drag the tool to encompass the portion of the image you wish to crop.
Step 3: Click the Crop button directly right of Select.
Step 4: Click File, followed by Save to apply the changes to the original file, or select Save As to save the edited image as a copy.
Use the Snipping Tool
Windows 10 includes other built-in tools that allow users to easily crop images by just clicking and dragging. Aptly referred to as the Snipping Tool, it is an easy way to crop and save images with no editing skills required. However, Microsoft will eventually depreciate this tool for the newer Snip & Sketch.
Step 1: Load the image you want to crop on the screen.
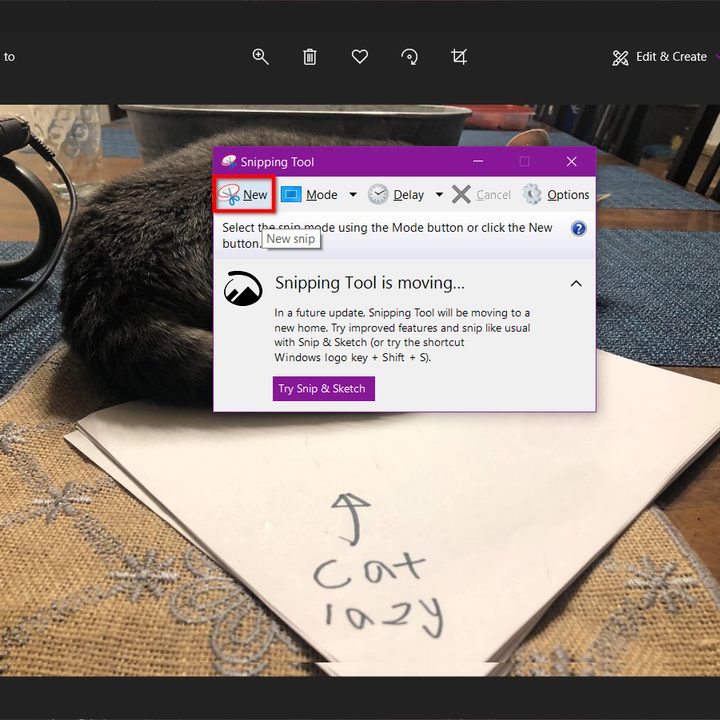
Step 2: Type “snip” in the taskbar’s search field and select Snipping Tool in the results.
Step 3: Click the New button in the Snipping Tool window.
Step 4: A transparent white overlay washes across the screen, and the mouse cursor turns into crosshairs. Click and drag the crosshairs to select the area you’d like to screenshot and crop, and then release the mouse to create a new snip.
Step 5: The resulting screenshot appears in the app. Use the pen, highlighter, and eraser tools to modify the cropped image if needed.
Note: The multicolored Teardrop Logo lets users open their snips in Paint 3D for more advanced image editing.
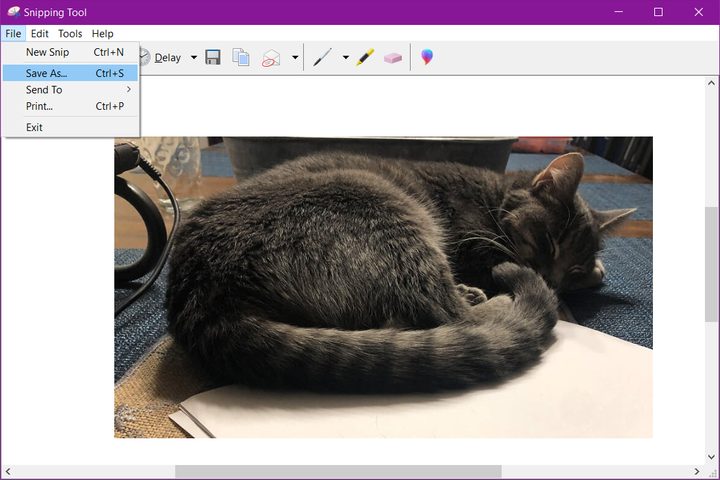
Step 6: Click File, followed by Save As to save the cropped screenshot to your PC.
Use Snip & Sketch
Snip & Sketch is the updated version set to replace the Snipping Tool, but it’s also accessible on Windows 10. The functions of Snip & Sketch are more or less the same as the Snipping Tool, but there are a few key differences. Snip & Sketch can capture hard-to-get screenshots that can’t be captured with the Snipping Tool, like program menu options or icon directions that only appear when the mouse is hovering.
Step 1: Load the image you want to crop on the screen.
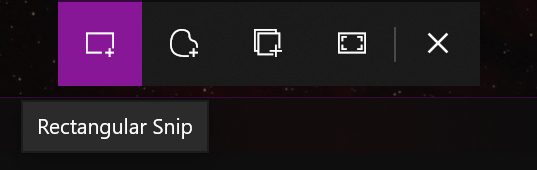
Step 2: Press the Windows + Shift + S keys. The screen should dim, and a toolbar appears along the top, as shown above.
Step 3: Select the Rectangular Snip tool located on the left end and use the mouse to create a box around the image. Here, you can go ahead and crop the image or wait until step 5.
Step 4: When a notification appears, reporting that the image is now available on the clipboard, click the notification.
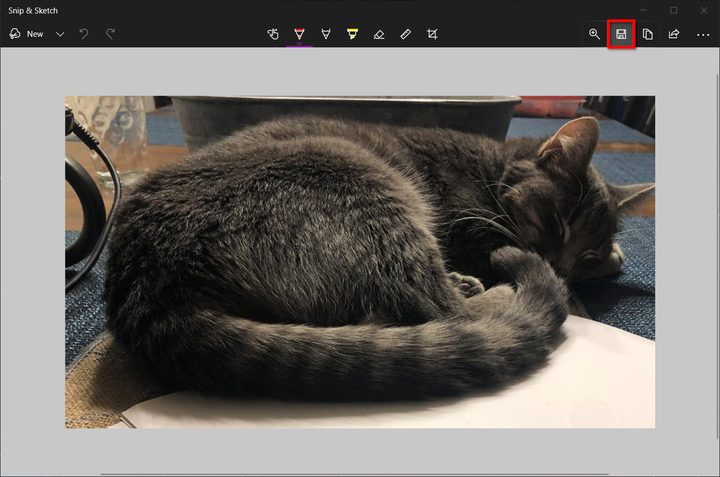
Step 5: When the cropped image appears in the Snip & Sketch app, edit it as needed using the pen, highlighter, pencil, and so on. There’s a crop tool, too, if you didn’t do so when capturing the screenshot.
Step 6: Click the Disk button to save the image.
MacOS
Use the Preview app
Apple’s Preview app is less of a pain when finding and cropping images stored on your Mac. It’s also the default image viewer that provides a few editing tools.
Step 1: Right-click on the image and select Open With on the pop-up menu, followed by Preview. If the Preview app is still your default viewer, just double-click on the file.
Step 2: Use the mouse cursor to draw a box around the portion you want to keep.
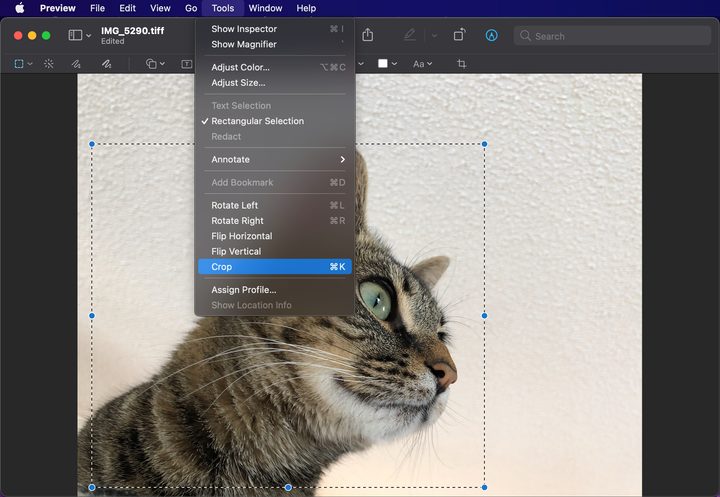
Step 3: Click Tools on the menu bar, followed by Crop on the drop-down menu.
Step 4: Click File on the menu bar, followed by Export to save the edit as a copy. Otherwise, select Save to apply the edits to the current photo.
Use the Photos app
Photos is a photo management and editing app exclusive to Apple’s MacOS, one that works similarly to the now-defunct iPhoto. Like Preview and Photo Booth, the minimalist image software comes preinstalled in the latest iterations of MacOS, meaning anyone with a machine running MacOS Yosemite or later has access to the app. Using the aptly titled Photos, you can easily group photos into albums, tag them, categorize them, and crop them.
Step 1: Open the picture you wish to edit. Click the Edit button in the upper-right corner. You may be prompted to add the image to your library at this point.
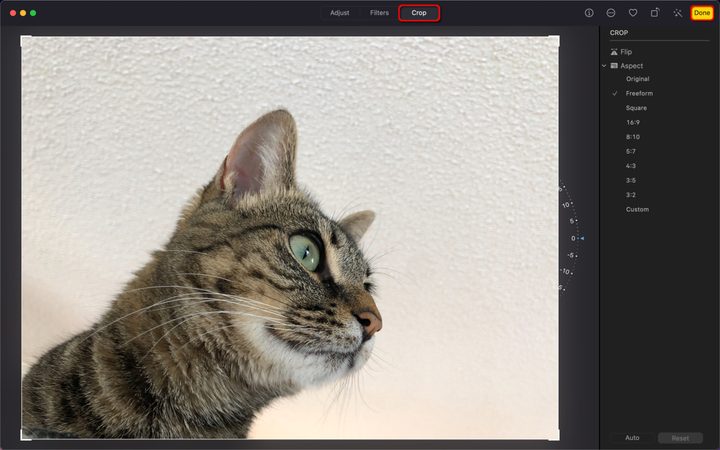
Step 2: The Adjust, Filters, and Crop tabs appear. Select Crop.
Step 3: If desired, click Aspect listed on the right to choose an aspect ratio for the resulting crop. Otherwise, manually adjust the rectangle to fit the portion of the image you wish to crop.
Step 3: Click the yellow Done button in the upper-right corner to finish.
Chrome OS
Use the Gallery app
Like Windows 10 and MacOS, Google’s operating system for Chromebooks has a default image viewer that provides a few basic tools.
Step 1: Right-click on the image and select Open With Gallery on the pop-up menu. Alternatively, if Gallery is still your default image viewer, just double-click to open.
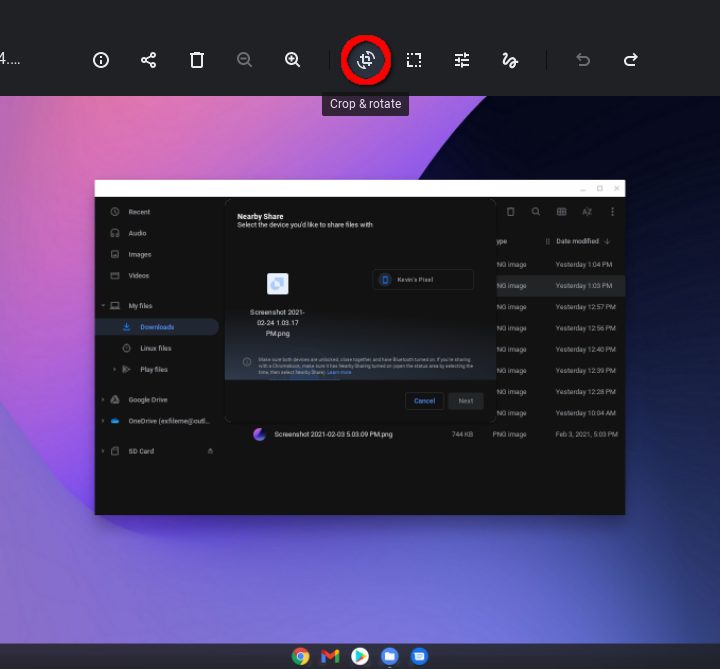
Step 2: Click the Crop & Rotate button on the toolbar.
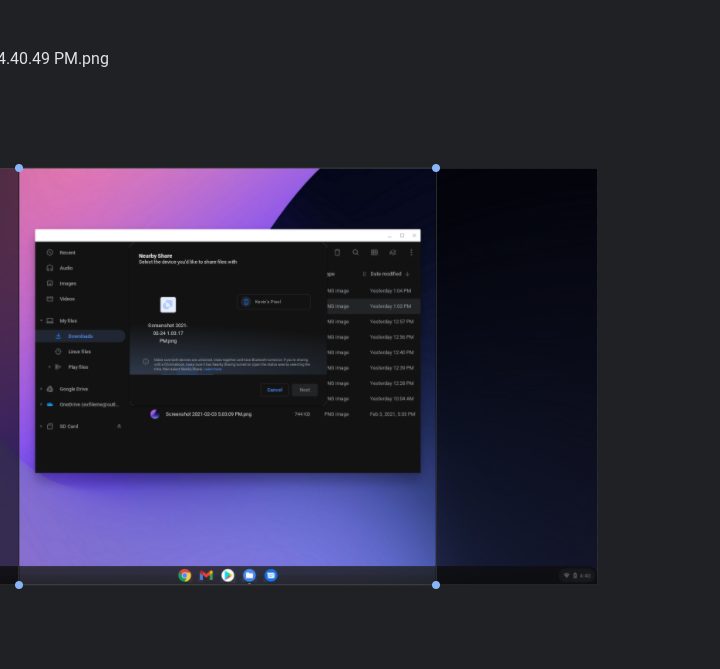
Step 3: The crop tool is set to Free by default. Use the mouse cursor to move the borders and set the crop window. Alternatively, select one of the five other options for a specific crop window.
Step 4: Click the Close button to close the Crop & Rotate tool. Alternatively, you can click the three-dot More button and select Save As on the drop-down menu if you don’t want to apply the edits to the original file.
Step 5: Click the blue Save button, or click the blue Down Arrow to select Save As and save the edits as a copy.
Alternatives
Photoshop
Though Photoshop isn’t necessary if you merely need to crop an image, it remains the most well-known piece of photo editing software. Though the premium software is expensive, you can always opt for the free trial if you’d like to test out its remarkable capabilities. When it comes to cropping, Photoshop lets you do it in just a couple of steps.
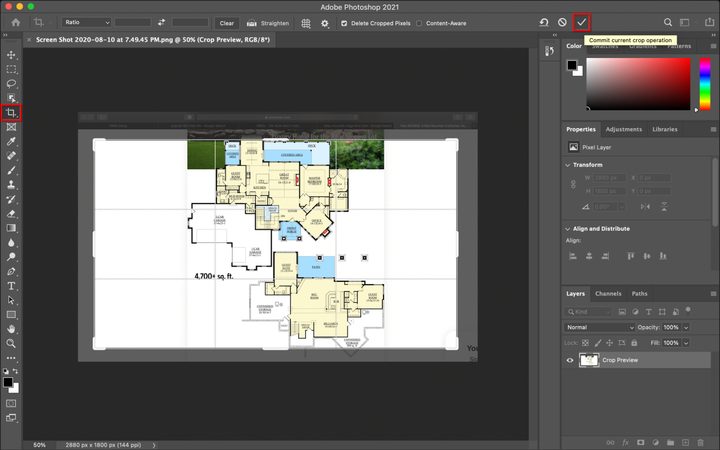
Step 1: Open the picture you want to edit. Next, select the Crop Tool from the left toolbar. It resembles a square with several lines protruding from two corners.
Step 2: Adjust your selection to capture the portion of the image you wish to keep.
Step 3: When ready, click the Check Mark on the options bar at the top of the window, as shown above.
Step 4: Select Save to apply the change to the current image or Save As to create a new file.
Pixlr (web)
Pixlr is a great image editor built for web browsers. The freemium software requires you to do little more than upload an image or enter a URL for a photo before cropping the image.
Step 1: Load the main Pixlr website and select either the Advanced Pixlr E or the Playful Pixlr X option. Either image editor works efficiently, but the advanced option offers more tools and features for image editing.
Note: You may need to enable Adobe Flash if your current settings block it.
Step 2: With the tool chosen, select the Open Image button on the left.
Step 3: Choose the photo you wish to upload and crop.
Step 4: Pre-resize the image if prompted. If you’re uploading a large image, the tool will present three options: Ultra HD, Full HD, or Web. You can also manually enter a new size. Click the Apply button to finish uploading the image.
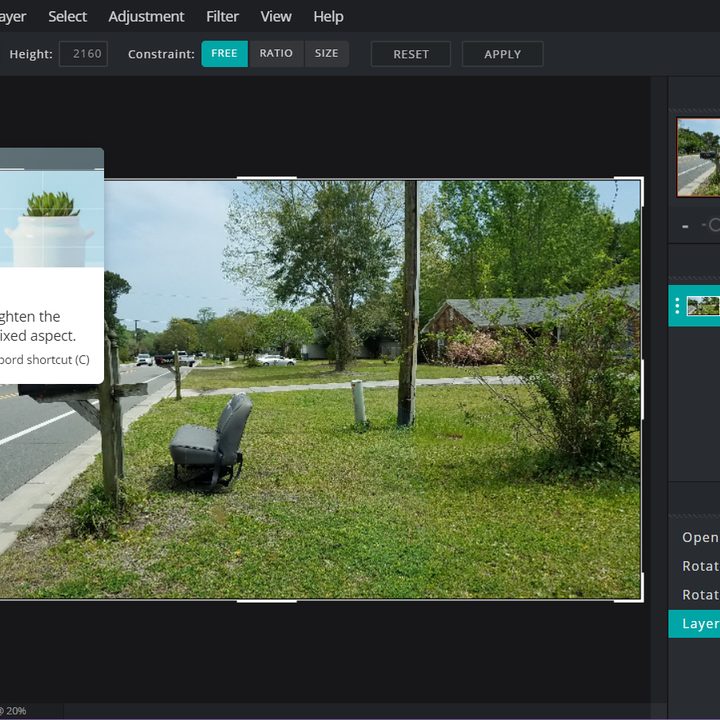
Step 4: Click the Crop Icon located on the toolbar. Alternatively, you can press the C Key to enter crop mode.
Step 5: Free mode is toggled on by default, allowing you to adjust the size by moving the sides in and out accordingly. Here are two other options:
- Ratio — This keeps the image aspect ratio locked. If the preset is set to None, then you’ll see a square boundary based on the image width that you can adjust. Click the Down arrow next to Preset to find a list of different aspect ratios you can apply to the image.
- Size — Enter the exact height and width you want to use.
Step 6: Click Save to apply your changes.
Step 7: A Save Image pop-up appears. Set the file name, file type, and quality, and then click the blue Download button.
Pixlr (Apple/Google)
If you’re using the Pixlr app to crop photos on your mobile device, here’s how to do it on Android.


Step 1: With the app open, tap the Photos icon on the main screen and choose a photo stored on your device.
Step 2: Tap the Toolbox icon on the bottom left. This opens the Tools menu.
Step 3: Tap the Crop icon.
Step 4: Adjust the grid to cover the portion of the image you want to keep. Alternatively, choose a preset aspect ratio to adjust your crop.
Step 5: To finalize your cropped selection, click the green Check Mark icon at the bottom of the screen.
Step 6: By clicking Done, you will finalize the edits you have made to your image, so ensure it is cropped to your liking before doing so.
Step 7: From here, you will have different options to save and share your image. You can choose to save the picture to your device, or you can post the image to social media outlets, including Facebook, Instagram, and Twitter. If you tap More, you’ll get even more options, like sending it to someone through text or email.
You can do far more than just cropping your images with this program, so you can continue using it for other editing or fine-tuning tasks. Using one program for all of these image editing options makes taking and sharing your pictures a simple task.


