Mac and PC might be two distinct camps with quite well-worn battle lines, but that doesn't mean you can't have the best of both worlds. Here’s how to install Windows 11 (these steps should work with Windows 10, too) on a Mac so you can run all of your favorite Windows applications without sacrificing your Mac's speed and aesthetics.
When Apple updated its Macs with its own in-house M1 chips, that prevented Boot Camp from working as it did on old Intel chips, removing the way you could download Windows on older Macs. But there is still an effective workaround if you're willing to invest a little in a VM (virtual machine) setup. Here's what to do.
Use Parallels Desktop 17 to run Windows 11
Parallels is a virtualization platform that's optimized with an eye on both Windows 11 and MacOS, including the latest Mac models with M1/M2 chips. That lets you set up a VM that's managed away from your local hardware so it can circumvent a variety of limitations – in this case, problems with Apple chip compatibility. While we'll be showing the steps with Windows 11 in mind, this process should work with Windows 10 too if you have the right files.
Step 1: Download the latest version of Parallels, Parallels Desktop 17. The catch is that you’ll have to pay for it. The standard version – which is all you really need – costs $79.99 for a one-time purchase with limited support. There is also a subscription version if you only plan on using it for a limited amount of time, and thee's also a discounted student version. You can test out a trial version first if you want to make sure everything works.

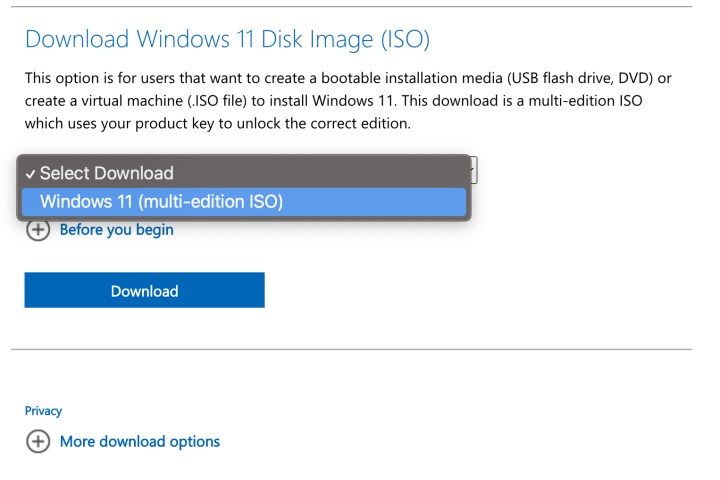
Step 2: Download the Windows 11 ISO file. This file was not available during the first
Step 3: Launch Parallels and follow any final setup instructions to make sure it’s fully installed. When it's ready, Paralells should launch the Parallels Desktop Control center.
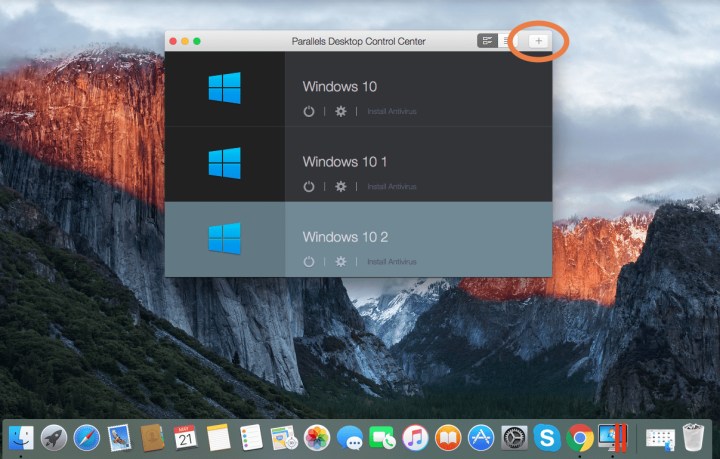
Step 4: Select the Plus button in the upper-right corner of the window.
Step 5: Select Install Windows or another OS from a DVD or image. Select Continue.
Step 6: The Installation Assistant will now open and guide you through the process of setting up your Windows 11 VM. As long as you have the
If you own a licensed copy of Windows 11, you will also have the option to enter your license key, which you can look up on your Microsoft account. This is a good idea to help speed up installation and make sure that all features are unlocked.
Step 7: You’ll be asked to answer some basic questions about your intentions with Windows to help the assistant choose settings, and then you'll name this particular VM something recognizable. You have the option to customize additional settings, but it’s not necessary, and you can usually do that later (also, it can mess up your VM if you tweak settings the wrong way). When you have completed everything, select Create and finalize your VM, then select Continue.
Now it’s time to wait. You’ll get a progress bar showing how long the installation is taking. Creating a full Windows 11 VM may be a little time-consuming, so don’t plan on using your Mac for a while, and make sure it’s online and connected to power. When the installation is finished,
What about older versions of Macs without M1 chips?
The good news is that, just as this option works with Windows 10 or 11, it also works with Macs with or without the M1 chip. So we still suggest using Parallels as the smoothest option.
Without the M1 chip, you also have the option to use the built-in Boot Camp to install Windows 10 directly, but keep in mind that won’t work with Windows 11 and may be limited in some respects. Using Boot Camp is not too dissimilar from the Parallels installation — you will have to make decisions about partitioning part of your hard drive for Windows, and you’ll need a copy of Windows 10 ISO handy, too.
If you'd like to learn more about Windows 11, we discuss some of the features we love here.
Editors' Recommendations
- How to transfer photos from an iPhone to a computer
- How to change where screenshots are saved on a Mac
- How to check the storage space on your Mac
- How to delete messages on your Mac
- How to check your CPU temperature