Windows always has been a great environment for multitasking, with the ability to run several applications at once and to switch between them with relative ease.
- Split screen in Windows 10 versus Windows 11
- Using Snap Assist in Windows 10
- Use the keyboard shortcut in Windows 10 & 11
- Snapping more than two windows in Windows 10
- Turning off Snap Assist and adjusting settings in WIndows 10
- How to split your screen in Windows 11
- Customize grids with a third-party app in Windows 10
In Windows 10, Microsoft tightened up the snapping mechanism and expanded its functionality. Today, the latest version of Windows 10 offers a number of ways to split your screen into multiple windows and get real work done, with better support for higher-resolution displays and multiple monitors. Even Windows 11 does the same, but with added productivity-first features like Snap Layouts.

Split screen in Windows 10 versus Windows 11
Before we begin, we do want to mention that we'll be talking about split screen multitasking across Windows 10 and Windows 11. Both operating systems will let you use what is known as Snap Assist.
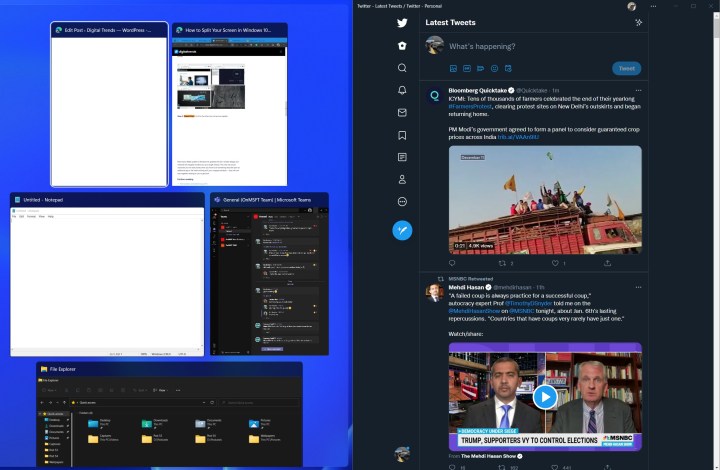
As we explain later, Snap Assist is a Windows feature that suggests ways for you to group your open apps together when you use a specific keyboard shortcut.
Anything you snap through Snap Assist won't "save." If you exit one app, you'll need to manually trigger that split screen again. The same also applies if you opt to open another app or minimize the Taskbar.
However, in Windows 11, Microsoft improved on that. It expanded on Snap Assist with a new feature known as Snap Layouts. You can still use Snap Assist keyboard shortcuts in
It has ways of grouping and saving your open apps so that if you minimize your apps to the taskbar, Windows will remember them as a Snap Group, and you won't lose your place. There's also a visual suggestion (with up to six ways) for how you can split screen via Snap Layouts with a pop-up when you hover over the maximize button — which you don't get in Windows 10.
All that aside, let us dive in deeper.

Using Snap Assist in Windows 10
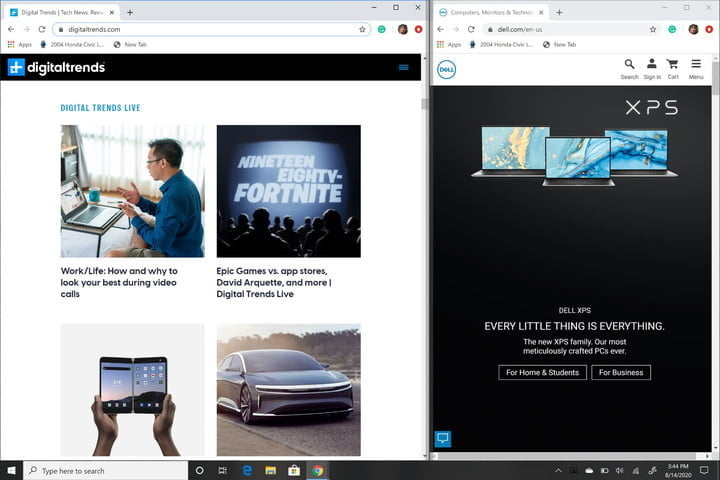
One of Windows 10’s most important contributions to split-screen multitasking is Snap Assist, which makes it easier to select an open application window when you are choosing which applications to arrange on your screen. Here’s how to use it:
Step 1: Choose the window you want to snap to one half of the screen, then drag it to the edge.
Step 2: If you have other windows or applications open when you snap your chosen window, you’ll also see a number of options that can fill the second half. Click on one, and it will automatically snap into place opposite the first window. If you don’t and the selection grid disappears, drag your second window to the edge of the empty space.

Step 3: To resize the two windows, hover the cursor over the dividing line until it becomes two arrows. Click and hold on the divider to adjust the two windows accordingly. However, there’s a limit to how narrow a window can be.
Note: Is Snap Assist refusing to work or acting strangely? Check your startup programs, the apps that automatically launch when you log into Windows. Sometimes these can interfere with Snap Assist, and disabling them will fix the problem. Our guide on managing startup programs is a great place to start.

Use the keyboard shortcut in Windows 10 & 11
Want a faster way to do this on your keyboard? There is a shortcut to split windows that is really useful. In an active window, press and hold the Windows key and then press either the Left or Right arrow key. This should automatically snap the active window to the left or right. Select another window to fill the second empty space.
If you want to expand a window to the full screen again, just press the Windows key and the Up arrow key together. If you accidentally make a quarter window instead of a half window, you can use the Windows and Up or Down arrow keys to expand it as well.

Snapping more than two windows in Windows 10
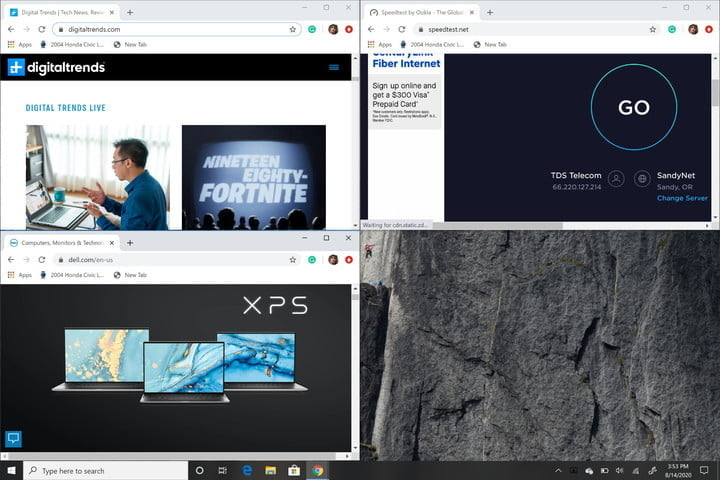
If you have a large or high-resolution display, you can take advantage of all of that extra screen real estate by snapping up to four windows on a single screen using Corner Snap.
Step 1: Drag and drop your first window into any corner. To use the keyboard shortcut, press and hold the Windows key followed by the Left or Right Arrow key to snap the active window to the left or right. Next, press and hold the Windows key followed by the Up or Down Arrow key to move the snapped window into the top or bottom corner.

Step 2: With the first active window in a corner, drag and drop your second window into any other available corner. You are not required to pick a specific corner.
Step 3: Repeat Step 2 to fill in the other two corners as needed. Note that a 2020 update to Windows 10 updated this four-window design and made all the snapped windows act as a single window. This may not sound important, but it’s really handy when you have to do something else, like open an additional app or file while working with your snapped windows — they will now stay together, waiting for you to get back.

Turning off Snap Assist and adjusting settings in WIndows 10
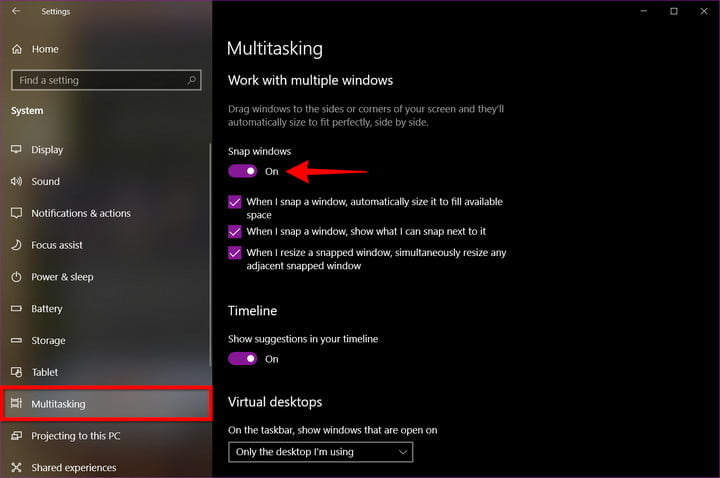
Snap Assist is easy to disable if it becomes troublesome. Here’s how:
Step 1: Open the Settings app. It’s the gear icon on the Start Menu
Step 2: Select System
Step 3: Select Multitasking listed on the left
Step 4: Click the Toggle displayed under Snap Windows to toggle this feature off. If you’d rather disable specific Snap Assist features rather than toggling it completely off, there are three settings you can disable instead. Just ignore Step 4 and uncheck the boxes next to each setting as needed:

How to split your screen in Windows 11
Snap Layouts in Windows 11 are a new feature that helps increase productivity and split your screen in the new Microsoft operating system. It's a lot like Snap Assist in Windows 10 but offers up to six different ways to tile a window. Snap Layouts are tailored to the current screen size and orientation, including support for three side-by-side windows on large landscape screens and top/bottom, stacked windows on portrait screens.
Step 1: Hit the Windows Key and Z on your keyboard, and you'll see a box pop up at the top right-hand side of the open window. You also can hover over the maximize button to see the various ways to use split-screen.
Step 2: Choose one of the ways to split-screen your window. There will be a total of six you can choose from. Windows will open the task switcher and suggest another one of your open windows to pick. Once you choose an open window, it will snap in place.

Step 3: If you're having trouble getting Snap Layouts to work, just hit the Windows Key and Left or Windows Key and Right on your keyboard. Or, follow our steps above for Windows 10. It's the same across the two operating systems.
Customize grids with a third-party app in Windows 10
We’ll be the first to point out that the native Windows 10 option is impressive; however, there are a variety of third-party apps that give you a bit more. With these apps, you can enjoy more definitive, grid-like changes to your windows so you can obtain all the tools you love so much (in the perfect size) and place them wherever you desire. Our recommendation is AquaSnap.
AquaSnap lets its users develop and change as many split windows as necessary with a neat snap function that operates similarly to Windows 10. It’s slightly more flexible, however, and consists of a few cool, extra tools such as snapping small windows together and other sweet gimmicks.
You can download and start using the Personal version of AquaSnap for free. With it, you’ll have access to basic features like docking, snapping, stretching, various keyboard shortcuts, and a whole lot more. If you’re ready to step it up, you can opt for the Professional edition, which comes in two different versions: Standard and Site. You can pay $18 for the Standard version and $600 for the Site version. These special editions allow you to acquire licenses, add convenient mouse shortcuts, benefit from multimonitor support, and relish three other premium features.
Editors' Recommendations
- How to change your Yahoo password on desktop and mobile
- The 10 best monitors for 2024: tested and reviewed
- How to disable VBS in Windows 11 to improve gaming
- How to convert WMA to MP3 on Mac, Windows, and Web
- How to convert FLAC to MP3 on Mac, Windows, and web


