How to use Family Sharing on a Mac

how to use screen time on a mac macbook pro table
Paolo Conversano/Unsplash

Apple’s Family Sharing feature is not available for just iOS devices; you can also set it up on your Mac. The service allows you to share applications you’ve personally purchased, as well as letting family members use your books, movies, and more. Let’s take a look at how to use Family Sharing on a Mac.

Difficulty

Easy

Duration

10 minutes

What You Need

  • A Mac desktop or MacBook

Setting up Family Sharing

Step 1: On your Mac, open System Preferences under the Apple icon tab in the top-left corner of the desktop. If you’re logged into your Apple ID account on your Mac, then Family Sharing should show up. However, if you can’t see the icon, simply log in to your Apple ID and go back to System Preferences.

The Family Sharing icon on a Mac.
Image used with permission by copyright holder

Step 2: Click Family Sharing. In this window, you will be asked if you want to be the organizer for the family. Click the Next button to confirm. In the next window, you’ll be asked if you want to Share your purchases. You also have the option to use a different account. Click Next.
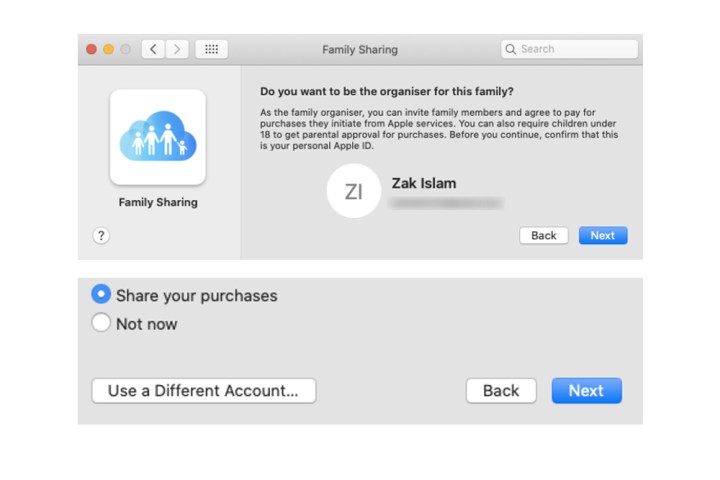
Confirming your Apple ID account to be the organizer for Family Sharing on a Mac.
Image used with permission by copyright holder

Step 3: In the payment window, your payment information with your Apple ID account will be shown. There’s also the ability to use a different payment method via a button at the bottom adjacent to Next. All the purchases made by your family members you add to the service will be connected to your card to buy such apps. Click Next. Agree to the terms and conditions and click Agree.

Confirming a payment method for Family Sharing on a Mac.
Image used with permission by copyright holder

Step 4: Alongside sharing apps and the like, Family Sharing on a Mac also allows you to share the location of your connected devices with family members. Click Done.

The Sharing your location settings for Family Sharing on a Mac.
Image used with permission by copyright holder

Step 5: Now you can add people to your Mac’s Family Sharing. Click the Add family member button, type in their name or email address, and then select Continue. You’ll have to confirm your own Apple ID password to proceed, as well as confirming some details pertaining to your account’s payment card.

Once they’re added, they’ll be sent an email. After they accept the invitation, their status within the family group will be changed accordingly.

If you want to add more members to the group, click the + button and follow the same steps listed above.

Adding family members to Family Sharing on a Mac.
Image used with permission by copyright holder

Customizing Family Sharing settings

Step 1: Click the Purchase sharing tab. You can choose to turn off the option to Share my purchases, as well as changing card details. You can also completely disable Purchase sharing by selecting the Turn off button.

The purchase sharing options for Family Sharing on a Mac.
Image used with permission by copyright holder

Step 2: Click the iCloud storage tab. It will tell you to upgrade to a higher iCloud subscription plan in order to share your account with family members.

The iCloud storage setup page for Family Sharing on a Mac.
Image used with permission by copyright holder

Step 3: Click the Location sharing tab. If you didn’t enable it during the initial Family Sharing setup process, open the Find My app on your Mac. Once you’ve set it up, select the People tab, and then select a family member's name. Lastly, click the Share my location option.

The Location sharing window for Family Sharing on a Mac.
Image used with permission by copyright holder

Step 4: Click the Screen Time tab. Here, you can manage Screen Time with your family members added to the group by selecting the Open Screen Time settings button.

For more on Screen Time, check out our guide on the useful Mac feature.

The Screen Time window for Family Sharing on a Mac.
Image used with permission by copyright holder

If you're not too familiar with Mac's various features or have just bought a new Mac or MacBook, head over to our guides for using multiple desktops on your Mac, and checking your Mac for viruses and malware.

Zak Islam
Former Digital Trends Contributor
Zak Islam was a freelance writer at Digital Trends covering the latest news in the technology world, particularly the…
There’s more good news about the upcoming M4 MacBook Pros
Apple MacBook Pro 16 front angled view showing display and keyboard.

According to a report from Taiwan's DigiTimes, Apple has begun mass production of new MacBook Pro models with 14-inch and 16-inch screens and M4 Pro and M4 Max chips.

This is consistent with information from other industry analysts such as Ross Young and Mark Gurman, who both expect the M4 MacBook Pros to launch later this year.

Read more
MacBook Pro may make an exciting change to its RAM
Apple MacBook Pro 16 downward view showing keyboard and speaker.

According to anonymous sources cited by Bloomberg, Apple's new M4 series of Mac computers launching this year will all have at least 16GB of RAM. That's double the current minimum of 8GB for entry-level models and a level Apple has stuck to since 2012 despite plenty of criticism and many of its competitors offering a base amount of 16GB.

The information comes from the developer test logs for four new Mac models labeled "16,1," "16,2," "16,3," and "16,10." These tests check for compatibility with third-party applications and are usually done fairly close to launch. Three of the models have 10 CPU cores and 10 GPU cores, while the last has eight CPU and eight GPU cores -- but all four have either 16GB or 32GB of RAM.

Read more
I’d never use a Mac without first changing these 8 security settings
Security and Privacy settings open on a MacBook.

If you’ve got one of the best MacBooks or Macs, the chances are good that you do an awful lot of sensitive stuff on your computer. Think about all the passwords you enter, the emails you send and receive, and the documents you create -- all of those can provide a treasure trove of data to any sticky-fingered ne’er-do-wells who manage to gain access to your device.

To prevent the worst from happening, it’s a good idea to beef up your Mac security. The good news is that doing so is far easier than you might think, and there are a handful of macOS settings you can change right now to keep your Mac -- and all the information it holds about you -- safe from prying eyes.

Read more