Want to be the next Martin Scorsese? Windows Movie Maker may not allow you to achieve this level of stardom, but if you master the program, you could be the talk of the next family get together. Microsoft’s Windows Movie Maker makes splicing home videos a walk in the park.
To help with Movie Maker’s learning curve, we’ve put together a comprehensive walk-through on how to use the software in Windows 8/8.1.
Note: Movie Maker on operating systems prior to Windows 8 largely has the same functionality, though there are some variances in the interface and menus. For those using a version of Windows before 8/8.1, we’ve provided a link to Microsoft’s walk-through for those operating systems at the conclusion of this article.
Feel free to also take a look at our picks of the best free video editing software programs, and our choices of the best free video converters.
Skip ahead to adding transitions and effects
Skip ahead to adding movie titles and credits
Skip ahead to publishing a finished movie
How to use Windows Movie Maker
Getting started
Open the program and start a new project by going to File > New Project. Save your new project under any name you’d like, and choose a destination for the project to save to. We recommend saving as often as possible while working to avoid losing any editing progress–in the event the program or operating system crashes or freezes.
The Interface
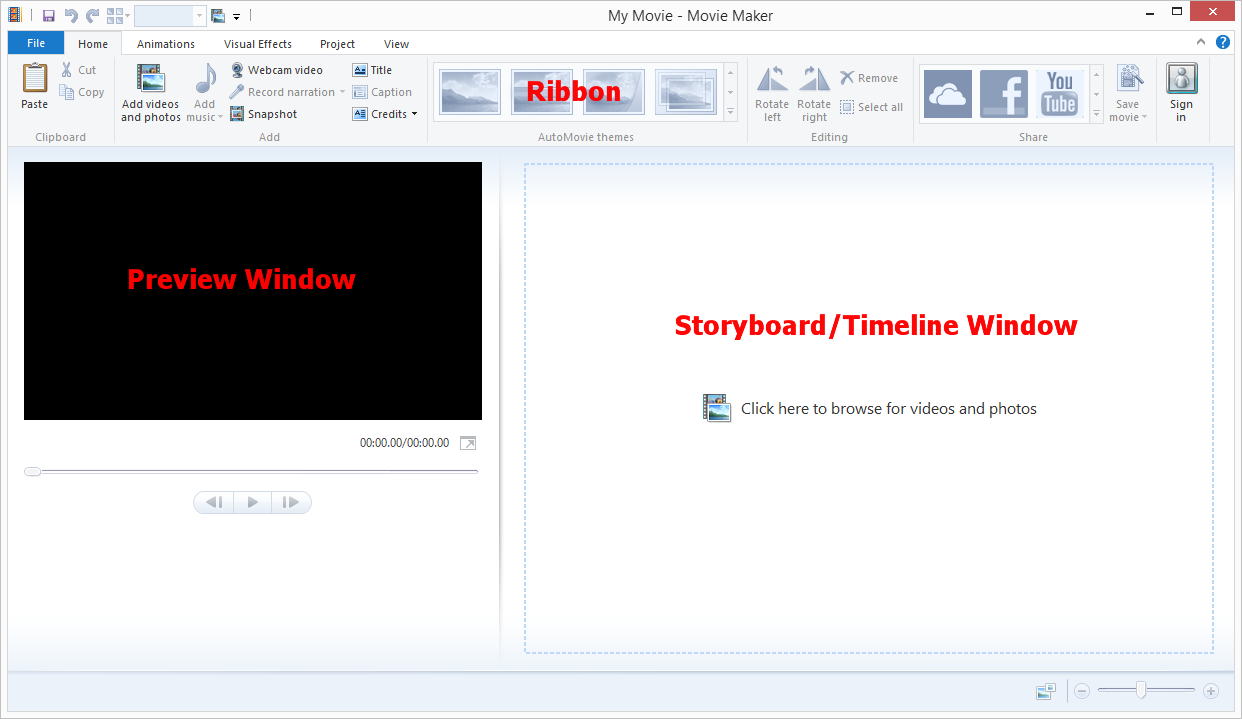
Windows Movie Maker has three regions you use while editing your video. The top of the program is the Ribbon and it’s where you’ll access the various editing tools such as transitions, effects, captions, audio levels, and more. You’ll also add any video, photos, or audio via the add tool located on the Ribbon and can quickly save your project with the disk icon located there as well.
Below the Ribbon and to the left side of the program is the preview window. The preview window is where you view the video playback of your project and can see what the sequence would look like as a finished product. You can use the rewind, fast forward, or play button in the preview window and can also toggle full screen view for your preview.
The window located underneath the Ribbon on the right side is your storyboard, or timeline, window. This is the location of your video sequence and it also contains your imported video clips. The storyboard/timeline window is where you navigate through your clips, split them when necessary, and arrange them in the sequence.
Uploading videos and photos
With the interface more familiar and a new project created you’re able to get started with the program itself. First, you need to decide what it is you wish to edit in the program. Movie Maker offers several different ways to easily upload various video, photo, and audio files in to the program.
How to upload an entire video from a digital video (DV) camera tape
For users who have video stored on a digital video (DV) camera tape connect the camera to your computer via an IEEE 1394 connection or a USB 2.0 connection and set your camera to play back recorded video.
Note: On most DV cameras the play back recorded video button says VCR or VTR.
When the camera turns on the program will recognize the device and will display an Autoplay dialog box. Once this pops up select Import Video, name the video file you’re importing, and then save the import to your computer.
The program will ask you which format you’d like to import the video to and you’re given the option of formatting to Audio Video Interleaved (AVI and DV-AVI) or Windows Media Video File (WMV). Formatting to AVI or DV-AVI will import your video using the default file type of your digital video camera while formatting to WMV assures that the information on the video is Windows compatible.
If the Autoplay dialog box doesn’t pop up when you turn your camera on just go to File > Import from device, select the source you wish to upload from then click Import.

Once you select your desired format click Import the entire videotape to my computer and then select Next to begin the upload process. When it’s complete just click Finish and your video is completely uploaded.
How to upload clips of a video from a digital video (DV) camera tape
If you’re not wanting to upload the entire contents of your DV tape Windows Movie Maker allows for uploading shorter clips in to the editor. Following the same directions above for connecting your camera and selecting a format to upload to you’ll want to then select Only import parts of the videotape to my computer then Next. Now navigate to the start of the clip(s) you want to import and choose Start Video Import.
Once you’ve started importing the video will begin playing automatically. When you get to the end point in the clip you want uploaded just click Stop Video Import and the video imports and saves as an individual clip. Simply repeat hitting Start and Stop Video Import for each of the clips you wish to upload.
How to upload photo and audio files
Importing photo and audio files into Windows Movie Maker is simple and requires just a couple steps. While in the Movie Maker window click Add videos and photos and locate where on your computer the files are you wish to upload. Highlight the files and click Open to upload them in to the program.

Continue on to see how to edit clips in Windows Movie Maker…
Editing video clips
With the content you wish to edit uploaded to your computer we can begin taking a look at the editing process.
If the uploaded video is not yet in the Movie Maker program navigate to the Add videos and photos button located under the Home tab. Locate the files you wish to import and select Open to add them to your movie’s timeline. The program will automatically break the sequence up in to 10 second segments for easy navigation of the timeline. Your sequence stays as one fluid video so you’ll still need to split any part of the clip you wish to edit singularly or delete.
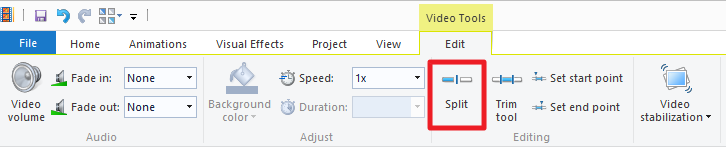
Splitting clips
To cut up any video imported to Movie Maker first navigate to the Edit tab under Video Tools and locate the Split button. In your video sequence either drag the black cursor or play the video and hit stop where you want to split your clip and click Split. Movie Maker will now split the clip at the exact time you’ve chosen and has created two separate clips. You’ll need to split your clip a second time to create an individual clip you can either move to another part of the sequence, add a transition to, or delete altogether.
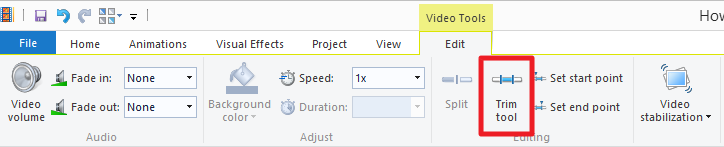
Trimming clips
Trimming clips in your sequence is a worthwhile tool if you want to get rid of a part of a clip, but not delete it entirely. Movie Maker’s Trim tool allows you to select a clip within your sequence and trim as much out of the middle of the clip as you want and it will join the beginning and end to form a new sequence. The trimmed part of the clip does not delete, rather the program hides what you’ve trimmed and will not show up during playback.
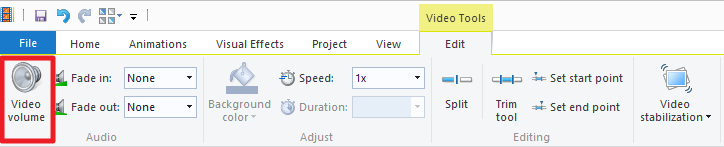
Adjusting audio levels
You’ll also notice the video levels displayed over the top of your video clips in the timeline. This allows you to match up the audio for each clip to assure the same volume is consistent throughout your video. To change the audio levels of a clip navigate to the Edit tab under Video Tools and select video volume to adjust the sound level. Once adjusted, the specific clip selected is the only one to have its audio adjusted. If you want to adjust only a few seconds of a clip split the clip at the end of the sequence you wish to adjust and change the volume for that clip alone.
Continue on to see how to add transitions and effects to your clips…
Transitions and effects
The difference between a summer blockbuster and just any old indie film comes down to the transitions and effects added during post production. With Windows Movie Maker you’re given a wide variety of transitions and effects which give your movie extra feel and we’ll cover how to add both to your sequence.
Adding transitions
Windows Movie Maker has an incredibly user friendly way of creating seamless transitions for any of the clips in your sequence. To add these transitions just select the clip you’d like to use a transition on and click on the Animations tab on the ribbon toolbar to bring up the dozens of transition choices. Hovering your mouse over a specific transition runs an example of what it looks like in the preview window. Once you’ve decided on which transition you’d like to use just click on it and it becomes attached to the clip. You’re also given the ability to adjust the duration of the transition from a quarter of a second to two seconds.
Note: When attaching transitions Windows Movie Maker will attach the transition to the clip directly in front of the cursor so keep this in mind when selecting which clips to add transitions to.

Adding effects
Windows Movie Maker also comes stock with a deep set of visual flair to add to your sequence via effects. Located under the Visual Effects tab on the ribbon toolbar previewing the wide number of effects is like previewing the transitions. Just hover your mouse over a specific effect and the player displays a preview of what the effect will look like in your movie. Once you find the effect you’d like to use just click on it to attach it to desired clip.

Removing transitions and effects
Removing transitions and effects from your timeline is just as easy as attaching them. For transitions scroll to the clip which has one attached and navigate to the Animations tab. Scroll to the top of the list and select No transition and your clip will return to its original state.

To remove an effect scroll to the clip which has the effect attached and click on the Visual Effects tab. Scroll to the top of the effects list and select No Effect and your clip will go back to its original looking form.
Continue on to see how to add a movie title and credits
Movie titles and credits
With your movie edited and transitions and effects added it’s time to put the cherry on top. Adding a title page and credits will give your home movie even more authenticity and allows you to showcase those who worked on the production.
Adding a movie title
To add a title page click on the clip you want the title page to precede and under the Home tab select Title. This adds a black page and an editable caption slide in front of the clip you’ve selected. Just add your desired title in the text box then click out of the slide and you’ve just created a title page.

Upon selection of the title page Movie Maker will open the Text Tools menu giving you access to many different settings for you to alter your newly added clip. The different settings let you choose how the title appears with a series of effects, you can set the transparency of your title, alter the font of your text, and even add a colored outline to your title’s text. It will take some testing to find the combinations of features which work best for your film but the deep offering will help give your movie a unique feel.
Adding captions
If you want to feature a title page with a background, or just add a line of text to any clip, clicking on the Caption button under the Home tab will insert a text box over the top of an existing clip. Once added you can alter the text as you see fit and you’ll also have access to the Text Tools resources to perfect the look and feel of your new caption or title.

Adding credits
Where would a movie be without a set designer or sound technician right? To give credit where credit is due you’ll need a full credits page and Movie Maker gives you the option of adding customizable credits along with separate director, starring, location, and soundtrack slides.
To add these simply navigate to the Home tab and click on the Credits drop down menu to bring up the page selections. From here choose either Credits, Director, Starring, Location, or Soundtrack and Movie Maker will automatically add these pages to the end of the sequence. Like adding a title or captions page you have the ability to input your desired text in the credits slides and you’re also given access to the Text Tools resources.

Continue on to see how to publish finished movies…
Publishing finished movies
Once you’ve put all the finishing touches on your next big Hollywood blockbuster it’s time to publish the finished product for the world to see. Windows Movie Maker gives you the ability to share your movie across many different platforms such as FaceBook, Vimeo, YouTube, and more. If sharing on social media isn’t appealing to you Movie Maker does give you the ability to save the movie to your computer allowing you to watch via your desktop or burn the movie to DVD.
Publishing to social media sites
For you social butterflies who prefer to post your homemade movies to sites such as FaceBook, YouTube, Vimeo, or Flickr Movie Maker’s built in social media publish feature makes this simple to do. Navigate to the Home tab in the Movie Maker interface and on the right side you’ll see a box titled Share. Click on the desired social media site you’d like to publish your movie to, select the quality you want your movie converted as — Movie Maker recommends a quality best for each site–then the program will ask you to sign into your Microsoft account and authorize the social media site before publishing.

Saving the movie to your computer
You can save the movie to your computer instead of posting it online by clicking the Save Movie menu to the right of the Share section. The drop down menu offers several file formats for your movie, including high definition displays, any size of Android or iPhone, a variety of tablets, as well as other websites. You can even save your movie in a format which allows you to easily send it via email. The first choice in the drop down menu is Movie Maker’s recommended format, which is generally a good choice for playback on your computer or burning the movie to DVD.
Choose the format you’d like your movie to save as, select a destination for Movie Maker to save it to, then click Save and your finished movie will convert and store on your computer.

Burning the movie to DVD on Windows Media Player
Burning your finished movie to DVD requires access to another Microsoft program, Windows Media Player, as well as an installed burner on your computer. For those with burners installed, Windows Media Player is a free program so we’ll quickly cover how to burn your finished movies to DVD.
Note: If your computer doesn’t have Windows Media Player installed Microsoft offers a download of the program on their website.
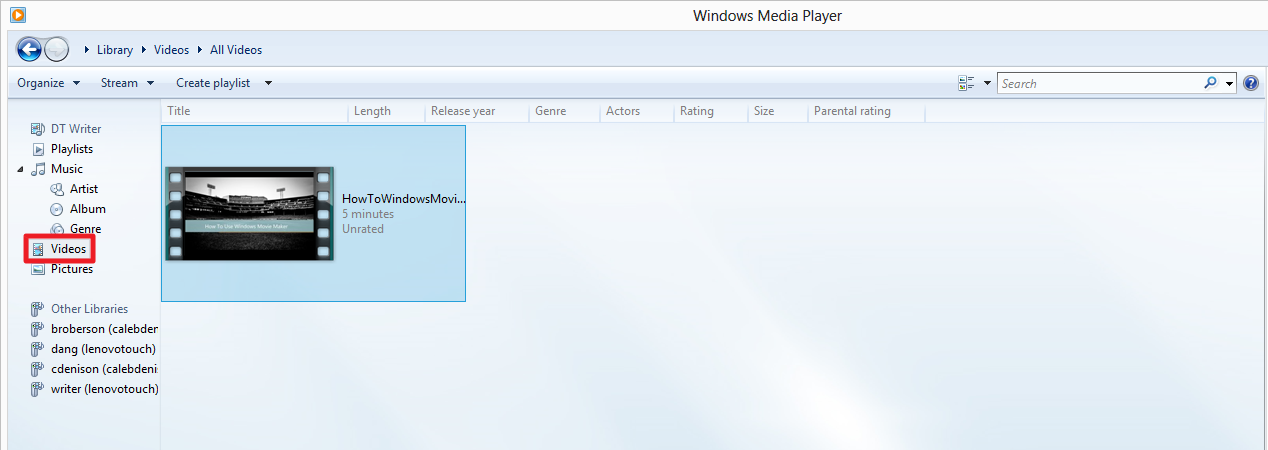
After you convert the movie to your desired format and save it to your computer, open Windows Media Player on your desktop. With the player launched click on the Videos category located on the left side of the program. Here you’ll notice the saved videos on your hard drive and can use the player to watch them or add them to different playlists.
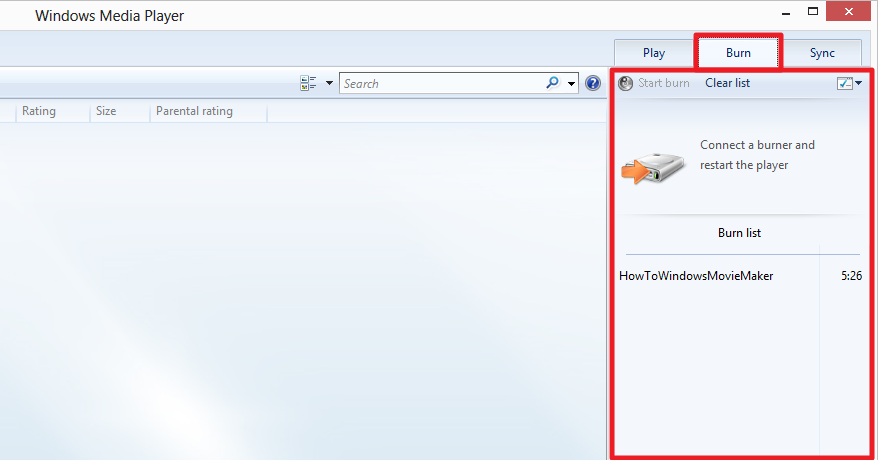
Right click on the video, scroll down to Add to, and click on Burn list. In the upper right corner of the player click on Burn and you’ll see your video located in the list. If you have a burner installed on your computer you’re given the option of burning the video either strictly as an audio CD or a data CD or DVD. Since you’re burning a movie, choose the Data CD or DVD selection. Now insert a blank DVD in to your disc drive and click Start Burn to create your DVD. Windows Media Player will alert you when the burn is complete and you’re able to eject the DVD.
This wraps up our walk-through for using Windows Movie Maker and we hope it’s assisted you in creating A-list type movies. For other tutorials about how to use Windows Movie Maker please visit Microsoft’s breakdown of getting started with Movie Maker for Windows 7 and Vista.
Did this tutorial help you get started with Windows Movie Maker? If you have any questions or are having trouble with any part of the walk-through let us know in the comments section below.