
How to get iron nuggest in Animal Crossing: New Horizons

Animal Crossing: New Horizons is a massive leap forward for the series. Not only does it take the best features from previous titles, but it found ways to introduce new, exciting content without bogging down the experience. The best example of this is crafting — players can now create their own furniture and tools to help beautify the island and their homes.

In order to build anything, however, players are going to need to gather resources. One of the most useful — and scarce — resources is iron nuggets, required for crafting high-quality fishing rods, nets, and a whole slew of other items. Thankfully, once you know where to find iron nuggets you can quickly build up a sizable stockpile.

Further reading

Find iron nuggets by hitting rocks

Believe it or not, all you have to do to find iron nuggets is smack rocks with your shovel. Simply walk up to one of the many boulders on your island and give it a whack with your shovel (or axe). This will cause the rock to drop one of several resources — including iron nuggets. Although this is the easiest way to get iron nuggets, it’s far from the best.

That’s because after the first smack, a brief window of time opens in which the rock will continue to drop resources when hit. In order to maximize your resources, you’ll want to follow the tried-and-true “two-hole” technique, explained below.

Dig holes behind your character

Animal Crossing New Horizons Bunny Day event guide egg locations
Image used with permission by copyright holder

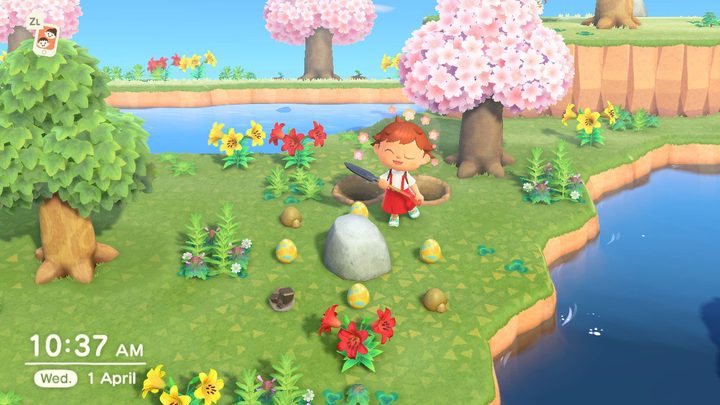
As you hit the rock with your shovel, you’ll notice that your villager gets pushed back a few paces. This means you need to waste time moving closer to the rock in order to strike it. To prevent this from happening, dig two holes — three if you want to be careful — behind your character. This will prevent them from recoiling backward after a successful hit. Now, you’re able to quickly land eight strikes and harvest eight resources. Just make sure there are no other items in the spaces around the rock; otherwise, it won’t have anywhere to drop your rewards.

Visit other islands

Your primary island in Animal Crossing: New Horizons can only hold a maximum of six rocks. If you’re in a hurry to harvest some iron nuggets, you’ll only get so far staying in your town. Once you’ve taken everything you can from these six, you can always venture out to other islands with a Nook Miles Ticket. These islands typically hold two or three rocks, giving you a chance to bolster your iron nugget stash. However, the island you’re sent to is random — meaning you could stumble upon a place that has dozens of rocks, or none at all! At the end of the day, collecting iron nuggets is a test of patience. While you can nab a dozen or so just by milling about your town and whacking rocks, there’s still no reliable method to quickly farm the valuable resource.

Editors' Recommendations

Jon Bitner
Jon Bitner is a writer covering consumer electronics, technology, and gaming. His work has been published on various websites…
All mounts in Minecraft Legends and how to get them
Four players stand together in the 4v4 PvP mode of Minecraft Legends.

In yet another genre-mixup following Minecraft Dungeons, Minecraft Legends brings the open-world survival and building game to the RTS genre. Unlike most traditional RTS games, where you control the action from a detached, overhead perspective, this game keeps you in the action by giving you a character to control on the field itself. To keep the action fast-paced, and make sure you can easily control and order your mobs around, giving your character a mount is essential. Just like in the original game that inspired it, there are multiple creatures you can use as mounts, and they all behave and function differently. While the world in Minecraft Legends isn't randomly generated, it can still feel overwhelming trying to find what you're looking for. Here are all the mounts you can ride in Minecraft Legends, what they do, and where to find them.
How to get every mount in Minecraft Legends

There are four different mounts you can tame and ride throughout your quest in Minecraft Legends. These include the horse, bird, beetle, and tiger. All you have to do to ride a new one is find it and press Swap Mount when near it, but finding them is the tricky part. Here's where each of them resides in the world, plus what makes them special.
Where to find the horse
You won't have to go looking for the horse since you begin the game with one. This is the classic mount and is made for getting you around the map much faster than on foot. The horse's special ability is being able to sprint indefinitely at a high speed.
Where to find the bird
A bird may not sound like a creature you could ride, and yet here we are. These rainbow-colored birds are quite small, but not hard to find in the Jagged Peaks biome. Keep an eye on your map for a clue as to when you're close to one since they will automatically be marked for you. Once you've mounted a bird, you will be able to jump higher than any other mount, plus slowly glide from any height by holding the jump button.
Where to find the beetle
Perhaps an even stranger choice for a mount, the beetle is much bigger than their real-life counterparts. These insects are native to the Jungle biomes, so venture into the trees to snag one. The Beetle has two special attributes, the first it shares with the bird which is being able to glide by holding jump in the air. The beetle's unique skill is that it can climb up any surface. So, while slow, it is very versatile and strategic.
Where to find the tiger
Now we're talking! If you want to play He-Man and ride your very own tiger, get yourself on a safari to the Dry Savanna biome to track one down. The tiger has the most simple ability, which is that it is simply the fastest mount you can get. However, this speed does come with a downside. Unlike the Horse, the Tiger doesn't have infinite stamina, so you will need to slow down eventually.

Read more
How to get fuses in Dead Island 2
A group of survivors looking stressed and annoyed.

eThere are going to be tons of things blocking your progress when trying to escape LA in Dead Island 2. Aside from the, you know, hordes of zombies, you will find plenty of gates and doors that need power to open. Most can be worked around by installing a battery or circuit breaker, but some require something else. Fuses aren't required at any point in the main story, but instead are limited keys that hide away some of the game's best loot. If you've been spotting all these gates and garage doors taunting you to open them, but lack the fuses to do so, we'll tell you how you can get your hands on some in Dead Island 2.
Where to get fuses in Dead Island 2

Unlike batteries or circuit breakers, fuses won't be found anywhere on the map while exploring. Instead, the only way to get these electrical devices is to purchase them. Obviously, your local hardware store isn't open for business anymore, so your options are limited to the vendors you come across such as Carlos in Emma's house or Ezekiel on The Pier. No matter who you get them from, you're going to be paying a premium. Each fuse costs $1,500, and the sellers usually only hold a few at a time. Even if they had the stock and you had the cash, your character can only hold three fuses at a time before needing to spend them to get more.

Read more
How to start the Burning Shores DLC in Horizon Forbidden West
Aloy flying.

Aloy's adventure wasn't fully concluded at the end of Horizon Forbidden West, but you don't have to wait for the third game to continue her journey. With the Burning Shores DLC, a brand new region is unlocked. This area is home to the Quen tribe and brings in a new character named Seyka to accompany Aloy on a new quest. Of course, there will also be tons of sidequests, new machines to hunt, and sights to see. If you're interested in exploring this new and dangerous region, there are some requirements you should know about that could prevent you from jumping in as quickly as you think. Here's everything you need to know about how to start the Burning Shores DLC in Horizon Forbidden West.
How to start the Burning Shores DLC

The major requirement for accessing the new content (outside of purchasing it, of course) is that this takes place after the main campaign, unlike the DLC for the first game that could be accessed in the middle of the story. This means that you need to have gotten through all main story missions ending in "Singularity." Your save must be at this point to access the DLC. If you finished the game and started a New Game + run, but haven't gotten back up to that point, you won't be able to start the DLC until you get there again. The final mission of the game has a recommended level of 35, while the first mission of Burning Shores is 38, so you may want to do some side activities beforehand if you are underleveled.

Read more