
Where to find planes in Fortnite OG

Fortnite has been raining nostalgia down on its millions of fans with Season OG, revisiting various points in the game’s history and giving everyone a chance to see how far the game has come. In doing so, many areas, weapons, utility items, and vehicles from years past have made a return for a limited time, including the fan-favorite X-4 Stormwing plane. There are plenty of these vehicles scattered around the map for you to find, so we’ll list out each spot for you so that you can land near one anytime you’d like.

All plane spawn locations in Fortnite OG

A map of where to find planes on the Fortnite OG map.
Plane spawn locations via fortnite.gg. Plane spawn locations via fortnite.gg / fortnite.gg

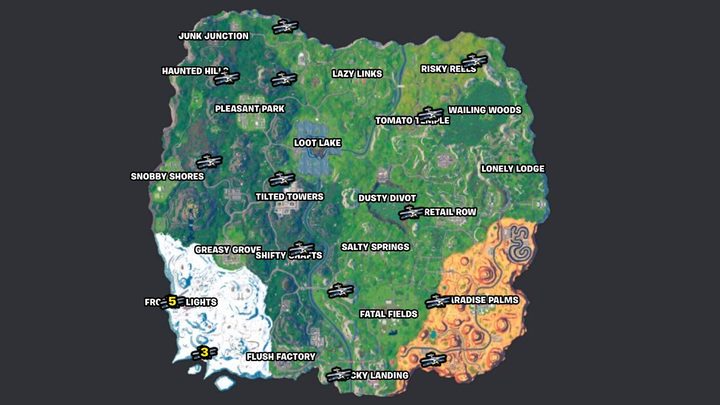
There are 16 spawn locations for planes on the current OG map, with a total of 21 planes available to pilot. Here is a list of all of them.

  • Five planes can be found within Frosty Flights.
  • Two planes can be found southeast of Frosty Flights.
  • One plane is on an island on the far southwestern section of the snowy part of the map far below Frosty Flights.
  • One plane is northeast of Junk Junction near the edge of the map.
  • One plane is just slightly west of Haunted Hills, which is also northwest of Pleasant Park.
  • One plane is almost directly in the center of the path between Haunted Hills and Lazy Links, which is also northeast of Pleasant Park.
  • One plane is a little northeast of Risky Reels.
  • One plane is in the northeast section of Tomato Temple.
  • One plane is in the southeast part of Dusty Divot.
  • One plane is east of Paradise Palms right before reaching the grass.
  • One plane is southwest of Paradise Palms near the edge of the map.
  • One plane is west of Lucky Landing relatively close to the edge of the map.
  • One plane is northwest of Fatal Fields, which would also be southwest of Salty Springs.
  • One plane is directly north of Tilted Towers.
  • One plane is in the northeast section of Shifty Shafts.
  • One plane is northeast of Snobby Shores, which is also southeast of Pleasant Park.

Once you’ve found an X-4 Stormwing plane, you’ll want to keep a few things in mind. For starters, it can carry your full squad anywhere on the map, so long as you have the fuel to get there. Additionally, the planes can be shot down by opponents on the ground, so be mindful of gunfire coming from below you, as you can be gunned through more quickly than you’d think with multiple people firing at you. In other words, fly safe!

Editors' Recommendations

Billy Givens
Billy Givens is a freelance writer with over a decade of experience writing gaming, film, and tech content. His work can be…
All status effects in Lies of P and how to cure them
Pinocchio in Lies of P.

Lies of P is a challenging role-playing game that will test your mettle at every turn with deadly enemies and dastardly environmental traps. But to make things even a bit more difficult, you'll have to contend with a collection of status effects that can majorly affect your character and make things much harder for you in battle. We've compiled a list of all status effects in Lies of P, as well as a list of ways to cure them.
All status effects
There are a total of seven status effects, with each either dealing damage or having a noticeable impact on your ability to perform in battle. Here are all of them and how they work.
Overheat
Overheat is caused by taking too much fire damage too quickly. When the Overheat bar fills entirely, you'll begin to burn and lose health until it is cured or wears off naturally. During this time, your Guard Regain recovery amount will also be reduced, which can drastically impact your survivability in fast-paced encounters.
Shock
When Shock is applied, your character's stamina recovery will be reduced significantly, which can have devastating consequences. Until this effect is cured or wears of naturally, you'll be stuck with very limited movement and attack opportunities due to your decreased stamina.
Electric Shock
Not to be confused with standard Shock, Electric Shock is caused by taking too much Electric Blitz damage in a short period of time. When this happens, you'll take increased Electric Blitz and physical damage for the duration of the effect, and your Fable meter will drain continuously, which can reduce your attack options in combat.
Decay
Decay is caused by taking too much Acid damage within a small time window. This will cause constant weapon and acid damage, both of which can make life difficult for you in battle since letting it go on for too long can result in needing to repair your weapon while also dodging your foes' attacks.
Corruption
Corruption is caused by a buildup of, well, Corruption. When this happens, you'll be afflicted with what is essentially your textbook poison effect, meaning your HP will drain continuously until it wears off or is healed with an item. This can be especially challenging to cope with when also fighting enemies, so avoiding sources of Corruption is highly advised when possible.
Break
Break is an annoying status effect to contend with, as letting its bar build up entirely will temporarily decrease how much health your Pulse Cells heal. This can be especially frustrating when you already find yourself at low health and don't have many Pulse Cells left, but it's usually best to wait until the effect wears off before healing so you can ensure you get the maximum amount of health possible.
Disruption
Disruption is perhaps the most concerning of all status effects in the game, as you'll be instantly killed when the Disruption bar fills up entirely. If you find yourself in a situation where a lot of Disruption damage is being doled out, it's best to back off until the bar depletes some or you'll soon be seeing a Game Over screen.
How to cure status effects
There are multiple items in the game designed to help you cure specific ailments, as well as items that can increase your resistance to them so that you can reduce your chance of becoming infected to begin with. You can find these cure and resistance items in various places while exploring throughout the game, or you can buy them with Ergo from Polendia at Hotel Krat.

Attribute Purification Ampoule - Cures Overheat, Electric Shock, Decay, and Corruption
Special Purification Ampoule - Cures Shock, Break, and Disruption
Attribute Resistance Ampoule - Enhances resistance to Overheat, Electric Shock, Decay, and Corruption
Special Resistance Ampoule - Enhances resistance to Shock, Break, and Disruption

Read more
The best traits to level first in Remnant 2
Three characters shoot at a boss in Remnant 2.

Much of Remnant 2's leveling process is based around increasing the ranks of traits that you'll discover throughout your journe. This will give you plenty of opportunities to build a character that best matches your playstyle. In the game's opening hours, however, each character will begin with just a few traits that can be leveled, and your equally limited trait points can make deciding which of those you want to invest in somewhat of a challenge. In this guide, we'll give you our opinion on which of these are best to focus on for optimizing the early part of your adventure. Here are the best traits to level first in Remnant 2
Best traits to level first in Remnant 2
When beginning the game with a new character, you'll have only five traits – one archetype trait exclusive to the archetype you've chosen and four core traits that every character begins with. Your archetype trait will level automatically as you play with that archetype, so you don't need to do anything with that trait. Instead, let's take a look at the four other core traits and discuss which ones are best to invest in.
Vigor
Vigor improves your overall health, which means you can take more damage before dying. This is likely the most important trait to pump points into, especially when first setting out into the dangerous world of Remnant 2. Enemies hit hard (especially bosses) and you have limited healing options during these opening hours, so you'll need every bit of extra health you can get. It wouldn't hurt to prioritize this trait until you get it to level 10, actually, as you'll be able to get plenty more points as the game progresses, and being able to take a few more hits against the game's first few bosses is immensely helpful. This is even more true for Challengers in team compositions where they'll be tanking and spending a lot of time in melee range.
Endurance
Endurance improves your overall stamina, which will allow you to run and roll more during combat. This is a great option to level up if you're playing a character that is focused on melee, as it will allow you to run more when you get surrounded or roll out of the way of enemy attacks without worrying as much about your stamina meter. For primarily ranged players, though, it's a bit less useful, so you're probably better putting those points elsewhere early on. As with Vigor, though, Challengers will likely benefit most from the trait due to their tendency to be a group's close-quarters combat specialist.
Spirit
Spirit improves your weapon mod power generation. This helps you to earn the ability to use your weapon mods more often in combat, meaning that its usefulness is entirely dependent on how useful your weapon mods are to your build. At the beginning of the game, your weapon mods will be most helpful during boss battles, and you're likely to end them before generating a second use of your mod anyways. Because of this, Spirit is likely better saved for leveling later on so that you can focus on survivability first. Gunslingers, however, are likely to see this as a good option in group settings because they're designed to be a DPS powerhouse.
Expertise
Expertise improves the cooldown speed of your archetype skills. This will aid you in using these skills more frequently, which can be a help against bosses and packs of deadly foes. However, like with Spirit, the usefulness of this trait in the initial few hours of the game is limited due to the already long cooldowns and the speed at which many bosses are likely to fall anyways. While Vigor should still be a priority for most classes, Expertise can be a particularly worthwhile trait for Medics who are playing with a group, as it's vital to keep their healing capabilities available as much as possible.

Read more
Fortnite Artifact Axe: how to destroy stones and best location
Animated image showing Fortnite Artifact Axe

Anyone who plays Fortnite long enough will come to love its yearly summer festivities, and as usual, this year's Summer Escape Event has proven to be a great time for players looking to engage in fun quests and earn new cosmetics. This week provides a new quest that tasks you with destroying 10 stones in battle royale mode, which offers you the reward of a new harvesting tool known as the Artifact Axe. If you're wondering what qualifies as a stone and how to destroy them, we'll give you the details below.
How to destroy stones in Fortnite to earn the Artifact Axe
First of all, you've probably hidden behind some of these stones before because, well, the game is actually just referring to the large rocks you can find scattered all across the map. Some are larger than others, but they're all easily identifiable and can be destroyed by smacking them repeatedly with a harvesting tool. In other words, you're quite likely to run across plenty of them playing naturally, especially if you spend any time in forests or along the coast.

If you're wanting to know of a spot that will help you knock the quest out quicker, you can try heading to the beach to the south of Kenjutsu Crossing at the bottom of the map.

Read more