Fans have held the Gran Turismo series in high regard for the past two decades. Now, on its 25th anniversary, Gran Turismo 7 delivers a visually stunning racing sim accessible to anyone willing to spend a few extra minutes digesting the finer details of cornering, split streaming, and proper braking. Let’s make one thing crystal clear, Gran Turismo 7 is not an open-world arcade racing game (something long-time fans already know). However, newcomers expecting to drift right out of Need For Speed and into Gran Turismo 7 are in for a heavy dose of realism. While the game isn’t a hyper-sim like the F1 series or MotoGP, plenty of nuanced mechanics pop up around every hairpin, and players must know how to handle them.
Gran Turismo 7 presents players with enough challenges to feel rewarded without being too hard, from proper cornering techniques to knowing when to ease on and off the throttle. If you need a more relaxing break from the high-octane world of Elden Ring, hop behind the wheel of your favorite sports car and explore the vibrant world of Gran Turismo 7. Whether you’re a newcomer to the series or a long-time fan, here are some tips and tricks to getting started in Gran Turismo 7.
- Gran Turismo 7 features a museum for car history buffs
- The best racing games on PlayStation 5
- The best upcoming PS5 games
Get your licenses
Most of the JRPG-like overworld is locked until you progress further in the Gran Turismo 7 campaign. However, players can head to the license center early on, which works as a more in-depth tutorial and a challenging set of mini-races in and of themselves. There are five licenses to unlock in Gran Turismo 7, and all five are attainable right off the starting line. They are:
- National B
- National A
- International B
- International A
- Super
National B and A serve as introductory lessons to every scenario Gran Turismo 7 inevitably throws at you. From literally driving in a straight line to executing multiple corners, these initial licenses do a great job of explaining mechanics players may not be familiar with.
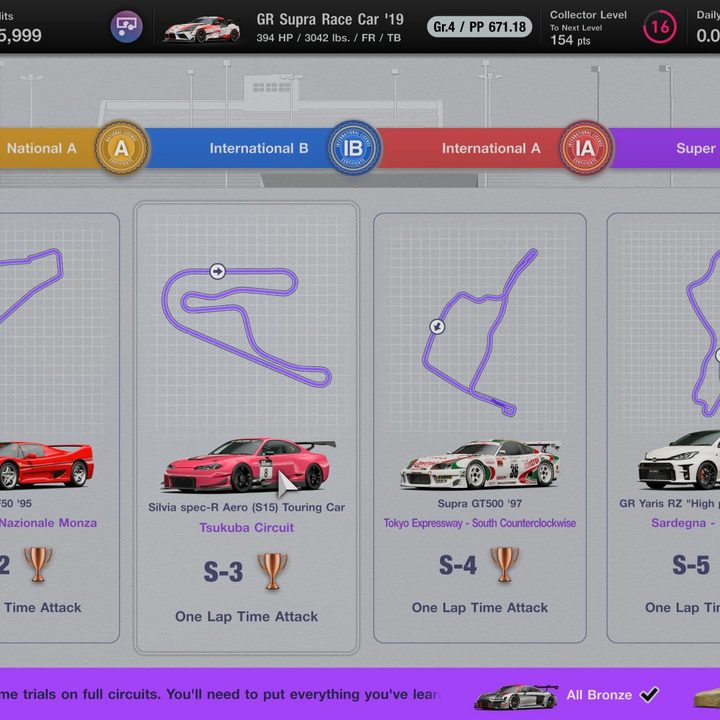
International B and A take those lessons up a notch, putting you in faster cars, setting faster times, and throwing different combinations of scenarios at you. Finally, the Super license puts you behind the wheel of the fastest cars in Gran Turismo 7, like the Lamborghini Aventador and several Formula 1 cars. Instead of short sections, the Super license records your fastest time around 10 tracks.
There are five licenses with 10 events each for a total of 50 time-trial races for you to sink your teeth into. The Super license is the only one to involve full tracks, so you won’t be banging your head against a wall wasting 3-4 minutes per attempt trying to gold the first four license blocks. That being said, we advise bronzing each block and moving on.
Gran Turismo 7 rewards you with two new cars for completing all the license challenges. You get one for achieving all bronze (silver included) and another for all gold. We highly recommend bronzing all the events and moving on to something else. The cars you unlock for achieving bronze, like the GR Supra Race Car (International B), the 86 Gr.B Rally Car (International A), and the R8 LMS Evo (Super), are three of the best early cars you can unlock. In these three cars, you’ll tear through World Circuit races like soft butter.
Follow your lines
The license center’s primary goal is to teach you the more nuanced mechanics of Gran Turismo 7. One of those mechanics is race lines, the yellow segmented line that traces the entire track. The aim of racing in Gran Turismo 7 (and in general) is to keep your car moving in as straight a line as possible. The less you have to turn the wheel, the better. While hairpin turns and tight corners obviously require some heavy turning, lines ensure you’re only turning the wheel as little as possible.
For example, when coming up on a sharp left turn, you don’t want to be on the left side of the track. Instead, you want to be as far right as possible. Then, turn into the left-side corner and emerge from the turn back on the right side of the track. As you’ll learn in the license center, cornering isn’t as easy as turning the wheel.
Braking, turning, and accelerating
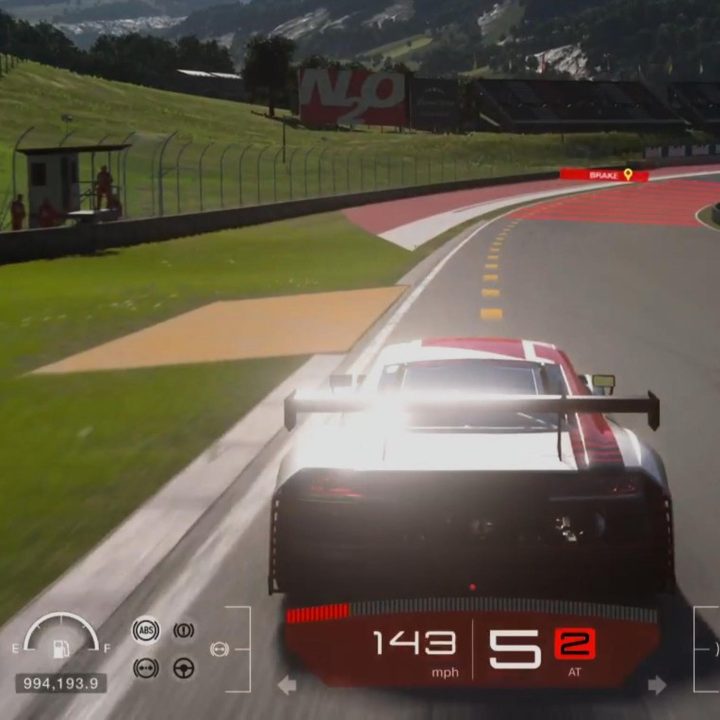
When you’re coming up on a turn, you’ll see several on-screen indicators telling you what to do and when to do it. These include brake indicators and turn pins. Both play an integral role in entering a corner, taking the corner, and accelerating out of the corner. Let’s break them down and explain how they work in tandem.
Brake indicators
Brake indicators are the bright red lines across the track telling you to hit the brakes. They’ll pop up around most turns and change depending on the car you’re driving. They aren’t uniform for all vehicles on the same track. For example, taking a Fiat 500 around Willow Springs displays different brake indicators than, let’s say, a Ferrari or an F1 car.
First off, the brake indicator tells you when you’re going too fast to make the upcoming turn. If you don’t slow down, you’ll slide clean off the track or into the wall. At top speed, the brake indicator is bright red. As you slow down, that red fades away. When it’s completely gone, you know you’re going slow enough to make the turn.
However, you don’t have to slam on the brakes for every corner. The longer the brake indicator is (sometimes spanning upwards of 200 meters of track), the harder you have to brake. Sometimes, the brake indicator is short, spanning only a few segments. You don’t have to slam on the brakes for those turns and can usually get around by laying off the throttle and gently pressing the brakes.
Don’t wait for the brake indicator to completely disappear, either. If it’s fading away while you’re coming up on the end of it, you can assume it’ll be gone by the time you make the turn. It takes some getting used to, but once you get the hang of it, you’ll be cornering like a pro in no time.
Turn pins
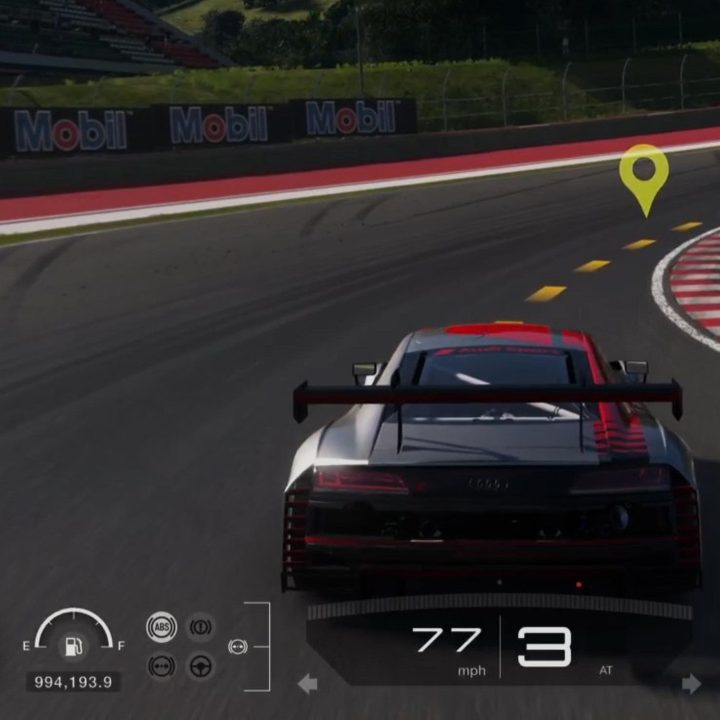
Turn pins are the yellow pin-looking indicators on the side of the track. These tell you when to start your turn, where to aim your turn, and when to hit the throttle coming out of a turn. Like we said before, you want to be as far right as possible when taking a left turn and vice versa. Follow your turn pins to keep your car in as straight a line as possible while still getting around the bend.
Learning when to hit the gas coming out of a turn is as vital as the turn itself. Too soon, and you’ll careen into the right-side wall. Too late, and other racers have the opportunity to pull ahead of you. The turn pin on the inside section of a corner serves two purposes:
- Aim here for the most efficient turn possible
- Press down on the throttle
“Press down on the throttle” doesn’t mean floor it. Instead, gently press the throttle as you’re coming out of the turn to get back up to speed. The acceleration should pull your car to the opposite corner, allowing you to maintain speed while staying on the track. This is most helpful when turning on straightaways. When taking multiple corners, it’s helpful to tap the throttle just to kick yourself forward and stay ahead of whoever’s behind you.
In Gran Turismo 7, braking, turning, and accelerating require more finesse than other racing games. It’s not as hyper-sim as F1, but nowhere near as arcadey as Need For Speed. The best way we can describe the finesse required is to “tease” the wheel, brakes, and throttle when going around the track.
Don’t floor it coming out of turns, don’t slam on the brakes when coming up on a turn, and don’t jerk the wheel all the way left or right when taking the turn. Instead, ease off the throttle when you see a turn coming up. Then, ease onto the brakes as you enter the braking zone (unless it’s a super tight hairpin or you’re coming up on it after a long straightaway). Keep pressing down on the brake until you see the brake zone fade away. This way, you’re not slowing down more than you have to, allowing for other racers to catch up and pass you on the inside. Finally, gently turn the wheel to stay on your line. Yes, sometimes you’ll need to turn it all the way, but most times, especially when taking more forgiving corners, you only have to nudge it left or right.
This “teasing” does take some getting used to and changes from car to car. Once you start manually tuning your rides, you’ll need to take them out for a test drive to retrain your muscles. However, muscle memory kicks in eventually.
Understanding PP
In Gran Turismo 7, Performance Points (PP) is your car’s overall level. The higher the PP, the better the car is. The first car you buy from the used car lot will be in the lower PP tier, between 300 and 400. For example, we went with the Honda Fit Hybrid for our first car with 349 PP. This initial choice doesn’t really matter, as you’ll only need this car for the introductory races.
PP gets as low as 80 for cars like the Fiat 500 and as high as 1000 for Formula 1 racers and supercars. Everything in between can be raised or lowered via the tuning shop, which is necessary for competing in certain events. Be careful; some tuning shop upgrades can’t be undone (like weight reduction) unless you spend thousands of credits on a new body.
You can raise or lower PP on the fly by changing out your tires. So, if your car is 50 PP too high for a particular race, try changing from soft tires to hard tires or intermediate tires.
The Tuning Shop
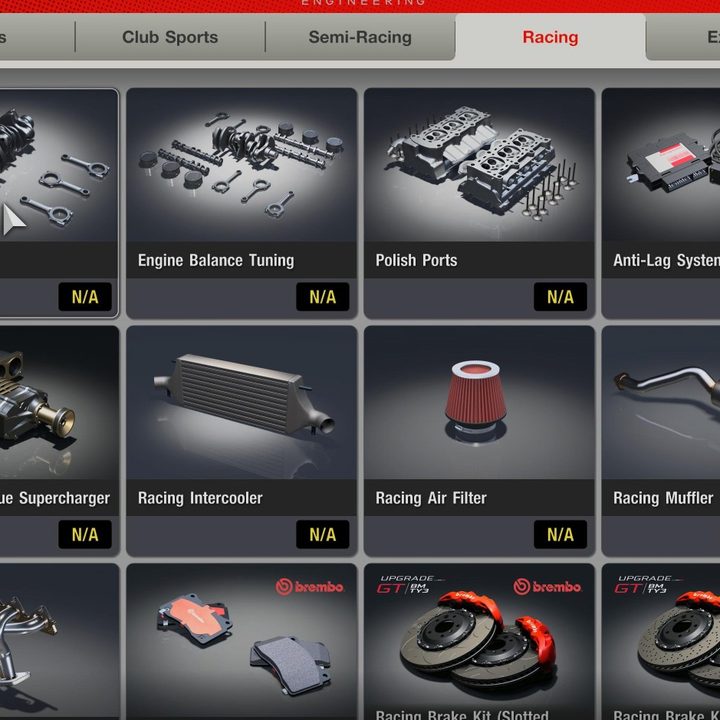
In Gran Turismo 7, the tuning shop is where you’ll buy all sorts of upgrades for your favorite cars. Here, you’ll increase your PP by adding certain components to your ride. You can buy new brakes, mufflers, air filters, tires, suspensions, and more across five different tiers:
- Sports
- Club Sports
- Semi-Racing
- Racing
- Extreme
Increase your driver level in Gran Turismo 7 to unlock more tuning tiers in the tuning shop. The best way to increase your driver level is by completing licenses. The car rewards shoot your level up faster than grinding menus.
You might think the extreme category gives you the best of the best parts, but that’s not totally the case. Yes, Extreme gives you some delightful upgrades, but the semi-racing and racing tiers are where all the good stuff hides. When buying upgrades, there are three main things you want to look for: suspensions, bodyweight reductions, and tires.
The best way to raise your favorite car’s PP is to reduce its weight. There are four stages of weight reduction between Sports and Racing tuning tiers that effectively cut the weight of your vehicle in half. However, these changes can’t be undone, so don’t go crazy and out-PP yourself from most events.
Look for suspensions that let you raise and lower your car height. Lower cars take tighter turns, and customizable suspensions give you more tuning options to play with. The Fully Customizable Suspension under the Racing tier is the best one. However, the Height-Adjustable Sports suspension works for racers on a budget.
Each tuning tier comes with new sets of tires that’ll raise or lower your PP. Those tires break down into soft, medium, and hard tires, with soft being the best. However, soft tires wear quickly, but we haven’t had an issue with that, at least not yet.
Before each race, you have the option to fine-tune your car. The more specific upgrades you bought at the tuning shop, like new computers, brake pads, and mufflers, can be attached in this menu. Here’s a simple rule of thumb to follow: If it only boosts your PP by a few points, it’s something you can equip and unequip in the car setting screen.
Any tunings you make will automatically lock themselves in once you measure the car. You might forget what the default settings were, and now you’re stuck with something you don’t like. Here’s how to get around that. Before you make any changes:
- Make a new settings sheet.
- At the top of the settings screen, press the three dots next to Edit Settings Sheet.
- Scroll down to Add Sheet and then press Okay. You can name this sheet now or edit the name later. It’s up to you.
Now, you can feel free to play around with different tunings to see how they change your car. If you don’t like those settings, you can always delete the sheet and make a new one, knowing your original sheet with the default tunings is intact.
Race yourself
Here’s an additional quick-tip to tuning your car. Pick any race track, preferably one with several different components like multiple turns in a row, a long straightaway, and a hairpin corner (the Deep Forest Raceway in Switzerland is a good one). Instead of selecting the scheduled race, select Time Trial. Then, do your best to set the fastest time possible in whatever car you’re looking to tune. We recommend taking three laps to do so. That way, you’re used to the track once you start tuning.
The ghost A.I. car will take your best lap time and race you when you come back. If the changes work in your favor, you should outpace yourself. If they work against you, the ghost car will beat you.
Don’t waste credits on new cars
With over 400 cars in the game, the urge to buy every car might be challenging to ignore. However, those credits are better spent tuning the cars you win rather than buying brand new ones. Furthermore, the reward cars you get from completing early menus and license challenges are good enough to get you into the crux of the game. At that point, menus get easier, the challenge tent unlocks, and World Circuit races reward you with more credits.
Of course, the urge to buy the car of your dreams eventually wins. Once you’ve saved up a few hundred thousand credits (probably between 250-350,000), head over to Brand Central to explore brand new cars from your favorite manufacturers. You’ll find plenty of high-PP cars for “affordable” prices. For example, you can grab a 2014 Jaguar for 128,600, a 2019 Porsche Turbo for 230,000, or a sleek red Ferrari F8 for 330,500.
Otherwise, the cars available at Brand Central (the high-performance ones at least) are over a million credits. Don’t even think about it. For starters, you can’t use those cars in early to mid-game events, since there’s a hard PP cap. Secondly, you’ll spend all your hard-earned credits and can’t afford tuning parts for other cars.
Of course, Gran Turismo 7 does give you the option to spend real money on in-game credits through microtransactions. So, we can’t stop you from buying all the cars and parts you want with real-world money.
Grind menus
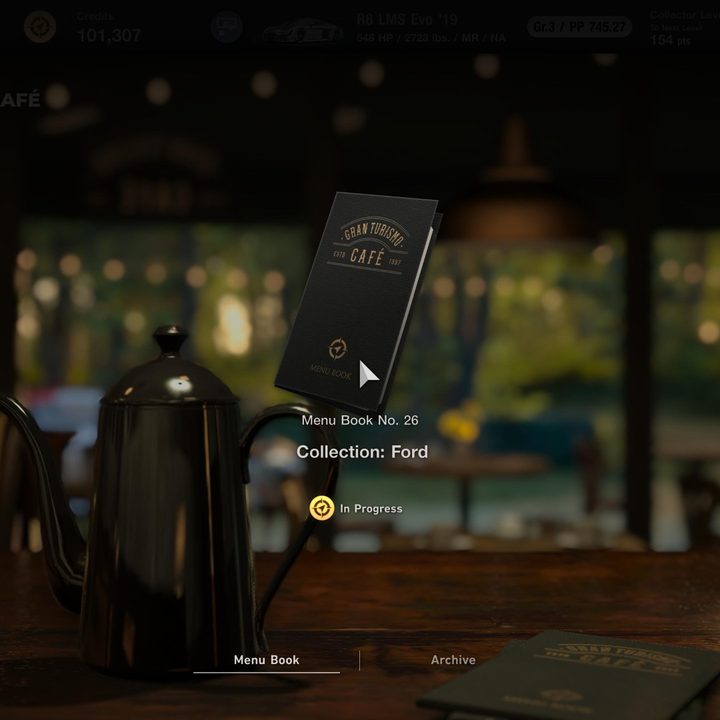
Menus are how you’ll unlock new features in Gran Turismo 7. Each menu comes with a specific set of goals, whether obtaining certain cars or visiting a new area on the map. While they’ll feel like busy work for returning players, new Gran Turismo fans will learn the broader gameplay mechanics by completing menus and unlocking features. You’ll pick up menus from the Cafe after talking to Luca, who always has way too much to say.
Besides unlocking new features like multiplayer and car customization, menus are the best way to unlock new cars in Gran Turismo 7. Most menus involve you completing races which reward you with a new car. Thankfully, the game holds your hand through this process, telling you which races you need to compete by marking them with an impossible-to-miss golden circle. Once you get all three cars, head back to Luca to claim your reward. Unfortunately, monetary rewards for actually completing the menus aren’t as valuable as the cars unlocked by playing them.
At the cafe, talk to Luca to claim your reward. He’ll tell you all about the cars you just unlocked, but unless you’re really into car history, ignore him. Skip through the dialogue and move on to the next menu. There are some other people in the cafe to talk to, but we haven’t found a rewarding reason to speak to them.
Most menus give you a lottery ticket to cash in at the garage, and you’ll find them under the gifts tab. The lottery system in Gran Turismo 7 works how you’d expect it. Most of the time, you get the worst reward, such as a few-thousand credits. However, you have the possibility to unlock a new car or a car-specific part you’d otherwise have to buy in the tuning shop. However, if you don’t have that car, you have to buy it.
World races and ‘recommended PP’
Most menus require you to complete Word Circuit races to unlock new cars associated with that menu. However, those races often restrict the kind of car you can use. Thankfully, they rarely (if ever) restrict your PP, so you can use your best cars as long as they meet the other requirements. Those requirements usually have to do with:
- Front, rear, or all-wheel drive
- Country (U.S., European countries, or Japan)
- Tires (Sport, Racing, Dirt)
- Car Type (Racing or Road Car)
When playing menus, you should always have a usable car, whether you unlocked it from a previous menu or during the menu you’re working on.
Each race comes with a “recommended” PP, so make sure the car you’re using is appropriately tuned to compete in that race. Otherwise, you’ll get left in the dust. We highly recommend tuning your car at least 50 PP over the recommended amount. Here’s why.
Most races in Gran Turismo 7 begin with a rolling start. However, you always start in last place, and the driver in first-place has a ridiculous head start, sometimes already around the first corner before you even get off the starting line. You’ll never catch them on the first lap, so you’ll need a fast car and some solid driving skills to catch up by lap two. If your car’s only at the recommended PP, you’ll never catch up to the first-place driver, even if you drive flawlessly.
Play challenges
Head over to the challenge tent when you need a break from World Circuit races. To unlock the challenge tent in Gran Turismo 7, you have to finish menu book 12. Menu 13 has you visiting the challenge tent to try your first mission.
These missions blend unique time trials with more arcade-like races. Sometimes you’ll have to complete a lap on only one tank of gas. Other times you’ll have to knock over a series of cones in under 12 seconds. Drag races are the easiest once you get the hang of manually shifting, while drift missions might have you pulling your hair out every time your car goes off the track.
Challenges work like licenses. You’ll get car rewards for getting all bronze and all gold. Like the licenses, don’t waste your time trying to gold every challenge, at least not at first. Some challenges are borderline impossible and may need nerfing in the future.
For example, the first challenge in the Rolling Stone block called The Pass, has you trying to get around four other racers without bumping them. However, the first-place racer is so far ahead that there’s no way you’ll ever catch him, even if you drive flawlessly. For reference, the other challenges in this block were challenging but doable. We got gold on all except for The Pass. Maybe we’re just not good enough, but go ahead and give it a try. You’ll see what we’re talking about. It also doesn’t help whenever Sarah pops up and tells you to “take a breath” after failing for the 15th time.
Appreciate Scapes
Head over to Scapes on the far left side of the overworld map when you really need a break from racing, licenses, and challenges. Here, you’ll explore over 2,000 real-world locations where you can take pictures of your favorite cars. Scapes is the photo mode of Gran Turismo 7 and is probably the most extensive photo mode we’ve ever seen in a video game.
From Iceland to Morocco, you can take your favorite cars all around the world, setting them against unique high-def backdrops. Some backdrops allow for more depth than others, letting you stage races and take photos with panoramic cameras.
We found the best backdrops are those that reflect naturally off your car. Anything in a city truly harnesses the power of next-gen consoles, pushing the capabilities of CGI to unbelievable levels. Some of our favorites so far are Miami and After the Rain. However, those only scratch the surface of what Scapes has to offer.