
The best ship modules in Helldivers 2

While the majority of your success lies in which weapons and armor you carry when facing off against the Terminids and Automatons on various missions in Helldivers 2, you shouldn’t overlook what your ship can do to support you. Besides just naming your destroyer, there’s far more you can do to customize it with modules. Whereas weapons and Boosters will impact you and your squad on a more constant basis, ship modules come in clutch when you need to bring out the big guns, aka Stratagems. These power weapons are already enough to turn the tide of a tough fight, but when you add in the right ship modules, you’ll be cooking bugs for breakfast.

The best ship modules in Helldivers 2

Ship modules are purchased on your ship via the Ship Management Terminal. There are 18 in total, split between the Patriotic Administration Center, Orbital Cannon, Hangar Ship, Bridge Ship, and Engineer Bay categories. They are unlocked by spending samples you can collect during missions.

Donation Access License

A description of a ship module in Helldivers 2.
Arrowhead Games

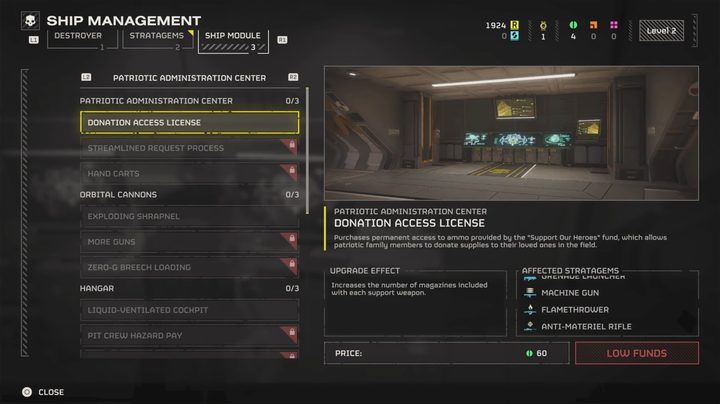
Look, sometimes you can’t argue with simplicity, and the Donation Access License is about as basic as they come. This mod gives any support weapons you call in more ammo by default, granting you more time blasting and less time waiting to call in your next one. It is a versatile mod as well since it can be applied to multiple Strategems. It applies to things like the Laser Cannon, Grenade Launcher, Railgun, Flamethrower, and more.

Liquid-Ventilated Cockpit

A description of a ship module in Helldivers 2.
Arrowhead Games

Eagle Strategems are some of the most deadly in the game for massive area-of-effect damage. Aside from the dangers of getting caught in your own blast, the downside is that they have hefty cooldowns. This mod will cut all Eagle Stratagem cooldowns, such as the Eagle 500KG Bomb, airstrike, and strafing run, by 50% so you can rain down terror in half the time. When you can use something like the Eagle 500KG Bomb basically whenever you need, not even a Charger will pose a threat.

Nuclear Radar

A description of a ship module in Helldivers 2.
Arrowhead Games

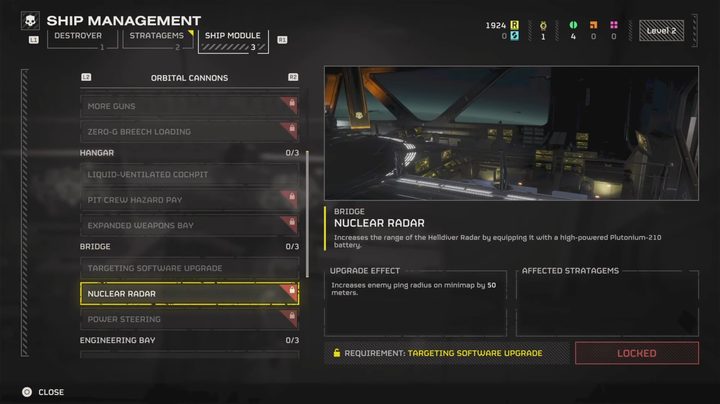
The deadliest enemy in Helldivers 2, besides your teammates, are the ones you don’t see coming. Your mini-map is handy, but typically doesn’t warn you about danger before you spot it (or more likely, before it spots you). The Nuclear Radar increases the radius of all enemy pings by a massive 50 meters so you will never be caught unaware.

Shock Absorption Gel

A description of a ship module in Helldivers 2.
Arrowhead Games

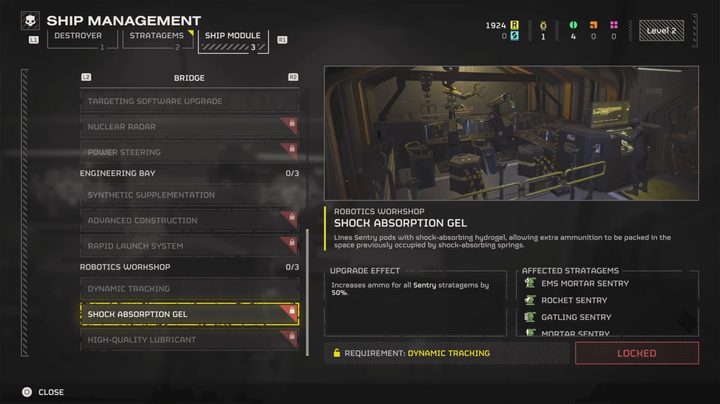
Calling in a sentry gun is basically adding a fifth man to your squad. The only issue is that this temporary teammate only lasts as long as they have ammo. Don’t ask us why it’s called Shock Absorption Gel, but this module increases the ammo for all sentry Strategems by 50% to watch your backs for that much longer.

More Guns

A description of a ship module in Helldivers 2.
Arrowhead Games

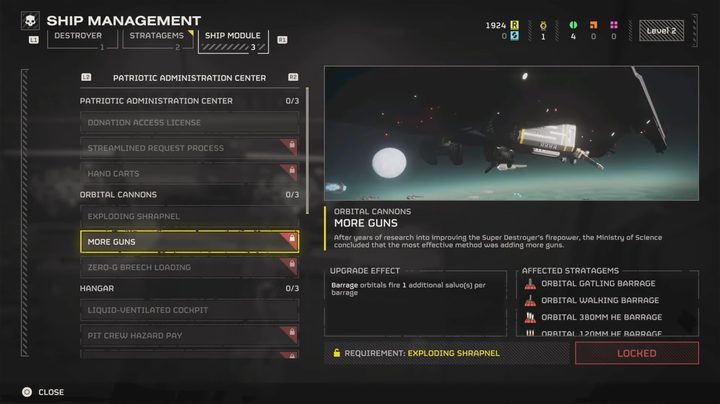
If there’s one tactic that always works in Helldivers 2, it’s to keep shooting. More Guns applies to your Barrage orbital strikes, such as Orbital Gatling Barrage, Orbital Walking Barrage, Orbital 380MM HE Barrage, and more. It increases the number of salvos dropped by one. That one extra bombardment can make up for a mistimed or misplaced deployment, or just make doubly sure that whatever you were trying to kill is most definitely dead.

Editors' Recommendations

Topics
Jesse Lennox
Jesse Lennox loves writing, games, and complaining about not having time to write and play games. He knows the names of more…
All sphinx riddle solutions in Dragon’s Dogma 2
A sphinx in Dragon's Dogma 2.

Dragon's Dogma 2 is full of mythological monsters and beasts. During your travels, you will encounter many classics like Cyclopses, Griffins, and Dragons, but a more obscure creature is hidden away in a cave waiting to challenge you in a different way. The Sphinx is found in the Mountain Shrine at the top of the hill once you go through Wordlsend Cave. It won't attack you when you approach, but instead, it will challenge you to a test of intellect. There are a total of 10 riddles to be solved, with a reward given for each one you manage to crack. Dragon's Dogma 2 never holds your hand with anything, so we'll help you unravel these riddles.
First five riddle solutions

The first half of the riddles are given at the location mentioned above. Once you solve this first batch, the Sphinx will move, and you will need to find it again to continue. Here are the first five riddles, their solutions, and rewards.
Riddle of the Eyes
“Our eyes are our allies, yet oft do they betray, for eyes tell lies, so I advise, and thence do lead astray. Yet how will your eyes advise you? Venture through yonder door and retrieve that which is of greatest value.“

Read more
How long is Dragon’s Dogma 2?
A sphinx in Dragon's Dogma 2.

Open-world RPGs can be anywhere from around a dozen hours long to well over 100. Dragon's Dogma 2 is very unique, even among others in the genre, for not adhering to a lot of traditional design philosophies, such as how it handles fast travel. If anything, that will only add to your total playtime, plus there are all the optional quests to do, Vocations to try out and level up, and more if you're a completionist. If you're wondering if you have the time to fit Dragon's Dogma 2 into your schedule among all the other games releasing, here's how long you can expect this adventure to last.
How long is Dragon's Dogma 2?

For the main quest, Dragon's Dogma 2 can probably be beaten in around 25 hours, give or take. That's assuming you mainline the story as efficiently as possible and don't get stuck on any boss fights being under-leveled. A more realistic playthrough where you explore a bit, do some side content, and maybe go for the true ending will push you into the 30 to 35-hour range, as it did for us.

Read more
The best vocations in Dragon’s Dogma 2
Dragon's Dogma 2 key art featuring a knight with a fiery hole in their chest.

Your Vocation defines your role in combat in Dragon's Dogma 2. Everything from your skills to what weapons and armor you can use is tied to this class. You will pick from just a handful at the beginning of the game, but can easily change Vocations later on, as well as unlock more than twice as many new options than what you start with. It can take a while to really get a feel for a Vocation and how it performs in combat, as well as to look through all of its skills and augments, before knowing if it's worth sticking with to level up. Personal preference will play a part to some degree, but these Vocations have the most potential to make you the strongest Arisen in history.
The best vocations in Dragon's Dogma 2

You can pick from 4 Vocations at the start of Dragon's Dogma 2, but will end up with a total of 10 by the end of the game if you unlock them all. New Vocations are unlocked by completing quests, but they are almost unmissable. Four Vocations -- the Magick Archer, Mystic Spearhand, Trickster, and Warfarer -- can only be used by your character and not any Pawns.
Warfarer
There's very little downside to being a jack-of-all-trades in Dragon's Dogma 2, which is exactly what the Warfarer is. This is the only Vocation that can use any weapon in the game AND learn any skill from other Vocations. This is the only Vocation that really lets you build whatever class you want and gives you the ability to adapt to any situation you find yourself in. The main downside to this class is it has the lowest base stats, but that is a small price to pay for how versatile you can be.
Mystic Spearhand
Hybrid Vocations are all quite powerful, but we put the Mystic Spearhand at the top of the heap. This class turns you into a fighter that can take advantage of magic to output crazy damage. The two almost overpowered abilities you get here are the ability to slow enemies for a short time and to create a magical mimic that doubles all your actions. It is great for both crowd control and large single targets, but takes a while to unlock and lacks some range.
Warrior
If you're going to be a straight-up melee fighter, you might as well hit with the biggest weapon you can, right? The Warrior swings swords large enough to make Guts blush and is a full-on tank. You won't be doing anything fancy with this vocation beyond charging up and swinging as hard as possible. The obvious drawback is any flying or ranged enemy will counter you, so bring some Pawns in those classes to cover your bases.
Sorcerer
For those who fancy themselves a pure mage, stick to the Sorcerer over the actual Mage vocation. While the Mage is more focused on healing, it is the Sorcerer who gets the best offensive spells you will want to be casting. If you have a second Sorcerer with you, you can even sync up and decrease your casting time. If not, you will need some tanks to take aggro while you deal with some slightly long casting times and low total health.
Thief
As far as the starting Vocations go, the Thief is the one we find the most fun and viable for the entire game. This is a light and speedy build focused on critical hits and being able to climb and hang on to large beasts. Once on, you have a number of great skills to stagger and knock down an enemy so the rest of your squad to gang up on it. Just don't get hit because you're one of the squishier Vocations.

Read more