
How to kill Chargers in Helldivers 2

If you thought Helldivers 2 would get any easier as you made it deeper into the game, think again. Even if you’ve unlocked most or all of the game’s weapons, that doesn’t mean a massive monster can’t come out of nowhere and flatten you in mere seconds. The first time you encounter a Charger, that’s probably what will happen.

These massive beasts may seem impossible to take down by themselves, but when you add in all the regular enemies that tend to surround them, not even a full squad of capable soldiers would stand a chance. We’ll help you crack this monster’s armor and stop any Charger dead in its tracks.

How to kill Chargers

A soldier fighting a charger in Helldivers 2.
Arrowhead Games

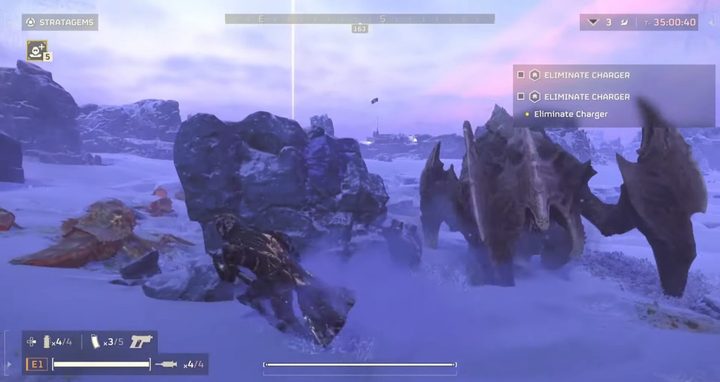
Chargers are perhaps the single-most devastating and tough enemy in Helldivers 2. They’re big, mean, and shrug off most of your attacks like they’re nothing. If you’re caught in the open with no plan, you have little hope of taking one down or even escaping. Before getting into specific strategies, here are some basic tips to employ when a Charger shows up to ruin your day.

If you’ve played almost any game with an enemy whose main form of attack is ramming you, then you should be very familiar with the tactic of getting them to charge into the environment. That tried-and-true trick works here and will not only stun the Charger, but reveal its squishy weak point on its behind. If you have no other ways to deal damage, kiting it into obstacles and exploiting that weak point can do the job. Some normal weapons do allow you to pierce armor, such as the Liberator, Penetrator and Breaker, so make sure your squad is built to deal with that.

That method will take more time than you might have, so why not remove some of that armor? Anti-tank launchers, recoilless rifles, and other explosives can strip off a Charger’s leg armor to give your team more opportunities to deal meaningful damage from angles other than behind it.

Strategems are your best weapons here, as many can either blast away at armor or outright ignore it. We mentioned anti-tank weapons, but the Eagle Airstrike or Napal Airstrike can also make quick work of a Charger. These are especially good for Chargers who bring along a ton of friends, though targeting and timing here will be more difficult If you’re a high enough level to have them, both the Orbital Laser and Orbital Railcannon Strike will lock on to the Charger and deal massive damage. Since the Railcannon in particular can be used over and over, all you need is the time and space to fire it off and you’ve as good as won. Another great pick is the Autocannon Sentry. This turret blasts armor-piercing shots automatically and can steadily wear it down while you fight from safety.

Finally, there is one method in which you can strike down a Charger with a single attack, but does require either amazing timing or some luck. One Orbital Precision Strike can one-tap a Charger if you manage to land it, but doing so is by no means easy. You either have to get lucky and spot a Charger out in the wild before it notices you, which isn’t even possible all the time since they often ambush you from underground, or somehow manage to fire one off and land a direct hit while it’s rushing around attacking you.

No matter which method, or combination of methods, you roll with, teamwork is always going to make the biggest difference. Pass aggro around to keep the Charger from bullying one player too much, and also give others a chance to attack its weak point and use their Stratagems. If you can coordinate and exploit its weaknesses, your squad can stop any Charger dead in its tracks.

Editors' Recommendations

Jesse Lennox
Jesse Lennox loves writing, games, and complaining about not having time to write and play games. He knows the names of more…
How to start The Forgotten Kingdom DLC in Remnant 2
Invoker

Remnant 2 is a massive game that already boasts nearly endless replayability, but that isn't stopping developer Gunfire Games from adding even more to do in the popular looter shooter. The game's new DLC, The Forgotten Kingdom, provides players with a substantial amount of extra stuff to check out, such as new biomes to explore, an additional archetype known as The Invoker, and plenty of fresh enemies to take down. If you're ready to see all of what The Forgotten Kingdom DLC has to offer, read on to learn how to access it from within the game.
How to start The Forgotten Kingdom DLC
The first step in accessing The Forgotten Kingdom DLC is to ensure you've purchased and downloaded it. You can buy the standalone version from your respective storefront for $10, or you can opt to snag the $25 bundle, which includes The Awakened King, The Forgotten Kingdom, and another future DLC that has yet to be announced. If you intend to play the full trilogy of DLCs, the former is your best option, as you'll save five bucks off the total cost of all three.

Once you've purchased and downloaded the DLC, you'll be ready to access The Forgotten Kingdom by visiting a World Stone and opening Adventure Mode. You'll need to have completed the Yaesha biome at least one time. At that point, you can select "Reroll Adventure Mode" and choose The Forgotten Kingdom: One Shot on the right, which will notably give you exclusive DLC content your first time through. Keep in mind that while this initial run won't feature any older content, your subsequent playthroughs of Yaesha will weave DLC areas in with main campaign content.

Read more
All Trinkets in Tales of Kenzera: Zau, explained
The main character of Tales of Kenzera: Zau stands with two elemental items.

Your main upgrades in a metroidvania like Tales of Kenzera: Zau will always be your new abilities. These transform the way you move and fight, but there are other ways you can make Zau a more powerful shaman. Trinkets are introduced right away, but aren't given away as freely as you might think. Each one requires you to overcome a small trial that tests your platforming abilities off the main path. Technically, you can miss every single one aside from the one you begin the game with. Even though there are a few fast travel points, backtracking isn't a particularly fun experience. Here are all the Trinket locations in Tales of Kenzera: Zau, plus which ones you should equip.
All Trinket locations
You can see which zones have Trinkets on the map, and for the most part, you will be able to grab them as you navigate through them for the first time. Here are each of the Trinket locations roughly in the order you should naturally be able to get them.
Battering Stance
This is the Trinket you begin the game with and is equipped by default.
Lifted Spirit

The first Trinket is found in this side path trial in The Buluu Caverns.
Retaliating Spirit

Read more
Get in on the action: Helldivers 2 for PC is 15% off for a limited time
A soldier in silhouette in Helldivers 2.

If you are a fan of Starship Troopers the movie, you'll really love Helldivers 2. It takes that hyper-militarized world and the excellent satire and completely immerses you in it, providing for a thrilling and absolutely hilarious experience overall. It's also been a massive hit, and it often has well over 100,000 concurrent players at any given moment, even though it's a couple of months past its launch date. As such, if you want to dive into the fun, then you can grab the game for much for 15% off at CDKeys, which brings it down to $34 from $40.

Why you should buy Helldivers 2
Helldivers 2 is a big upgrade on the previous game, taking you to a fully 3D world to bring Managed Democracy to the rest of space. That primarily means that you get to either fight bots or bugs, with some actually great gameplay differences, and Arrowhead, the studio that made the game, even creates major orders that the whole player base is supposed to work towards. As a player, though, you can group up with three more people and dive into the hell of future space combat against alien species. You get tons of weapons and armor to pick from and even orbital stratagems that you can call down from your destroyer spaceship, which are very cool.

Read more