
Bounty hunter Samus Aran has used many abilities and power-ups to complete her adventures across the galaxy in the Metroid series. That holds true in the most recent installment, Metroid Dread. In fact, the main hook of Dread is exploring Planet ZDR in search of these hidden abilities and powers. While many of these abilities are rewarded to you through natural progression, others aren’t so easy to find. If you want to achieve 100% completion in this game, you’ll need to find all the power-ups hidden throughout the stages.
In this guide, we’ll dive into all 18 abilities, with guides on what they do and where to find them in Metroid Dread. Keep in mind, we have separate guides for the Power Suits and the Aeion Abilities, as well. Though we’ve listed the abilities close to chronologically, you can mix up the order slightly since Dread is a non-linear game.
Related Guides
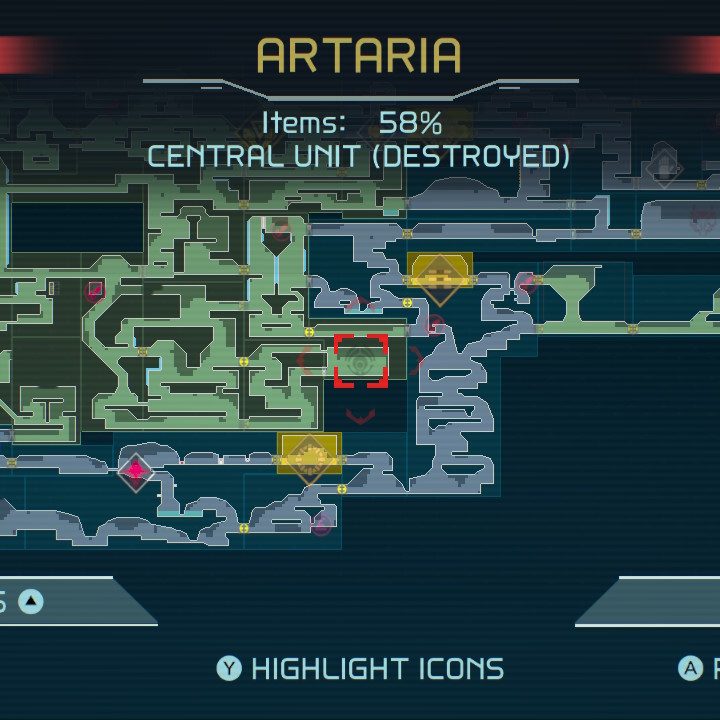
Charge Beam

What it does
The Charge Beam is likely the first ability you’ll come across and is essential to make it through the game. It allows you to charge a shot with your arm cannon, dealing additional damage, which is useful against heavily armored enemies. It also allows you to open Charge Beam Doors. To use it, hold down the Y button for a second and release it when the beam flashes.
Where to find it

You’ll find the Charge Beam at the bottom of Artaria, as shown in the map above. To get there, we recommend heading down from the left side, through the cave area. It’s in a room with a Chozo Statue.
Spider Magnet
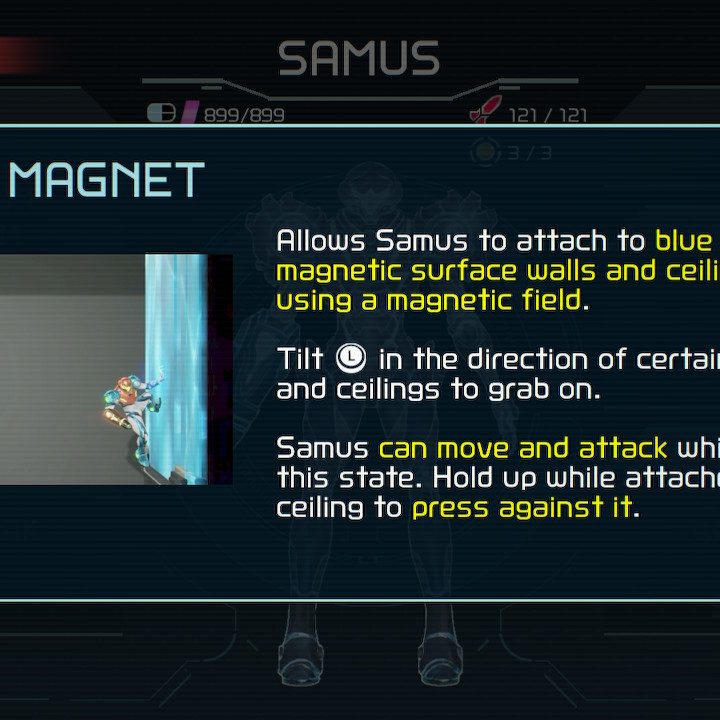
What it does
Next up is the Spider Magnet, an ability that lets you climb on blue walls. These walls are scattered throughout the planet and are great for reaching sections that are high up. When starting out, you don’t have the ability to jump or spin high up in the air, so the Spider Magnet is a great alternative that allows you to reach certain areas. The cool thing is that you can still shoot and parry while clinging to these walls.
Where to find it
This one is rewarded to you after you defeat your first E.M.M.I. robot, located on the east side of Artaria. You’ll need the Omega Cannon to defeat the E.M.M.I., but once you do, you’ll gain a permanent ability for your troubles.
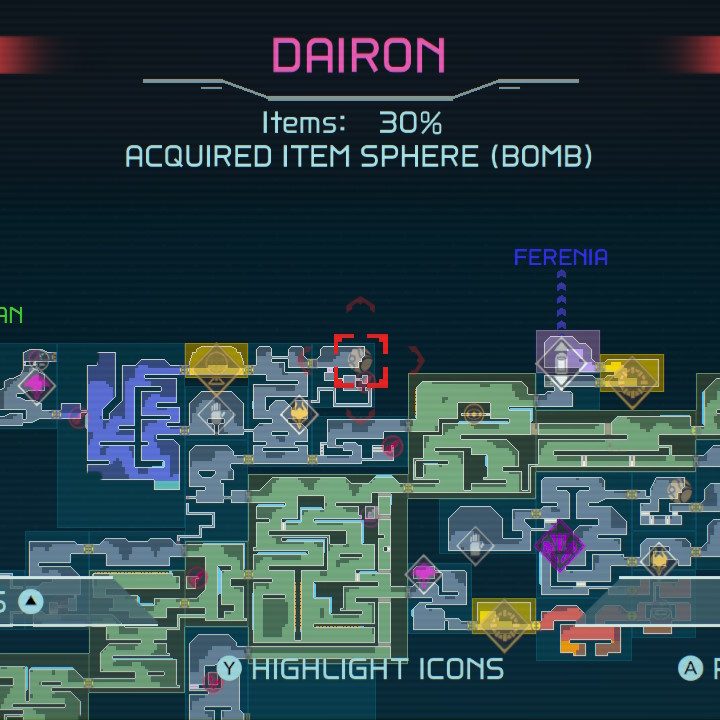
Wide Beam

What it does
A famous ability in the Metroid series is the Wide Beam, which allows you to shoot three blasts instead of just one. This results in higher damage output, but also allows you to push Wide Beam Boxes and Wide Beam Covers. Simply press Y to fire.
Where to find it
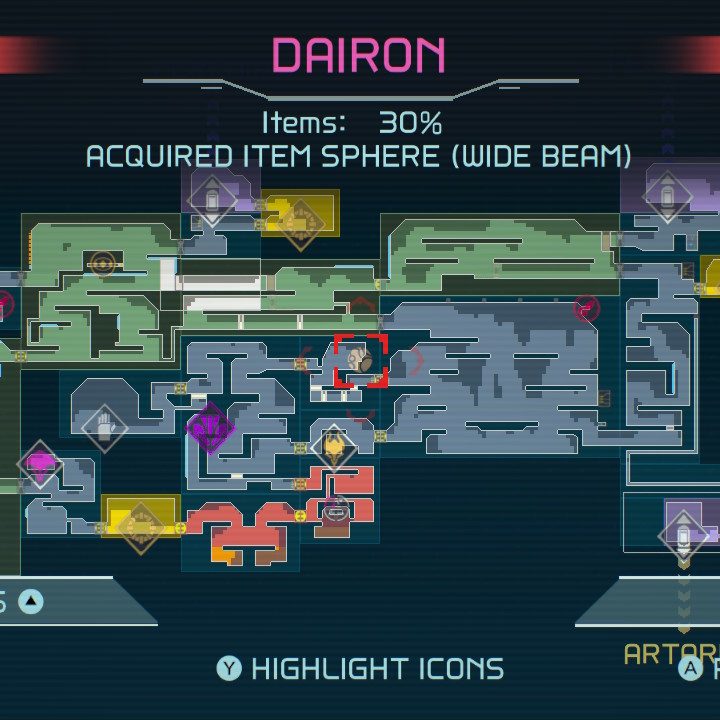
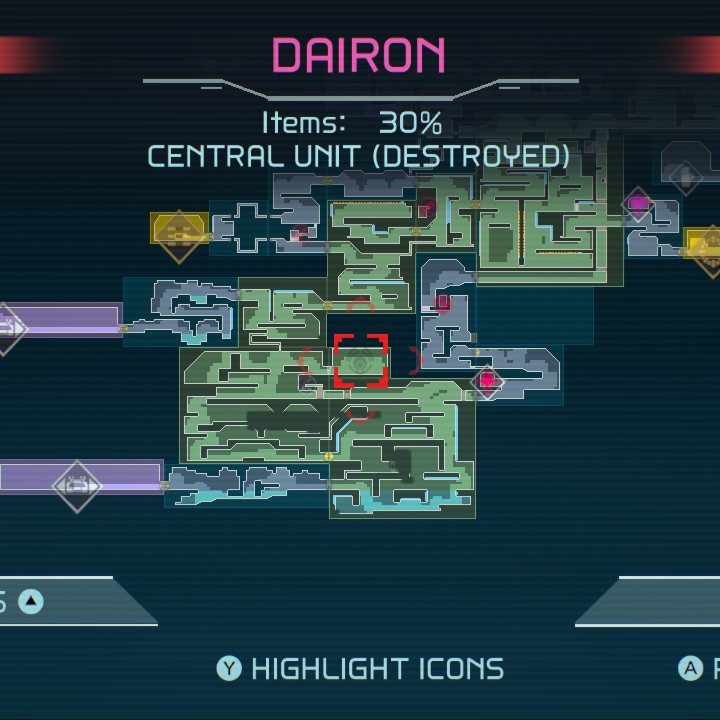
To find the Wide Beam, you’ll need to head to the center of Dairon after turning on the power. Use the map above for the specific location.
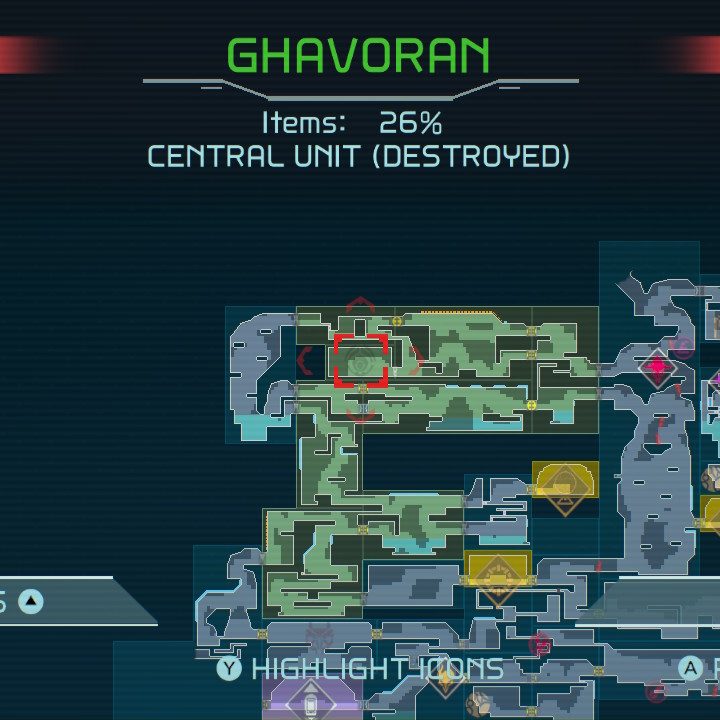
Morph Ball
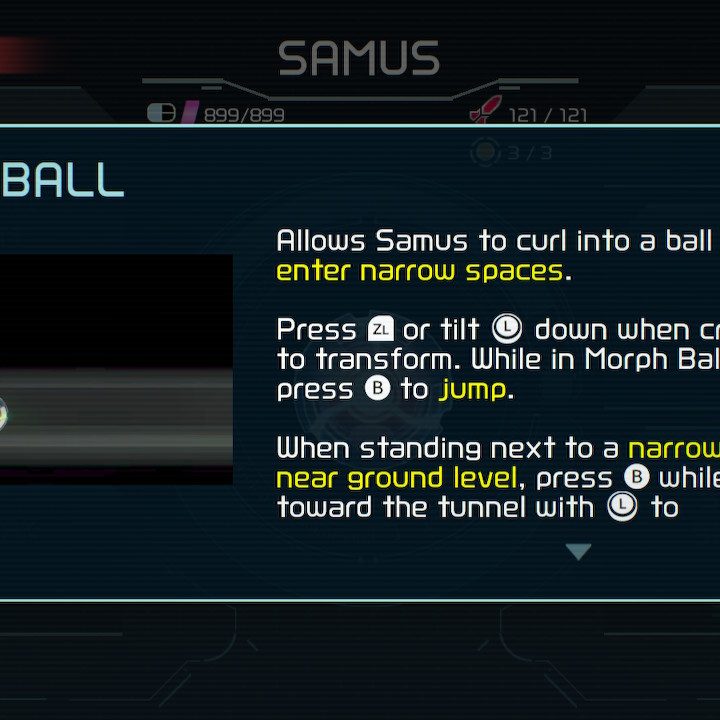
What it does
The famous Morph Ball is back! Discovering this ability is exciting because so many areas up to this point are only accessible in Morph Ball form. To use it, press ZL or flick the left stick down and Samus will turn into a tiny ball. You can jump while in Morph Ball form by pressing B. This is yet another essential ability that is used to traverse tunnels a normal person (or alien) wouldn’t be able to fit into.
Where to find it
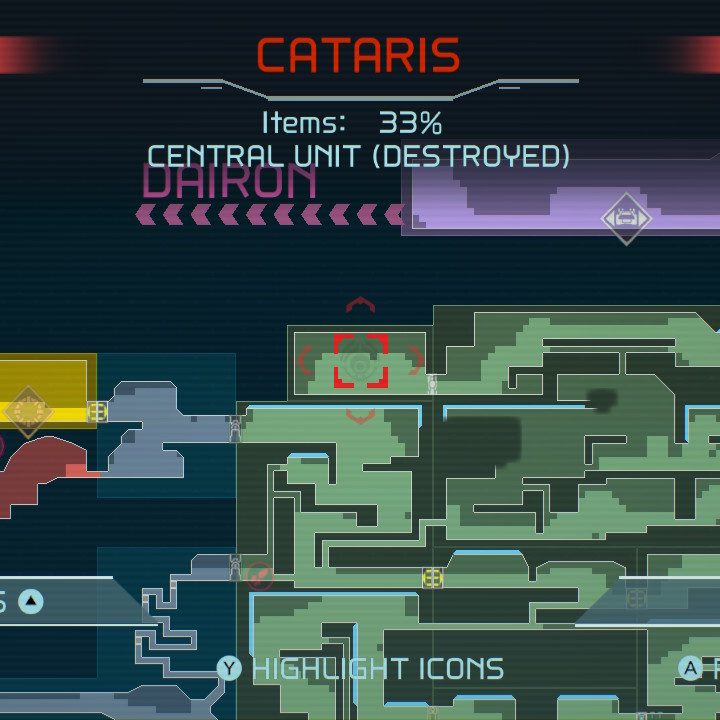
Head to Cataris and make your way to the Central Unit to take on the E.M.M.I. of this area. Upon defeat, you’ll be rewarded with the Morph Ball — finally!
Diffusion Beam

What it does
All around Planet ZDR are walls that can be destroyed if you’ve got the right tools. Certain walls have red rocks protruding from them, indicating they can be penetrated. For this, you’ll need the Diffusion Beam, which releases when you charge up a shot. Press and hold Y to charge and upon release, you’ll fire a Diffusion Beam.
Where to find it
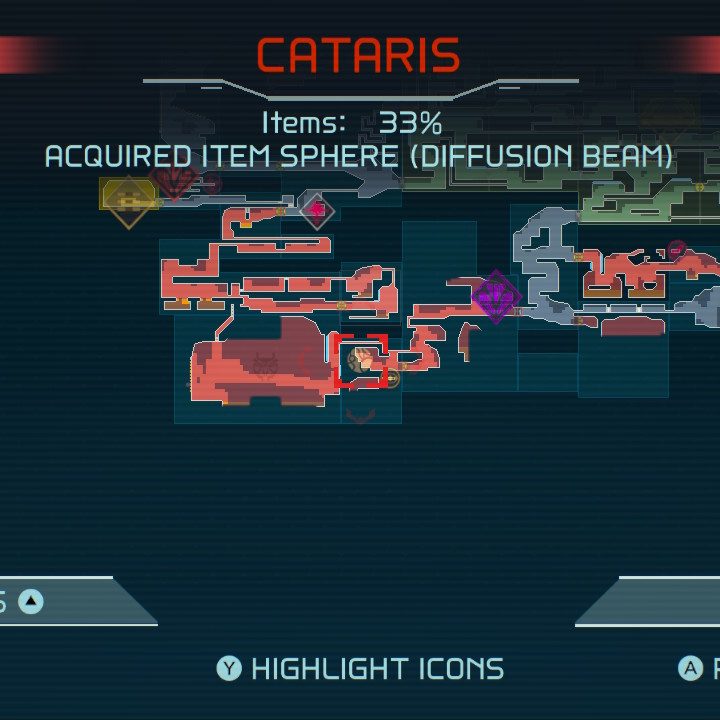
After defeating the Kraid boss in Cataris, use the Spider Magnet and Morph Ball to make your way to the right side of the chamber where you’ll find the Diffusion Beam.
Morph Ball Bomb
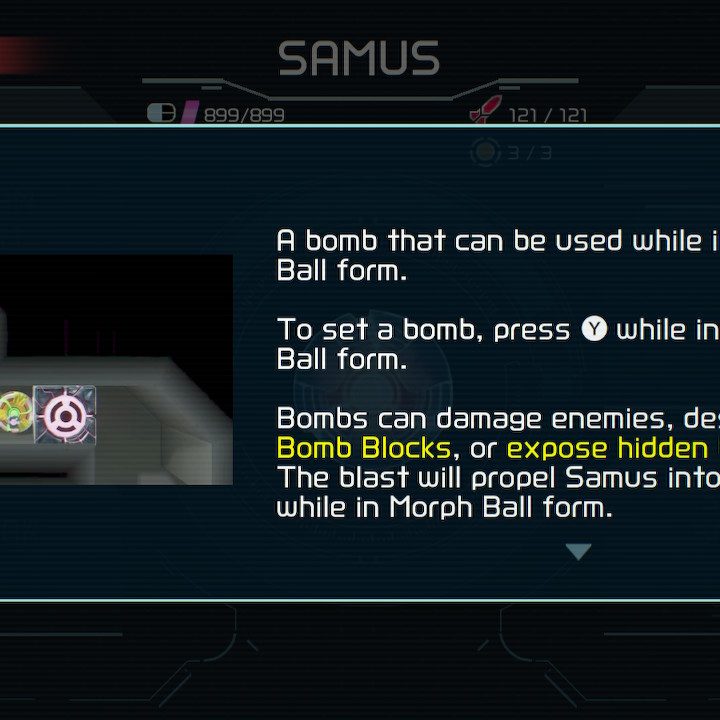
What it does
The Morph Ball is useful, sure, but until you get the Bomb that goes with it, the ability never feels complete. Luckily, you unlock the Bomb shortly after finding the Morph Ball, so you don’t have to wait too long. To use the Bomb, make sure you’re in Morph Ball form. Then, press Y to drop a bomb, which can be used to destroy blocks — even if they’re hidden. You can also jump while in Morph Ball form and leave a bomb in the air.
Where to find it
You’ll find the Morph Ball Bomb in the upper left side of Dairon. To reach this area, turn on the power and make your way through the E.M.M.I. area first. You’ll then come to a room with a Chozo Statue holding your prize.
Speed Boost (Shinespark)

What it does
This is one of the more complicated abilities, as there are lots of button inputs tied to it, and if you want to earn 100% in this game, you’ll need to master the Speed Boost. In its most basic form, the Speed Booster lets you run a lot faster. To utilize it, click the left stick while running and you’ll enter Speed Boost mode, allowing you to blast through certain walls quickly. While that isn’t too complicated, there’s a follow-up move tied to it called Shinespark.
During the Speed Boost, tilt the left stick down and Samus will turn purple, indicating the Shinespark is ready to use. From here, press B and then quickly tilt the left stick in the direction you’d like to go, and Samus will propel herself in that direction with immense power. In short, the button inputs are as follows:
Left Stick (tilt), Left Stick (click), Left Stick down (tilt), B, Left Stick (tilt)
While running, click the left stick in to enter Speed Boost mode and then press down on the left stick, then B, then the left stick again in the direction you want to go. On top of all that, you can integrate the Shinespark with the Morph Ball to project yourself into small, hard-to-reach areas. You won’t need to master all of the Shinespark moves unless you want to earn 100%, but you should at least be familiar with them.
Where to find it
The Speed Boost ability is given to you after you defeat the E.M.M.I. in Dairon, which is found in the lower-left side of this area, close to the shuttles that lead to Burenia.
Grapple Beam

What it does
Certain doors can only be opened with the Grapple Beam, as indicated by a blue upside-down triangle shown above. Much like the Spider Magnet, the Grapple Beam also lets you reach areas that are high up, allowing you to zip up to them almost like Spider-Man. You can even swing between Grapple Points just like in Super Metroid. Use L to aim while holding ZR and you’ll notice your laser will be blue. Then, while still holding L and ZR, press Y to shoot the Grapple Beam.
Where to find it
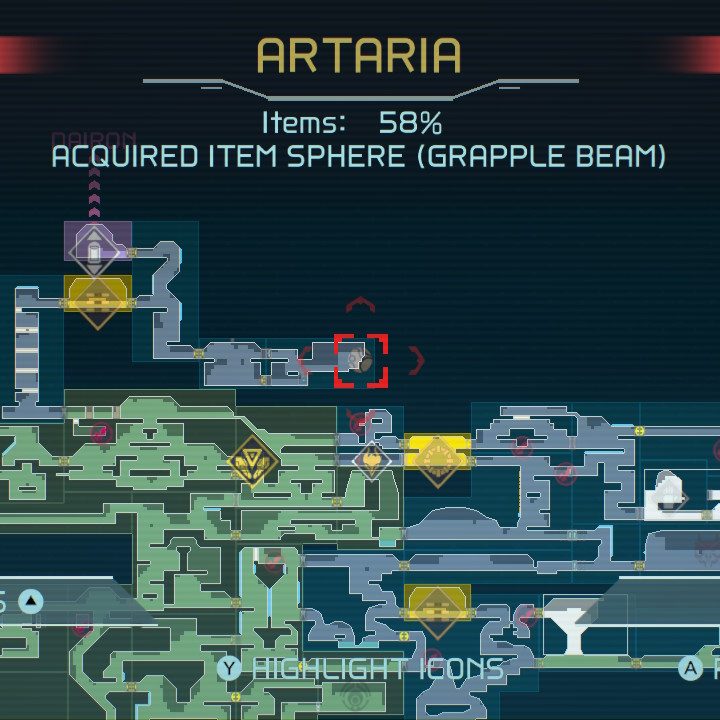
The Grapple Beam is located in Artaria toward the north side by the elevator that leads to Dairon. Keep in mind, you’ll need to use the Speed Boost to reach this point.
Super Missile

What it does
This one is simple: The Super Missile does more damage than the regular Missile. Press R to ready the Super Missile and use L to aim it (if you want). Then fire away with Y, as usual. These also allow you to destroy Super Missile Covers and are particularly useful against bosses.
Where to find it
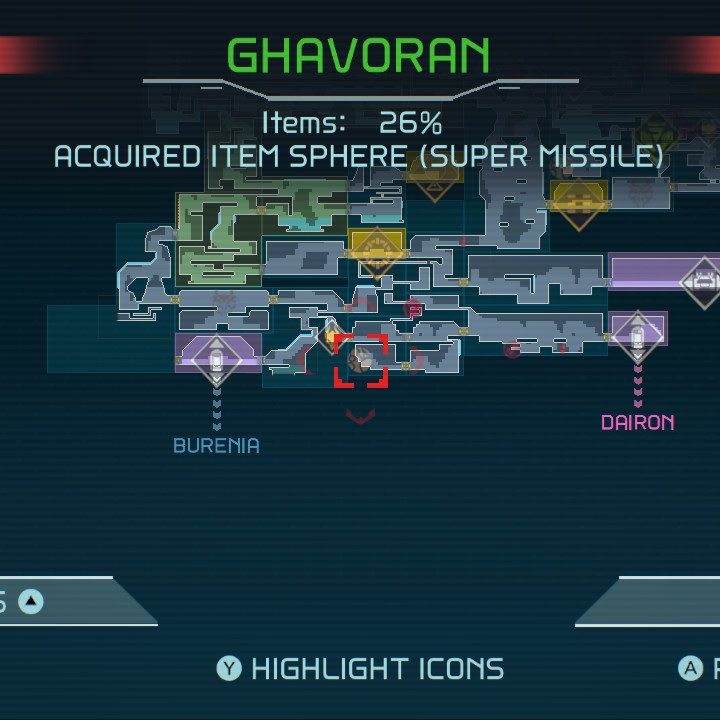
You can find the Super Missile in the Ghavoran area, toward the very bottom, in between the two elevators that go to Burenia and Dairon, respectively.
Plasma Beam

What it does
The Plasma Beam is one of the most useful upgrades, as it allows you to shoot through multiple enemies at once. It also deals damage to robotic enemies, which is perfect for making it through some of the earlier stages. The best part about this move is that it’s simply tied to the Y button, with no need to charge. It replaces your old Y attack and is a welcome enhancement. Use it to destroy Plasma Beam Covers, as well.
Where to find it
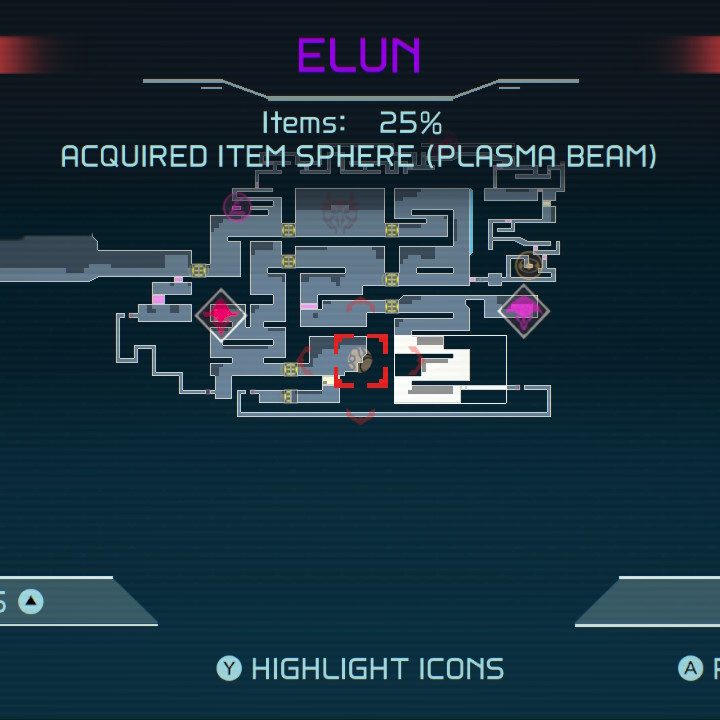
Head to Elun to find the Plasma Beam, toward the bottom in the center of this area. You’ll be able to collect it from a Chozo Statue.
Spin Boost

What it does
The Spin Boost is similar to a double jump, wherein it allows you to jump twice consecutively. While flipping in the air, press the B button to jump again. Remember, you begin flipping as long as you’re moving in a specific direction prior to pressing the jump button. If you jump in place, you won’t flip, and you won’t be able to use the Spin Boost. Use this move to reach platforms that are up high.
Where to find it
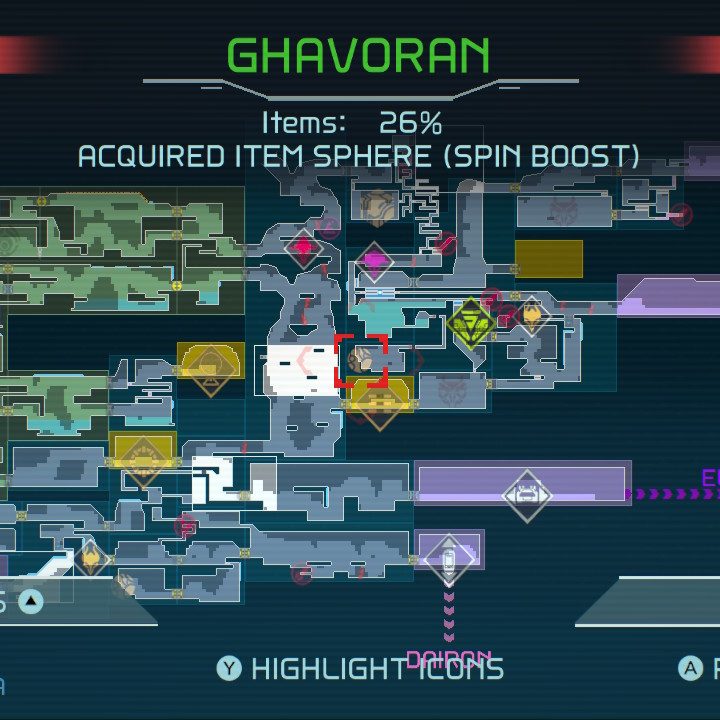
This power-up is located in the center of Ghavoran in a room with a Chozo Statue, as shown in the map above.
Ice Missile
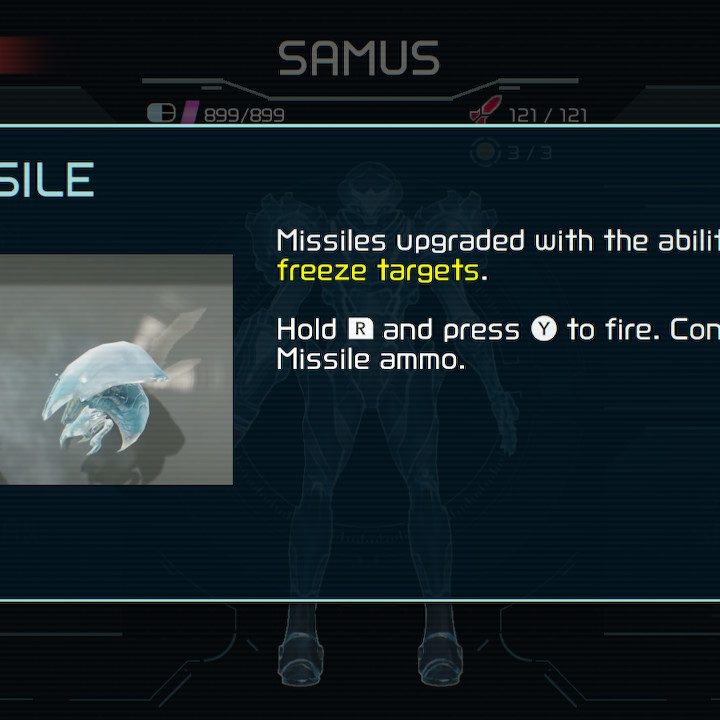
What it does
The Ice Missile is useful because it freezes enemies in place. This replaces your Super Missile, which is fine since the new ability is way more effective. Press R to ready it and the Y to fire (and L to enter aim mode if you so choose).
Where to find it
You can find the Ice Missile in Ghavoran after defeating the E.M.M.I. on the left side of the map. After you take it down, you’ll be rewarded with this ability.
Storm Missile

What it does
We love the Storm Missile because you can lock on to up to five targets at once with it. There are also locked doors tied to Storm Missile Boxes that you’ll now be able to destroy. To use it, hold down the R button and use the yellow laser to aim at your targets. Remember, you get up to five. However, if there are fewer than five enemies nearby, multiple missiles will connect with one enemy depending on how the shot is lined up. Keep in mind, this consumes three missiles (which is generous considering you get five shots).
Where to find it
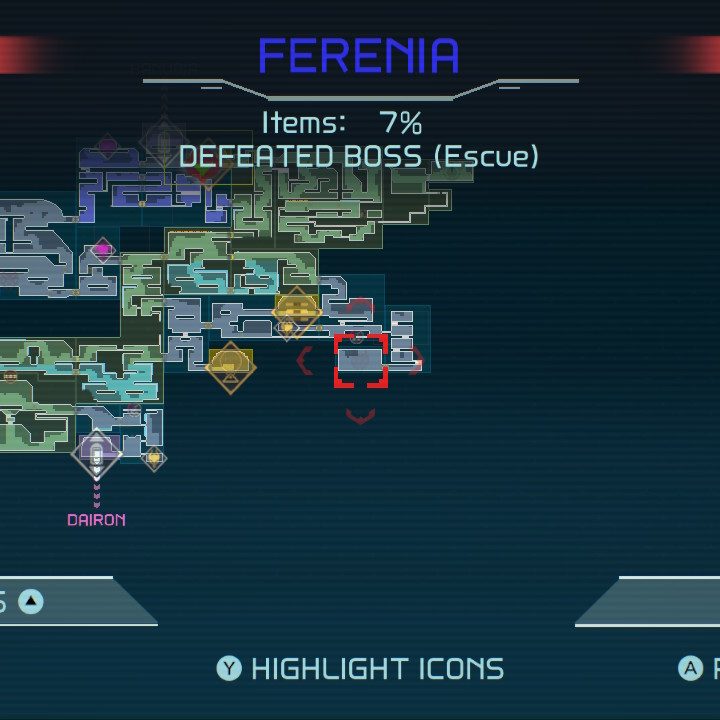
To unlock the Storm Missile ability, you simply have to defeat the Escue boss in Ferenia, located on the lower right-hand side of the map.
Space Jump

What it does
Think of the Space Jump as a suped-up version of the Spin Boost. You can basically use it to continuously jump, so long as your timing is right. Make sure you’re flipping in the air and then press B at the peak of the spin to jump again. Keep performing this maneuver to get to new areas!
Where to find it
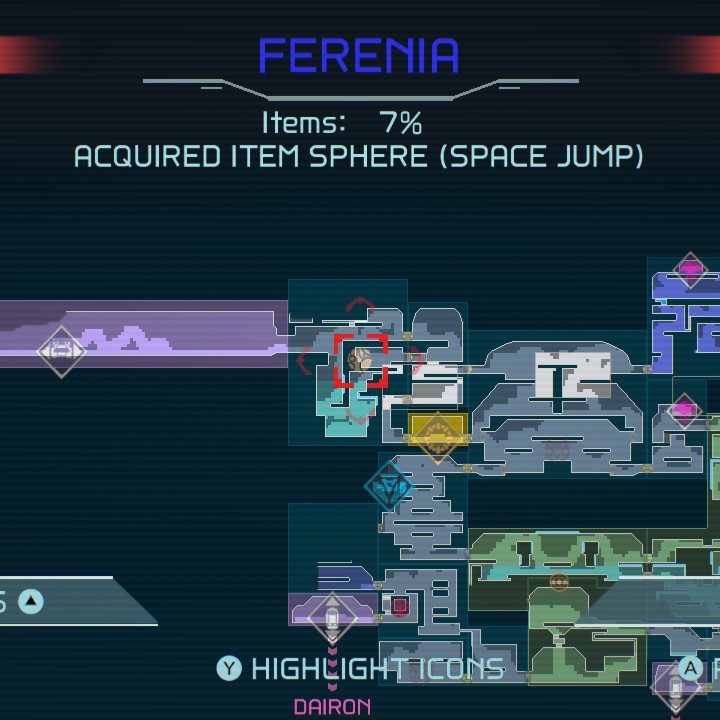
The Space Jump ability is found on the far left side of Ferenia, close to the shuttle that takes you to Ghavoran.
Screw Attack
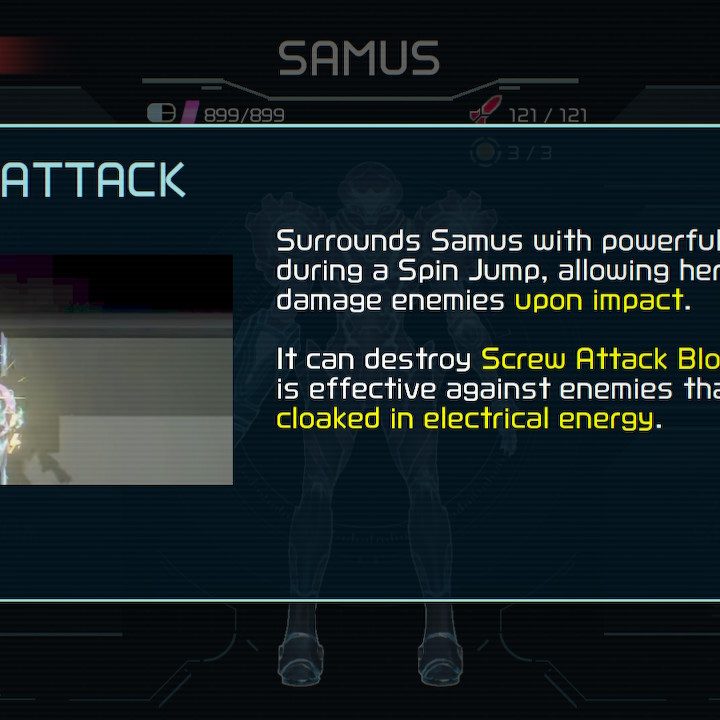
What it does
Once again, the Screw Attack is an enhanced version of the Space Jump. It allows you to continuously spin and deal damage to enemies if you touch them, while also letting you break through Screw Attack Blocks. It works almost identically to the Space Jump, so you should be used to the timing at this point. Press B at the peak of the jump and you’ll be able to jump again, and so on.
Where to find it
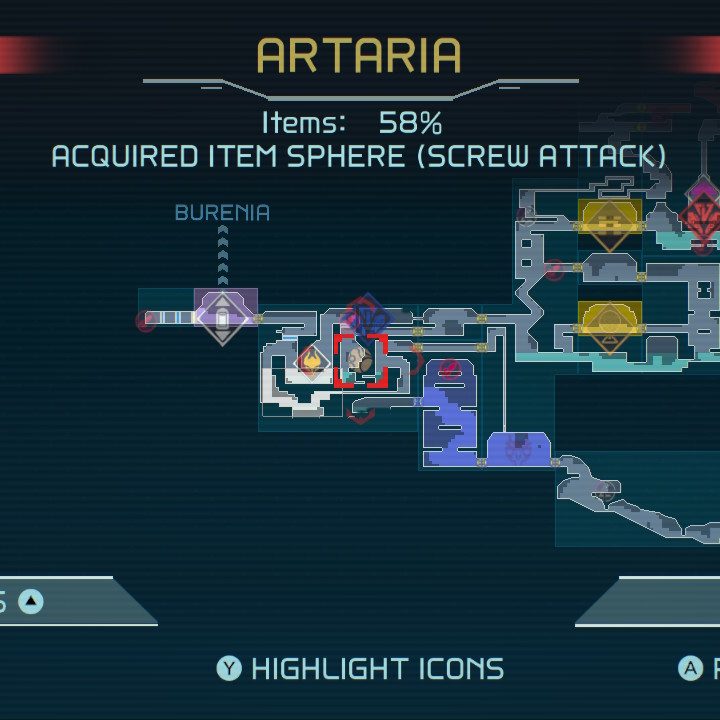
You’ll find the Screw Attack on the far left side of Artaria, but you can only get here during the later portions of the game. Use the map above to see its specific location, which is right next to the elevator that leads to Burenia.
Cross Bomb
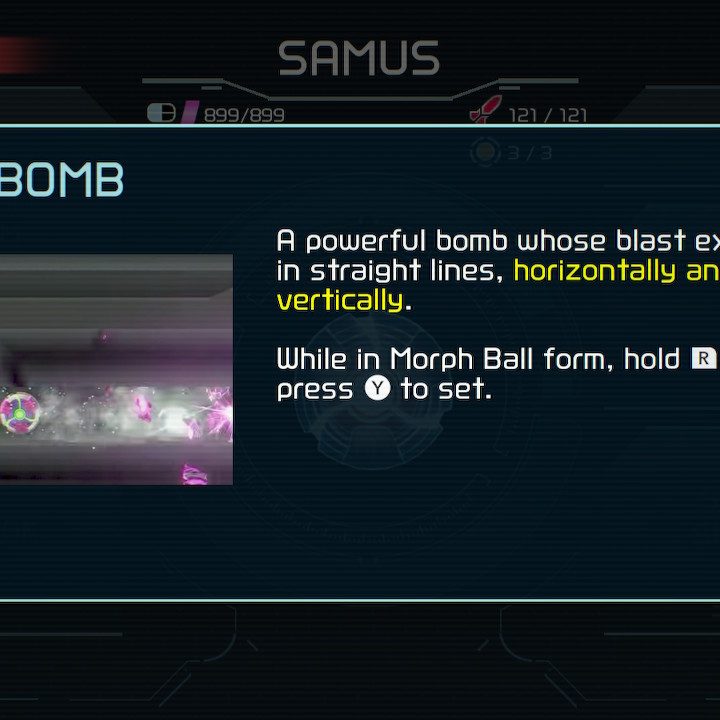
What it does
Likely one of the most underused abilities is the Cross Bomb, which allows you to destroy additional blocks both horizontally and vertically. While in Morph Ball form, hold down the R button and then press Y once to set the Cross Bomb. This move is effective for taking out multiple blocks at once, which you’ll need if you plan on collecting 100% of the items in the game.
Where to find it
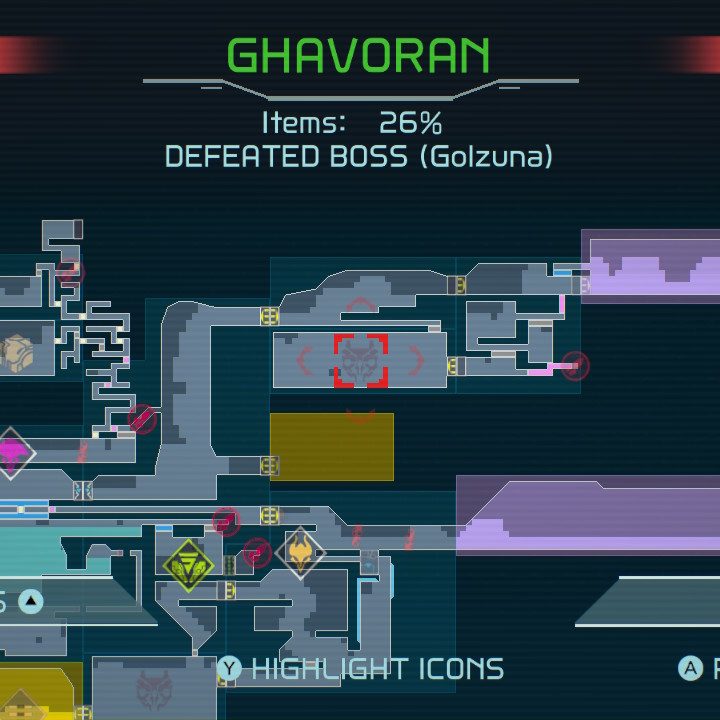
The Cross Bomb is rewarded to you upon defeating the Golzuna boss on the top-right side of Ghavoran.
Wave Beam

What it does
The Wave Beam replaces the Plasma Beam, allowing you to deal damage through walls and terrain. Once again, it’s simply tied to the Y button, so press it once to fire. This move also allows you to destroy Wave Beam Covers.
Where to find it
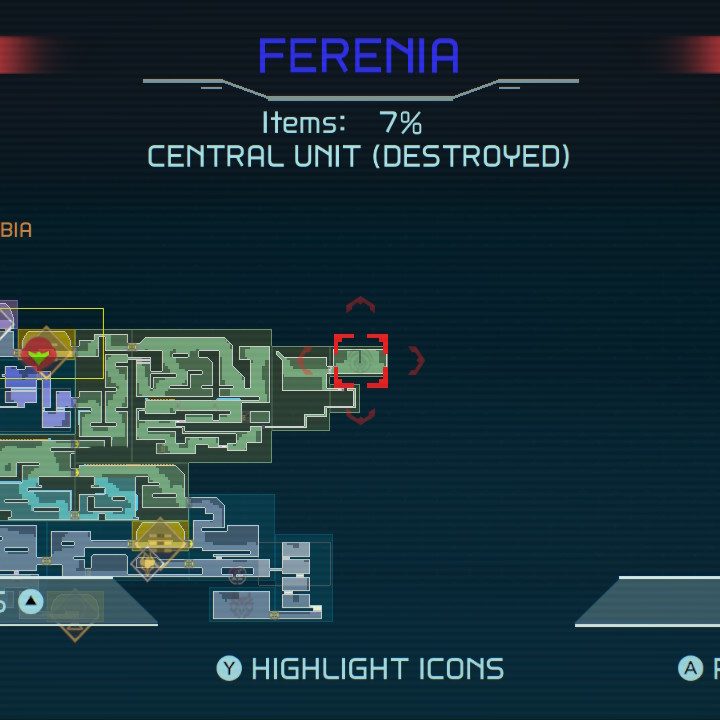
To acquire the Wave Beam, you’ll need to destroy the E.M.M.I. in the top-right section of Ferenia.
Power Bomb

What it does
Finally, the Power Bomb is not a wrestling move, but rather a deadly attack that wipes out all the blocks and enemies in the immediate area. It looks absolutely devastating when it goes off, almost like an exploding sun. It uses its own ammo, aptly referred to as Power Bomb Ammo. To use the move, you need to be in Morph Ball Form. Then hold down the R button to charge it, and once it’s ready, press the Y button to drop the bomb. Boom! It also destroys Power Bomb Blocks around you, so be aware of that.
Where to find it
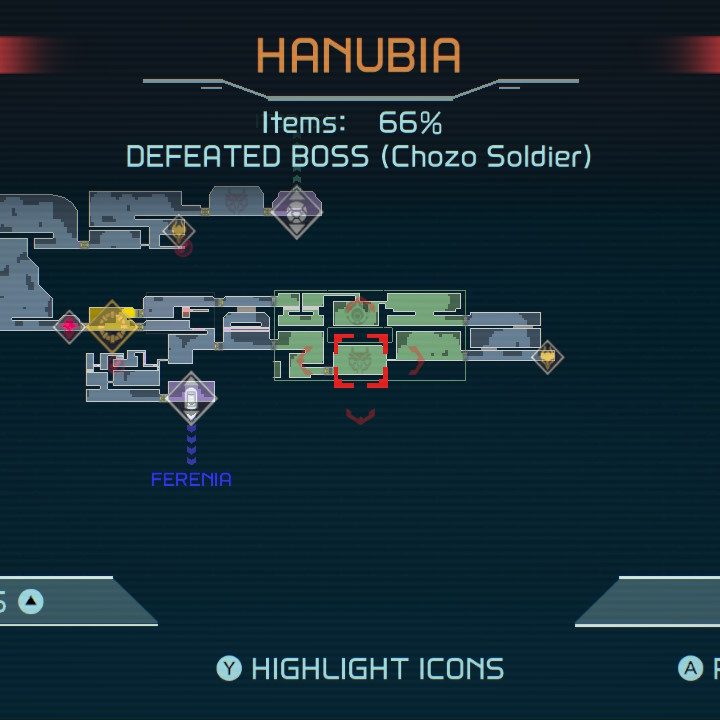
To gain the final upgrade, you need to defeat the Chozo Soldier in the lower-right portion of Hanubia. The fight is pretty tough, but by now you should be well equipped with enough gear to take the boss down.


