
Resident Evil 4 Separate Ways DLC: how to solve the lithograph puzzle in Chapter 4

Part of the way through Chapter 4 of Resident Evil 4‘s Separate Ways DLC, you’ll find yourself needing to track down some ingredients to make some new medicine. One of the first things you’ll encounter while doing so is a wall of lithographs that must be placed in a specific order to open a hidden door leading to a shield wall puzzle, which itself yields one of the necessary ingredients you’re seeking. Here’s how to solve the lithograph puzzle.

How to solve the lithograph puzzle in Chapter 4

When you first set off to find the ingredients, you’ll probably come across the wall with two lithographs set in it alongside two empty slots. This means you’ll first need to find the other two stone tablets – both of which are nearby and require minimal effort to round up. One tablet is easily found in the same room as the lithograph puzzle, while the other is on a desk in a room further down the main hallway.

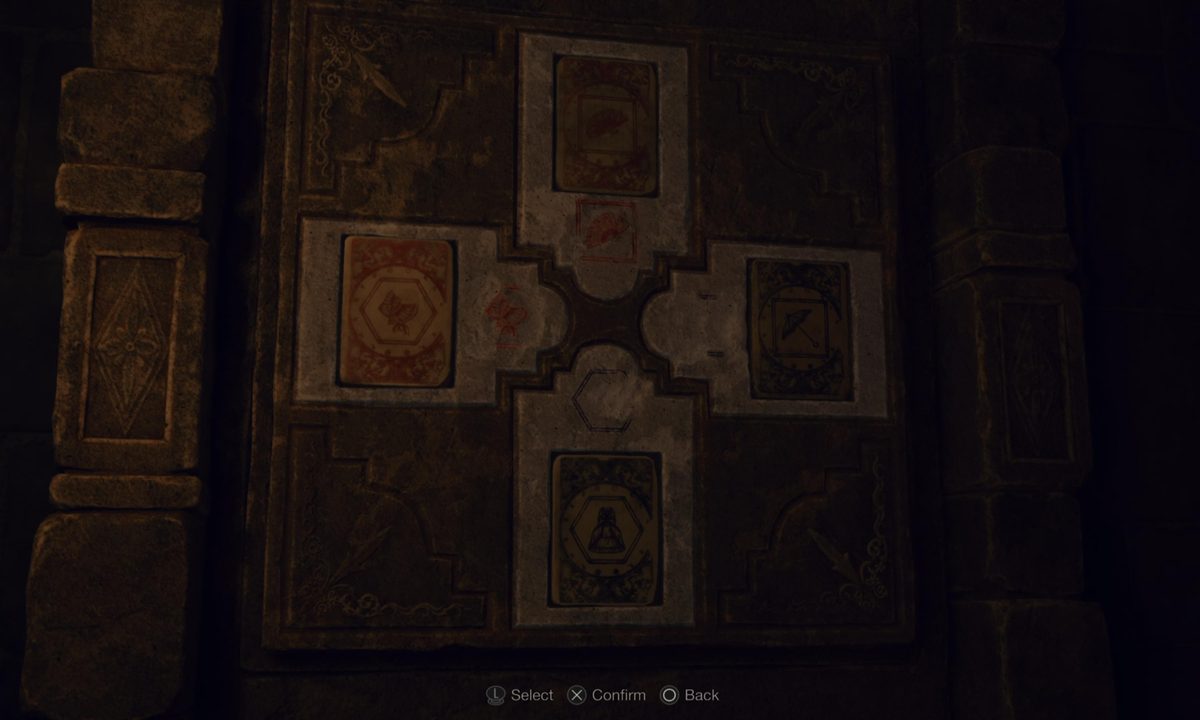
When you’ve obtained both lithographs, return to the puzzle and place the tablets into the empty slots. Notice next to each slot is a symbol (two of which are partially scrubbed off) that corresponds to one of the symbols on each of the lithographs. In order to solve this puzzle, you’ll need to not only match the appropriate symbol, but you’ll also need to select and flip the lithographs to the correct colors, too.

A wall with lithographs
Capcom

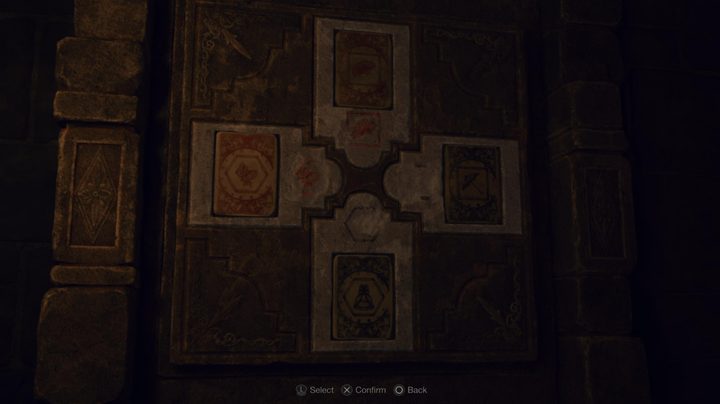
Starting from the top and working clockwise, here are the correct solutions.

  • Top: Red fan with square border
  • Right: Black umbrella with square border
  • Bottom: Black dress with hexagon border
  • Left: Red hat with hexagon border

By placing the lithographs in the proper slots and matching the colors, the door will open and lead you to a room with an even trickier puzzle you’ll need to solve to get the first ingredient needed for the medicine.

Editors' Recommendations

Billy Givens
Billy Givens is a freelance writer with over a decade of experience writing gaming, film, and tech content. His work can be…
All charm locations and effects in Alan Wake 2
Saga walks through Coffee World in Alan Wake 2.

Alan Wake 2 features an abundance of collectibles to find if you'd like to see and learn about everything the game has to offer, and some of them can actually come in handy for combat, too. While playing as Saga, you're going to want to keep your eyes open for charms to find and equip, most of which can be obtained by completing nursery rhymes around each of the game's three main maps. Below, we've listed all of the charms in the game, what effects they provide, and where you can find them.
All charm locations and effects
Logan's Charm
Effect: Increases your maximum health.

Location: Obtained automatically at the beginning of the game.
Coffee Mug Charm
Effect: Saves you from dying when your health is depleted, but it breaks immediately after.

Read more
How to show all collectibles in Alan Wake 2 with the Mayor Setter Charm
Mayor Setter

There are a lot of collectibles to find in Alan Wake 2, so you're probably wondering if there's a way to show them all on your map. The answer is yes, but only when having the Mayor Setter Charm equipped, which you can't obtain until pretty late in the game by visiting Mayor Setter himself. When that time comes, you may be shocked to find that Mayor Setter is actually a dog. Less shocking, however, is that you'll probably want to pet him.

Luckily, in addition to being a pleasant experience, petting this political canine will accomplish multiple useful things. For starters, you'll earn the trophy or achievement called "The Nice Things in Life," which marks one more thing off your list for 100% completion. But perhaps most importantly, Mayor Setter will bestow upon you the aforementioned Mayor Setter Charm. When wearing this charm in one of your charm slots, you'll be able to spot the locations of basically any collectible on the map, making tracking everything down significantly easier without a guide.
How to get the Mayor Setter Charm and show all collectibles on the map
Mayor Setter will spawn in the game in Return 6 after you've spoken with your colleagues in the police station and selected to continue exploring instead of passing the point of no return. At this point, you can return to your car and drive to Watery to find that Mayor Setter is sitting on the stage inside Suomi Hall where you can interact with him to earn the Mayor Setter Charm, which you can then equip to show all unfound collectibles on the map.

Read more
Where to get the Pilgrim’s Perch Key in Lords of the Fallen
Stomund from Lords of the Fallen

Like any good game in the Soulslike genre, Lords of the Fallen is filled with intricate explorable areas featuring branching pathways and well-hidden secrets. To uncover them all, you'll have to take things slow and be extremely thorough, but even if you're checking every nook and cranny, you'll occasionally find that you're missing an important item or key needed to pass through specific barriers. For instance, early in the game while exploring Pilgrim's Perch, you may come across a door or two that requires a Pilgrim's Perch Key, which you actually won't be able to find in the area itself. Don't worry, though – we'll tell you where to get it below.
Where to get the Pilgrim's Perch key
The Pilgrim's Perch Key can be purchased for 9,500 Vigor from Stomund, Captain of the Fidelis in Skyrest. You can find this NPC standing to the right of the vestige, but he'll only start selling you items after you've exhausted all of his initial dialogue, so be sure to speak with him multiple times if you haven't already.

It's perfectly reasonable to see the cost of the Pilgrim's Perch Key and feel a bit overwhelmed – that's an absolutely staggering amount of Vigor to obtain early in the game. However, it shouldn't take too long to farm it up, especially if you use our favorite XP farming spot a bit further into Pilgrim's Perch. Plus, the cost will be worth it, as you'll be able to open various doors throughout Pilgrim's Perch that lead you to new areas and rewards.

Read more