
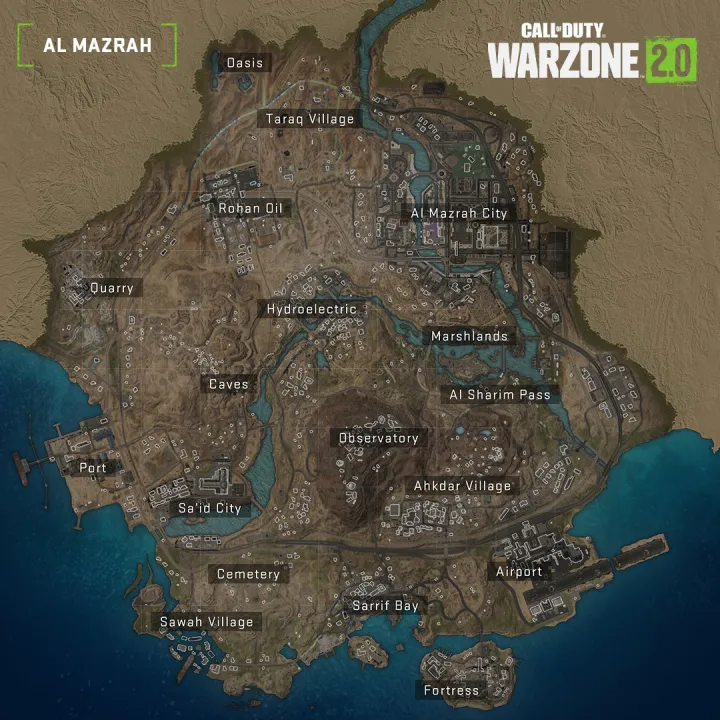
Where are we dropping? Now that Warzone 2.0 has come out and introduced the brand new Al Mazrah map, that’s a tough question to answer. Just like with the original Warzone, where you choose to land will have a major impact on how long or short your game will last. This new map is packed with named locations of various sizes, layouts, and general loot quality. Plus, Warzone 2.0 introduces Strongholds with AI soldiers to add even more to consider.
The best place to drop in Warzone 2.0 will depend on a few things, such as the initial path of your drop, whether you’re with a squad, and if you prefer to land in a hot zone or would rather play it slow and safe. No matter which situation you find yourself in, we’ve got the best options to give you a fighting chance at victory. Here are the best places to drop in Warzone 2.0 to claim victory on Al Mazrah.
Further reading
- The 7 biggest differences between Call of Duty: Warzone and Warzone 2.0
- Call of Duty: Modern Warfare II tips and tricks for multiplayer
- The best Call of Duty: Modern Warfare II killstreaks
The Quarry
We’ll start off with a familiar location that has been reworked from the first Call of Duty: Modern Warfare 2 for Warzone 2.0. The Quarry is on the northeast side of the map and is a wide, spread-out series of structures that allows teams to do some looting before instantly getting into the action if you play it smart. You likely won’t be the only team to seek out this location, but it’s certainly big enough for a few teams to land and grab some starting guns before engaging anyone else. The loot itself is generally middling but perfectly serviceable to get you started before moving in on more dangerous locations.
Taraq Village

Another northern option to consider is Taraq Village. It’s another wide-open area, but a smart choice due to it being near other, more popular drop sites. If you land here early, you and your squad could grab up some guns relatively uncontested and then have a nice tactical advantage when moving on to your next area, thanks to the elevation advantage this village has over places like Al Mazrah City. If you get a decent sniper here, you’ll have easy pickings when you’re ready to move out.
Sawah Village

This zone is tucked away on the coast, where most people generally won’t bother to go. That’s their loss, however, since any team that does drop will typically have free access to the entire area’s loot. The real advantage of Sawah Village, though, is the Stronghold in close proximity. Once you’re geared up and safe after landing, you can instantly get some higher-tier loot by raiding the Stronghold that shouldn’t be crowded with other teams.
Sarrif Bay

Sarrif Bay is a lot like Taraq Village in that it initially doesn’t look like a place anyone would want to drop but secretly has some nice advantages. For one, it is close enough to the Airport and Fortress, which are very hot drop spots that most other teams will prioritize going to. If your squad can gear up quickly, you can use this position to clean up weakened teams fighting in that area from an elevated position. It is a bit more dangerous than the previous options. However, there are plenty of escape options.
The Observatory

Essentially in the dead center of the map, The Observatory is a riskier choice but a great tactical advantage if you can claim it. Not only is the loot great, but the positioning and elevation make it ideal for scouting and being in a perfect spot to pivot, depending on how the circle decides to close in. If you drop here, just know you’ll be in for a fight, so give yourself the best odds of winning those initial fights by securing the high ground and rooftops.
East Suburbs
The East Suburbs is the largest single location on the entire Al Mazra map, with the only exception possibly being Al Mazrah City itself, making it both a hot landing spot and also the safest in that category since you have so much room to divert your course if you want. It’s packed with essentially everything you could need, from guns, armor, and even fueling stations to a store and a hospital. The great thing about this location is that you can sort of dictate how dangerous you want it to be. You can try and hit one of the major spots there and ensure an early fight, or pick a spot on the outskirts and work your way in once the other teams have started to engage each other.
Al Mazrah City
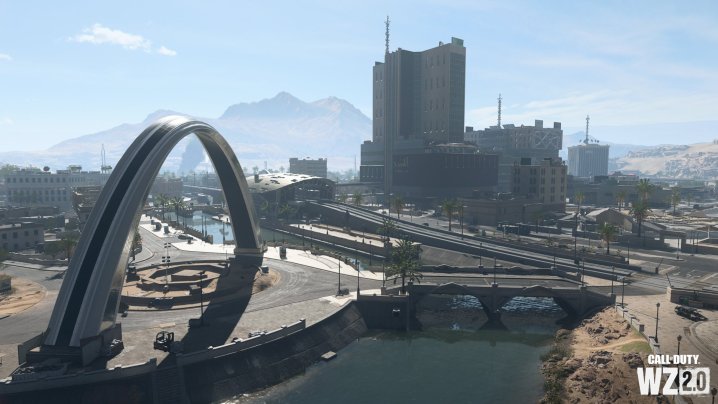
Finally, there’s the map’s namesake in Al Mazrah City. If you’re landing here, you’d better be looking for some instant action because that’s what you’re going to get. Unless there’s some crazy fluke, this is going to be the hottest spot to drop in every game. The loot here is some of the best you can find on the map, and there’s quite a bit of it to claim. That’s assuming you and your team live long enough to get your hands on it. There really isn’t anywhere safe to land here, thanks to the skyscrapers providing excellent sniping positions and tons of buildings for teams to flank and run through. Unless you and your team are very confident or are just looking to have some quick, chaotic fun, maybe try one of the less-risky drop spots.
Editors' Recommendations
- The best Dragon’s Dogma 2 mods
- The best item recipes in Dragon’s Dogma 2
- The best places to land in Fortnite (Chapter 5, Season 2)
- The best armor in Helldivers 2
- Best Stratagems in Helldivers 2


