

Building a PC for the first time, or even the second or third time, can feel a little intimidating. But one of the best parts about building a computer is that, for the most part, the parts fit where they should, and don't fit where they shouldn't. A graphics card will fit in the graphics card slot, and good luck putting the CPU in the wrong socket.
With a little care, time, and this handy guide, you can build a PC without hassle. We're here to walk you through it.
Of course, building a PC isn't a quick task you can knock out in a few minutes. Most people will spend a few hours putting together their rig – not including all the time they spend looking for the best components and the best prices.
If you're thinking about building a PC from scratch, here's everything you need to know. This includes a look at all the required components, important safety gear, and how to install every piece of hardware.
For more guidance, be sure to look at our roundups for the best graphics card, best processor, and best motherboard.

What you need to build a PC
This is a guide on how to build a computer, but you can't do that until you have all the parts a computer needs. If you haven’t selected and purchased all the required hardware, make sure you do that first. Also, make sure that it's all compatible and that it will fit inside whatever case you want to build it in.
Here are the core components to build a PC:
- Case
- CPU
- CPU cooler
- Motherboard
- RAM
- Solid state drive (SSD) and/or a hard drive.
- Power supply
- Graphics card
Multiple PC components need to be compatible with each other, which can create some headaches for newcomers. To help you, we're put together guides on how to buy a processor, and how to buy a graphics card. We also have some tips on what to look for when buying a motherboard.
Before you dig in, ensure there’s a clean workspace with plenty of room to open boxes and put parts together, preferably a desk at a comfortable height for working on.

Safety first
There’s an invisible risk when building a computer that you rarely have to worry about with an assembled PC: static electricity. The same force that lets you shock your friends when you wear wool socks can also fry components in a heartbeat. Fortunately, static is easy to all but eliminate with a few simple steps.
One solution is to purchase an antistatic wristband. One end wraps around your wrist, and the other clips somewhere on the computer case, keeping the wearer constantly grounded. Touching the case frequently with the PSU plugged in and powered off achieves the same effect.
Make sure you're building your PC in a room with a bare floor if you can — carpets generate a lot of static — and wear rubber-soled shoes rather than socks. Many components ship in antistatic bags, so leave them bagged until just before installation.
These precautions are important whether building a new system or upgrading your old PC.
Opening the case
You can't build a PC in a case without opening it first. The instructions included with the PC case should introduce you to its basic layout, as well as list special instructions regarding component installation.
Lay down the case in your work area and remove the side panel. For most PC cases, this means the left-side panel when viewed from the front. This panel provides access to the case interior.
Also, remove anything that’s dangling inside the case. If it’s attached, push it aside. Many cases have permanent internal wiring that becomes problematic later on.
How to install the power supply
The first component to make its way into the case should be the power supply (PSU). It is typically located at the rear of the case, usually at the bottom, but in older chassis, it can be at the top. Consult your case’s manual if you have trouble finding the proper location.
Step 1: Most cases are designed for the PSU to be installed with the fan facing down, letting it pull cool air from outside the case, but check your manual if you're unsure. You may need to remove a PSU mounting plate depending on your case, but most will require you to push the PSU into the rear of the case, from the inside.

Step 2: Attach it to your case using appropriate screws or thumb screws.

Step 3: If your power supply is a modular PSU, plug in the power cables that you need for your various components. If you're not sure, though, don't worry, you can plug them in later as and when needed. If your PSU is not modular, you'll have all the cables already installed.


How to install the processor
Although you don't have to, it's a good idea to install the processor before you put the motherboard in the case, as access is far easier.
Step 1: Carefully remove the motherboard from its antistatic bag and set it on a hard, flat, nonmetal surface such as a wooden desk or the top of the motherboard box itself.
The process isn’t designed to be difficult, and as long as you follow the instructions clearly and keep an eye out to ensure the chip is fully seated before you clamp it in place, you’ll be fine. However, there are some subtle differences in the process depending on who made your CPU, and processors are delicate, so be careful.

Step 2: Locate the square CPU socket. If the motherboard is new, it'll have a plastic cover on it. Unhook the metal retention lever and lift it up to free the plastic cover, and remove it.
Step 3: To install the CPU, you need to line it up correctly. On most Intel CPUs, you'll have notches on the side that allow you to only place the CPU in one orientation. On the latest Intel CPUs, you get a little golden triangle in one corner to help you align it properly. The same is true of all modern AMD processors.
Pick the processor up by its sides, taking care not to touch the underside, and align it correctly using whatever aids you're given. Then gently place it into the CPU socket. Double-check it's in the right place, by giving the CPU a little nudge from side to side. If in place, it'll move a tiny amount. If it isn't in the right orientation, it'll slide out of place. In that case, remove the CPU and check alignment before reinstalling.

Step 4: Once you're happy that the CPU is correctly installed, press the retaining arm down firmly but gently until the CPU is locked in place. This can take quite a bit of pressure, but it shouldn't be hard. If in doubt, check again that the CPU was seated correctly before locking it down.
For specific instructions, we have guides for installing an Intel CPU and for installing an AMD CPU.

How to install RAM
System memory, or RAM, doesn’t require any careful placement or wires and is one of the easiest components to install. The only caveat to that is choosing the right slots, as most motherboards come with four, and the best ones to use differ from motherboard to motherboard, so check your manual about which slots to install your new RAM in.
Before starting, ensure that your motherboard is well supported across its entire surface, as it is possible to put too much pressure on the motherboard when installing RAM if you push too hard. This is unlikely, but as with any steps in this guide, take care, and if in doubt, double-check everything before proceeding.
Step 1: When you know which slot to install your RAM in, push the plastic wings at either end of the slot down and outward (some motherboards only have one). Then, to confirm you have your stick turned around the right way, make sure the gap in the RAM stick's metal connectors lines up with the notch in the slot.
Place the stick in the slot sticking straight up. Push down firmly until the RAM clicks into the slot and the plastic wings click back in and clamp the ends of the sticks.

Step 2: Repeat the same process for each stick you have until all of your RAM is installed.
We put together a more detailed guide for how to install RAM if you need additional information.


How to install the motherboard
The motherboard is the most unwieldy component in your system, but since it acts as the foundation for everything else in your case, installing it correctly is of paramount importance.
Step 1: If your motherboard doesn't have an integrated rear panel, take it from the box — it looks like a small cutout of all the different motherboard ports — and install it in the back of your case by orientating it properly and pushing it in. Double-check that it aligns with your motherboard's outputs before plugging it in if you're not sure which way it goes.
Step 2: To install the motherboard, you have to screw it into the insulating standoffs that prevent your components from shorting. Some cases come with these pre-installed, while others need you to install them yourself. They’re easy to identify because they look unusual — they're essentially screws that have another screw hole on top instead of the typical screwdriver notch. They’re usually gold or black.
If necessary, screw your motherboard's standoffs into the correct holes depending on the size and layout of your motherboard. You can look at your motherboard to figure it out or install them where your manual suggests.
Step 3: Place your motherboard into your case, and push and wiggle it into place so that it slots into your I/O panel and has all of its screw holes lined up with the motherboard standoffs underneath.
To attach your motherboard to the case, screw it in. First, seat the screws and give them a couple of precursory turns. Then, proceed in a star pattern, tightening each screw a little at a time. Don’t go wild while tightening, as you might damage the board. You only need enough torque to hold the board in place without it wiggling.


Step 4: Once the motherboard is seated comfortably in the case, there are a few necessary connections.
The motherboard’s main power connection is a wide, two-row cable that fits snugly into a similar-looking spot on the board itself. This 20- to 28-pin connector powers both the motherboard and the CPU. However, some boards have one or two more four-pin or eight-pin connectors for the processor, which resides near your CPU, typically in the top corner. If you have them, you’ll need to plug them in, too.
Connect the case plugs and buttons to the motherboard. A double-wide row of pins — the location of which will be noted in your manual — handles the buttons for reset and power, and activity LEDs for power and storage. These can be especially fiddly, but you need at least the power button connected in order to turn your PC on.
The USB headers and front-panel audio connectors will be on their own. These connections are around eight by two pins, and they’re enclosed in a larger plastic housing. This header has a notch on one side that should clearly indicate which direction it plugs in.
At this stage, it is important to keep in mind the organization of devices and cables within the computer. Use our PC cable management tips to ensure the internal airflow is not hindered.


How to install the CPU cooler
Installing a CPU cooler differs depending on the cooler you're using, so for specific instructions, please refer to the manufacturer's manual or support site. Here are some simple instructions that apply to almost every cooler.
Note: In the below images, we're installing an all-in-one (AIO) water cooler, but the tips apply to most air coolers as well.
Step 1: Every cooler needs thermal paste. You don't have to use the best thermal paste, but make sure you use some. It typically looks like a silver paste and comes either pre-applied to the cooler or in a short syringe tube.
If you're reapplying heat paste, be sure to remove the original heat paste with a lint-free cloth and a little isopropyl alcohol.
When your CPU is ready, Apply a pea-sized amount to your CPU in the center.

Step 2: If your CPU cooler requires it, remove your case's other side panel and attach the custom backplate design. You may need to remove the stock backplate from the motherboard first.
Step 3: Place the CPU cooler on top of the processor, and press down gently. Line up any retaining brackets or bolts with the CPU cooler mounting holes on the motherboard.
Install the retaining screws/brackets to secure the cooler in place. If you have to tighten several screws, be sure to do them a couple of turns at a time in a cross pattern so that you don't put too much pressure on one portion of the CPU. Make sure that they are tight enough that the CPU cannot wiggle around, but don't overtighten.


Step 4: If your cooler has a separate fan, attach it now, and plug its three-pin or four-pin connector into the CPU cooler port on the motherboard. It should be located near the CPU cooler. If it has multiple fans, either plug the additional ones into extra motherboard headers or use a fan splitter to power both from the CPU fan port.
If you're installing an AIO watercooler, mount the radiator at an appropriate point in the case (at the front or rear air intakes/exhaust are common) and attach the fan's header to the correct port. You may also need to attach the pump header, which some motherboards have specific ports for.

How to install the graphics card
Not every system needs a dedicated graphics card (discrete GPU), but if you're building a gaming PC, it's a necessity.
Intel processors mostly come with integrated graphics, so if you're not gaming, you don't need a separate graphics card. Look out for processors with an "F" at the end, though — they don't include integrated graphics.
Before proceeding, consider whether you want a standard horizonal installation, or if you want to install the GPU vertically.
Step 1: Modern graphics cards use a PCI-Express (PCIe) x16 slot. It’s a long, thin connector located on the rear of the motherboard, below the processor. For the vast majority of motherboards, you’ll want to use the top PCIe x16 slot.
To seat the card in that slot, you’ll need to remove one, two, or, in some cases, three rectangular backplates from your case. It’s one of many thin metal brackets lined down the back of the case to keep it sealed up. Do this by removing the screw(s) that secures the backplate(s) to the chassis. Once removed, the plate should slide (or fall) out freely.
Keep the screw, as you’ll need it in a moment.
Step 2: Grab your graphics card and, making sure the ports are aligned to the rear of the case and the PCIExpress connector is facing down, carefully slot it into the motherboard. You should hear a click when the motherboard locks it into place, but that's not always the case on every motherboard.
You don’t need excessive force, so if you encounter a great deal of resistance, take another look at the backplate and PCIe slot to make sure both are clear and the motherboard is properly aligned. Also take note if there is a pushpin that locks the card in like your memory slots, as some motherboards use it as a safety measure.

Step 3: Use the screws pulled from the metal brackets to fasten the back of the card into the same spot in the case. Again, they don’t need to be extremely tight — just enough to hold the card firmly in place.

Step 4: Most graphics cards need more power than the PCIe slot provides. If your card needs extra juice, you’ll see one, two, or even three PCIe power connectors on the card’s side facing away from the motherboard or, in some cases, on the top of the card. This can be a traditional six- or eight-pin PCIe power connector or a new mini 12- or 16-pin design for new Nvidia GPUs.
Find the appropriate connector on your power supply, sometimes labeled VGA, and slot it in. The connector’s design prevents improper installation, so if the connection isn’t easy, double-check your alignment to make sure it’s correct. If your PSU doesn't have the required native connectors, you may need to use an adapter, which should have come with your graphics card.
If you need additional help, we have a detailed guide on how to install a graphics card that provides additional information.


How to install expansion cards
Graphics cards aren’t the only components that use PCIe slots. Other add-in cards include wireless networking, sound, video capture, and even storage. Their installation is no different than adding a discrete GPU.
There are a few different types of PCIe slots. Many expansion cards use the “PCIe 4x” slot, which is much shorter than the full PCIe slot used by video cards. A quick check of your motherboard’s connectivity, and the size of the connector on your card, will make it obvious which slot is appropriate. If in doubt, refer to the expansion card’s manual.
Step 1: Remove the metal bracket at the back of the case that corresponds with the PCIe or other expansion slot playing host to your add-in card. Keep the bracket screw handy so you can use it to secure your new card.
Step 2: Line up the row of contacts on the card with the slot and firmly push down. If the card requires any additional power from SATA or four-pin Molex connectors, find the right cables and plug them into the card.
Step 3: Secure the card in place by screwing it into the back of the case.

How to install hard drives and SSDs
There are three different storage drive sizes you’re likely to encounter, and they all mount and connect differently. Generally, hard disk drives (HDD) are the larger 3.5-inch size, while newer solid-state drives (SSD) adopt the smaller 2.5-inch size. There’s also the even smaller M.2 format and PCI-Express drive format, which tend to be thin sticks with bare chips measuring around a few inches long.
Make sure you know the difference between NVMe, M.2, and SATA drives.
Step 1: To install a hard drive, find the 3.5-inch drive mounting point(s) in your case. These can be full hard drive cages with multiple mounting points, or it might be just space for a single drive with screw holes right in the case. If in doubt, refer to your manual.
Slot your drive into the appropriate place and screw it or lock it into place using your case's mounting system. When in place, attach the SATA data cable to the drive and the motherboard, and attach the SATA power connector to the drive.


Step 2: To install a SATA SSD, repeat the same steps as the larger hard drive, only changing the mounting point to an appropriate 2.5-inch cage or slot — sometimes these are found behind the motherboard tray. Make sure that it is secured in place, and attach both the SATA power and data cable.


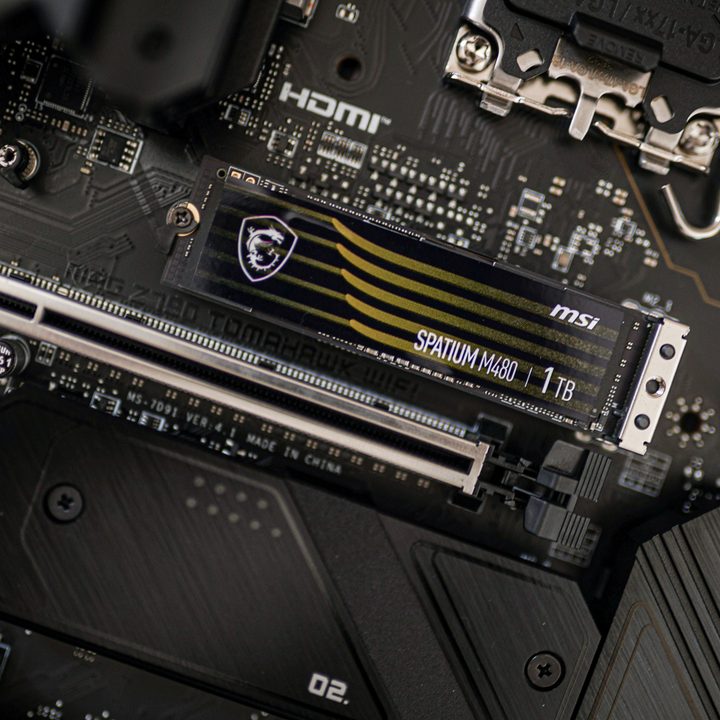
Step 3: To install an M.2 NVMe SSD, locate the appropriate slot on your motherboard. It will be labeled, but it is pretty small, so check your manual if you're unsure. Some manufacturers place the M.2 port on the back of the motherboard.
Remove the retaining screw and slot in the drive at a 45-degree angle. Gently but firmly push down on the drive until it clicks into place, then replace the retaining screw.
Step 4: To install a PCIe SSD, choose an appropriate PCIe slot on your motherboard. The 16x slots will offer the most bandwidth, but that may not be necessary for your particular drive's bandwidth. Consult the drive's manual for confirmation on which is best for your particular motherboard.
Angle the drive with the gold contacts down, then gently push it into the PCIe slot. It should click into place when it is locked in. It shouldn't take much force, so if it gets stuck, check the alignment.
Attach any necessary additional power cables.
Turn the PC on
Step 1: Switch on the power supply and press the Power button on the front. If all is well, it should display the post screen or manufacturer logo on the monitor and then move on to Windows installation or the login screen. If it doesn't, however, don't fret. It's not uncommon for PCs to need to reboot a couple of times on their first startup, and some can even take a couple of minutes to boot the first time while they configure memory and other components.
If you encounter any error messages or beeps, refer to your motherboard's manual to decode the message and figure out what you need to fix.
If you don't get any power at all, turn the power supply off and double-check all of your connections. Make sure the wall socket is turned on, too. For further help, consult our PC troubleshooting guide.
Step 2: Once the system does boot up, you'll need to install Windows. If you're not sure how, here's a quick guide on how to download and install Windows.
Step 3: Once you reach Windows, you'll need to install drivers. Windows 11 already supports modern chipsets and automatically downloads and installs the remaining drivers in most cases. Check the Update and security menu in the Settings pane for more information regarding this process.
If that doesn’t work, the chipset driver for your motherboard will handle most connectivity and onboard features, though this varies greatly based on motherboard and component manufacturers. You can download the latest version(s) from your motherboard manufacturer's website.
If you have a discrete graphics card, you’ll need to download your graphics drivers from either the AMD page for Radeon drivers or the Nvidia page for GeForce drivers.

Don't forget peripherals
It's easy to get wrapped up in the thrill of building a gaming PC and forget that you need peripherals to make it function. We have guides to help you out if you still need a keyboard or are interested in the best computer mice. You should also consult our list of the best computer monitors.
With some luck and a lot of attention to detail, you should have a fully operational system. Keep an eye on your system temperatures for a few days to make sure all the coolers are working correctly, and if an error message pops up, take care of it accordingly. After a few weeks, you’ll get the hang of your machine and be more confident in what you can push it to do. If something breaks or needs an upgrade, you’re fully equipped to deal with it.
Going forward, set a reminder to ensure you regularly clean inside your PC to help ensure performance.


