
The first raid in Destiny 2, Leviathan, is the toughest content the game has yet made available. The hours-long multi-stage battle requires a team of six players — more than anything else you’ll do in Destiny 2 — and requires you to be at the top of your game with a recommended Power level of at least 270. A big part of every raid is dying over and over again to figure out what to do, but you can skip those hours with our handy Destiny 2 Leviathan raid guide.
From strategies for each encounter to what to expect from enemies you’ll face, we’ve got it all. Here’s how to clear the Leviathan raid quickly and efficiently with all your Destiny 2 pals.
Recommended gear
Generally, you want your Power level to be as high as you can get it for the raid. The recommended level is 270, but higher is obviously better, and teams in the 280s should be able to handle some of the tougher, damage-dealing portions of the raid much more easily than teams with lower numbers. It’s worth the investment of time to bring high-level gear with you.
Apart from that, you’ll find much of the raid includes close-range encounters with tough enemies, so reliable high-damage weapons are a lot of help. There are also a few Exotic weapons that seems specifically geared toward the raid.
Rat King
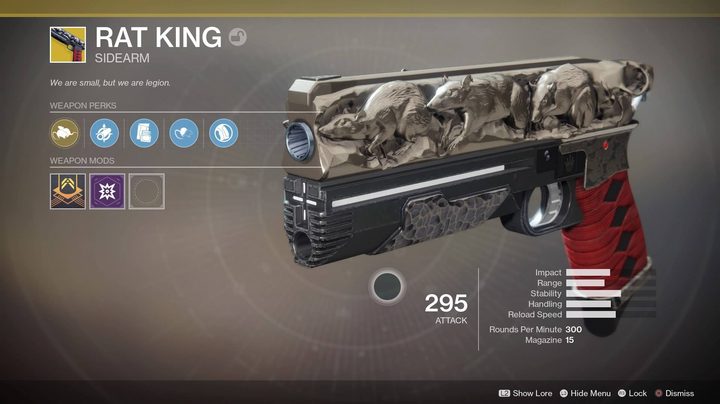
It’s tough to unlock the Rat King Exotic sidearm, but if you and your team can manage it, it’s a great gun to have with you. It’s a fast, effective kinetic weapon, but its best feature is that it gets a power buff for each other player who’s also using it. That means you can get up to six times the power out of Rat King during the raid.
Skyburner’s Oath
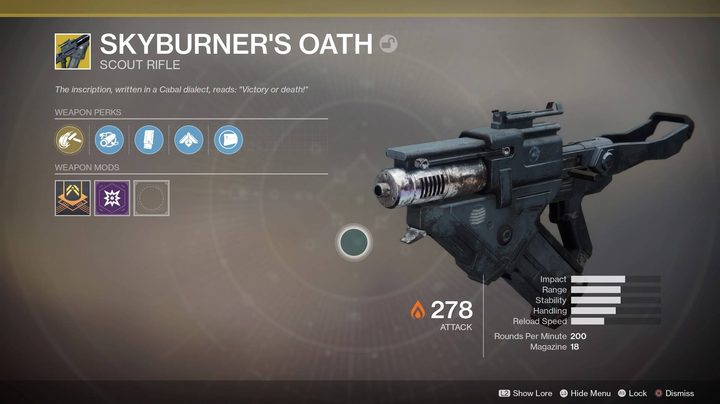
This anti-Cabal Energy weapon is basically designed for the raid. It’s a bit slow-firing, but it can be handy in a lot of situations, especially toward the end of the raid. It does extra damage when you aim down the sights, it can fire in full-auto mode, and it ignores Cabal Phalanx shields, which are those annoying riot shields that some enemies carry around. Phalanx enemies are especially irritating in the final phase of the raid, and a gun that can pop those guys without issue can be extremely handy.
Curtain Call
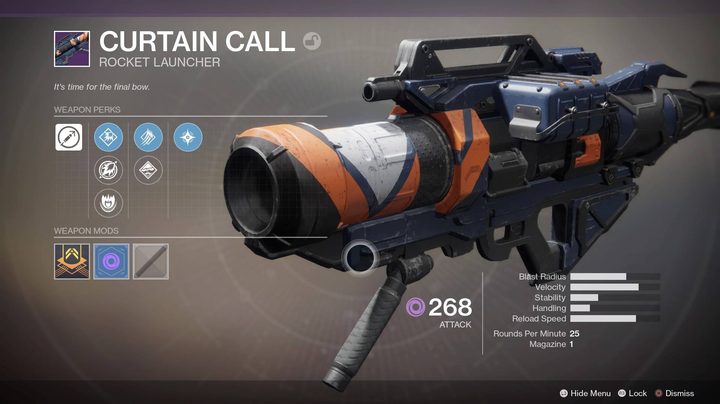
Judicious use of Power weapons is key to surviving aboard the Leviathan, and Curtain Call is extremely useful in a lot of cases. Its powerful rockets explode into additional cluster bombs that spread out, wreaking havoc over a large area. In portions of the raid where you have to fight lots of tough enemies at once, a bunch of giant explosions can be extremely helpful.
So it begins…Leviathan Castellum
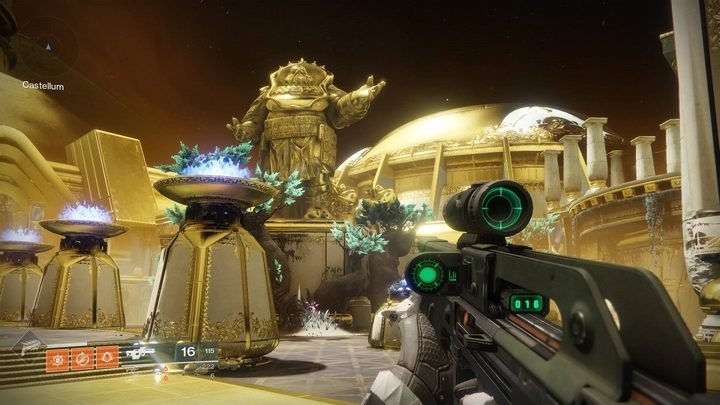
Your first task in the raid is to find your way through the entryway, which will continually fill up with enemies. You’ll actually venture to three different locations throughout the Leviathan, and unless you find secret paths through the underbelly of the ship, you’ll continually return to the entry room to open the doorways to each new encounter.
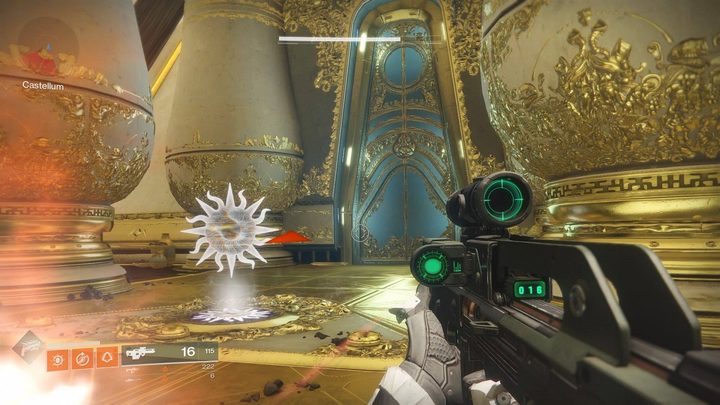
Head through the room until you find a doorway with a small white glowing seal in front of it (see screenshot, below). You’ll need to bring three keys to back to this location to open the door behind you. On the seal are three symbols, one of which will appear as a hologram levitating off the ground. The hologram indicates which key you need to go get, and which enemy you have to kill to get it.
Around the room are four symbols in front of doors where enemies will spawn. A chalice; two battle axes crossed; a beast; and a sun. Take note of these symbols, because you’ll be dealing with them a lot throughout the raid. The hologram symbol on the seal will indicate which door to head to.
All the while, the room will fill with a variety of minion enemies. You’ll want to split into two teams. Leave about four people behind at the seal to protect it, and send two other people out into the room to hunt down the keys. Head to the doors denoted by the hologram symbol, where you’ll find a variety of Cabal enemies and one bigger guy with a yellow health bar, called the Standard Bearer. Kill him and he’ll drop the key you need, which you’ll then need to pick up and run back to the seal.
Once you have your first key, a new kind of enemy will appear and bee-line for the seal, called a Standard Liberator. They’re tougher than regular Legionaries and make their way straight for the seal that blocks the door. If a Liberator makes it to the seal, it’ll steal the last standard you brought to the lock, so you’ll have to recapture it. This is why you need to leave behind several team members to protect the seal. The fight there will be tough, and gets more and more difficult over time. The upshot is that standing on the seal gives you the Force of Will buff, which makes you a little more effective on defense.
Every so often when you kill a standard bearer, you’ll see a notification in the bottom left corner of the screen telling you a Consular has appeared. These are strange, Psion-looking guys who float in round orbs, and show up at specific points around the room. When a consular appears in the room, you need to dispatch someone to locate and kill it by running up and using a melee attack inside its bubble. If you don’t, the Consular will project invulnerable shields to protect both Standard Bearers and Standard Liberators.
It’s worth making a note of what the Consulars (also sometimes called Projections) look like, because you’ll need to deal with them a lot throughout the raid, and they always need to be killed as quickly as possible.
Killing the three Standard Bearers and bringing their standards back to the seal will open the first door, allowing you to head through to the Royal Pools.
Royal Pools
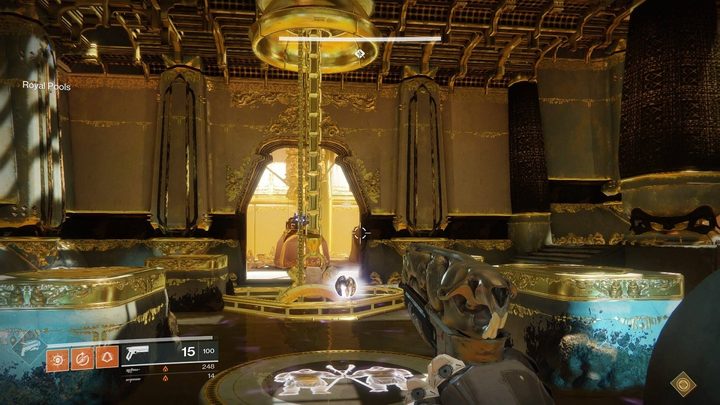
The Royal Pools make the Castellum look pretty simple and tame by comparison. This is your first hard fight of the raid, with lots of mechanics that require each member of your Fireteam to take on a specific role.
The room is a big square, and in each of the four corners are the four emblems you saw in the Castellum: Crossed axes, sun, chalice and beast. Each is set in the middle of a pool of corrosive purple water that will injure you if you stand in it, with a big chain in front of it.
In the center of the room is another emblem, and three sets of chains, with one in the back and two in the corners. These three sets of chains in the center room are your true goal for this room. Eventually, each of the three sets will raise three cisterns out of the water in the room, and you’ll need to shoot them. More on that later.
To raise those chains, you’ll need to send four players to stand on the emblems in the corners of the room, one for each emblem. Spawning on each emblem is an orb that, when you touch it, conveys a buff that protects you from the corrosive water.
For each of these four players, standing on the emblem slowly raises the chains in each of the corners of the room. You need to raise the chains until they lock into place, which will raise the cisterns in the center room. It’s a slow process, and you’ll be fighting swarms of enemies while you do it. For the four players on the emblems, however, the big problem is the Bathers.
Climbing out of the chain pit in each corner are huge, blade-wielding enemies called Bathers. They need to be dispatched quickly, because they’re tough to bring down. The best way to do that is with Power weapons like grenade launchers (and our team found swords to be extremely effective). Don’t worry about dumping power weapon ammo on Bathers, because each one will routinely drop power weapon ammunition to resupply you. In fact, keeping your ammo up throughout the raid with smart grabs is essential.
As you stand on your emblem, the buff protecting you from the damaging water will wear out. This is where the other two players on your Fireteam come in. The only place to recharge the buff is on the center emblem, where it continually respawns. You’ll need one of the last two guardians who are hanging out in the center of the room to grab the buff and then head to your emblem to replace you and continue raising the chain.
The pools on one end of the room are at a higher elevation than at the other, and it’s at this higher elevation that the Bathers come out first. So on each side of the room, you’re creating a rotation in which there’s always a player restoring their buff and heading to an emblem to replace one of the players whose buff is about to run out.
It’ll look like this.
The two players in the center of the room will want to pick one side (left or right), grab the buff from the center emblem, and then first head to the higher elevation pool to replace that player. The player leaving the higher pool then grabs the water protection buff from the center room, clearing whatever enemies they can along the way, before running to the lower pool and replacing the player there (and also helping with their Bather, who will have arrived by then). The player at the lower pool then heads to the center, rebuffs, and replaces the player at the upper pool. Continue this rotation until the team has killed three Bathers at each pool; if you’ve kept someone on the emblem the entire time, all the chains should lock into place. Otherwise, you’ll have to keep trying, and endure more Bathers.
With the chains locked, everyone should head to the center room and clear out additional enemies, before four players step onto the center emblem, where the water protection buff is waiting. Working as a team, those four should focus their fire on a single cistern to take it out (the best way to do this is to pick the order to take down cisterns ahead of time so that everyone knows where to shoot and when). You should be able to take down one set of three cisterns before your water protection buff runs out. When that happens, quickly get out of the water to avoid getting too hurt.
The last two players who aren’t shooting the cisterns are on enemy-killing duty. Bathers will spawn in the room to attack the people in the center of the room, and occasionally those floating-orb Projection guys will pop up as well. The two players who aren’t shooting cisterns have to keep these enemies at bay to protect the folks in the water.
You’ll need everyone to be on their game here, because dying is severely punished. In each encounter, players will notice they have an orange circle token in the bottom-right corner of their screen. This is their resurrection token. It means that you can only revive another member of the team one time. Any player can be revived repeatedly, but each player only has one revive to give. Once you’ve resurrected a player during the encounter, it’s gone — which means you can only suffer six deaths total in each encounter.
(You’ll also want to note that if anyone dies in the Royal Pools, they lose their water protection buff, so anyone killed while shooting the cisterns needs to get out of the water immediately.)
The Royal Pools is pretty straightforward, though, and once you get the rhythm of rotation down, as well as clear out enemies and get used to dropping Bathers with a dose of power weapon ammo, the fight should go pretty quickly.
Once you’ve cleared the encounter, you’ll either have to backtrack to the Leviathan Castellum to open the next door, or find a way into the Leviathan Underbelly, a network of tunnels and rooms that hold the ship’s hidden treasure chests and feature a number of shortcuts around the raid. It’s a confusing maze down there, though, and we still haven’t completely worked it out.
Leviathan Castellum, Part 2
Return to the Castellum and find the seal to open the next door, which should feature the Beast emblem. Repeat the process like last time, dispatching a team of two players to find and capture the standards you need to open the door while the other four protect the seal.
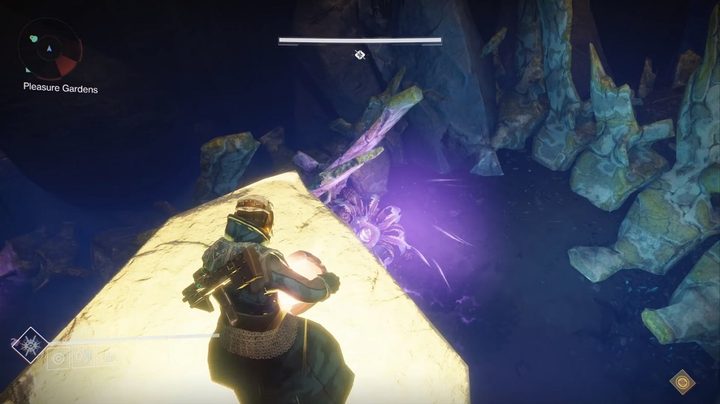
Pleasure Gardens
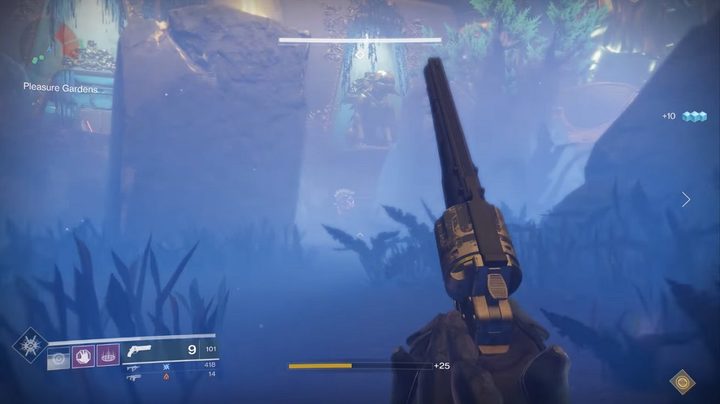
Your next stop is a misty, vegetation-filled area known as the Pleasure Gardens. As you enter, you’ll need to kill several Legionaries and Hounds running around, but once they’re cleared out, you’ll be free to get the lay of the land before starting the encounter. Many of those Legionaries drop power weapon ammo, and you’ll want to make sure you’re filled up.
The goal of the Pleasure Gardens is to kill six Warhounds that will stalk around the area, trying to find you. This is a stealth challenge: You’ll need to move around the Pleasure Gardens and avoid being spotted by the Hounds in order to gather several damage buffs to use against them. Without the buffs, you’ll have a hard time killing the dogs, so sneakiness is essential.
Divide your Fireteam into two groups — four people to walk around on the ground gathering buffs, and two to claim the two gems that spawn in the center of the room, under the statue of Emperor Calus. The two people with the gems will climb up on top of the rocks and columns scattered around the room. Their job is to direct the ground team to help them avoid getting spotted by the Hounds.
If you are spotted by the Hounds, you have about 30 seconds to do some damage to them before retreating into the golden dome in the center of the room, which is a safe room. When a Hound sees a member of a team, it starts a psionic howl that will eventually wipe your entire team, unless you’re safe in the dome. The dome is only accessible through its top hatch when this happens, so make sure to jump and climb on your way back, and hurry. The safe room will be accessible three different times, but you only have six total resurrections for this encounter, just like the last one.
Once you’ve picked up the gems, turn you attention to the eight purple flowers, which are scattered around the roughly symmetrical, oval-shaped room. Two will spawn at a time, with one on the left side of the room and one on the right. Starting in the center, inside the gold dome-shaped room with the statue on it, the four people on the ground team will pick up buff orbs called pollen. The ground team needs to carry all four orbs to each of the flowers.
When they arrive, one of the people holding the gems will stand in one of the columns of light that appear around the room on top of rocks and other debris. While standing in the light, the gem-holders can fire a beam of sunlight down onto the flowers, which releases spores, charging up the pollen. With all four people standing at a flower, each blast adds 12x to your damage buff. You want to get it up to at least about 36 on your first round.
Flowers spawn at three symmetrical locations around the edges of the room, and you can see them even when their purple flowers haven’t appeared yet, so it’s possible (and helpful) to learn their locations. Two are immediately outside the doors of the gold dome, two more are a little further in about the middle of the room and two are in the back corners of the room, closer to where you first enter. In addition, there’s one flower located between the big pile of rocks on the right side of the room (from when you’re standing beneath the statue looking out at the room) and one located in a stand of trees on the left side.
Each run of the encounter works like this — The gem holders call out the locations of the flowers and the ground team starts moving toward them. The gem holders use their vantage point to help direct the team around the hounds, which have set, repeating patrol routes that are easily learned. After the team reaches the first flower and the gem player zaps it to create a buff, a Legionary will enter the room at some point, possibly to snipe the gem players, and possibly to head to the ground and disrupt that team. You can use the same gem light beam you use to activate the flowers to quickly kill the enemies. Just be careful not to hit the Hounds.
Once you’ve got the pollen buff up to 36x or higher, you’re ready to attack the hounds. When they start howling, each of the six Hounds heads to one of the six flower locations scattered around the outside of the room (so not the tree one or the rocks one). Assign each member of your team to a Hound, so that when you’re spotted, each one heads to their assigned location to attack their Hound, before running back to the safe room. That includes the two people using the gems — when the Hounds are triggered, anyone standing at ground level will get the damage buff, not just the people carrying spores. Make sure to spread out and attack all six Hounds at the same time.
With a solid Power level for your whole team and at least a 36x buff, you should be able to do significant damage on each of your hounds. The goal here should be to knock them down as close to dead as possible without killing them. Killing a Hound causes the rest of them to become “restless,” which will decrease the time you have in your further attempts to try to take the Hounds out.
In the words, you don’t want to just kill one at a time. You’ll want to try and kill at least a few at once because — remember — you only have a few tries, and each successive try is more difficult. Be sure to communicate if anyone’s damage-dealing potential is especially low, and plan to adapt to get more people shooting at those Hounds. Once you’ve done all the damage you can, run back to the golden “safe room” and follow the steps over again, until you’ve killed all the Hounds.
With that done, look for a hidden doorway to open in the wall of the Pleasure Gardens that will let you enter the Leviathan Underbelly. With some exploration here, you should be able to shortcut your way to the next encounter, the Gauntlet (specifically, there’s an illusory wall you can walk through along the way). If not, head back to the Leviathan Castellum and fight your way into the third door.
The Gauntlet
Your next encounter is something of a game show, with mechanics to match. You’ll come up an elevator with a big gold fixture in it, which rises into the center of the room. Around the edges are the same four symbols you’ve been seeing. Assign four people to each symbol, where they’ll stay for the rest of the fight. The remaining two members of your Fireteam will be your runners, and they’ll have other things to do.
This encounter requires a lot of coordination, so take your time in talking out each person’s roles and expectations. To start the encounter, one person must stand on each of the four columns in front of the different symbols, which will then lower into the ground. Standing on these columns is essential for a later part of the fight, so be sure to always return to them.
Activating the columns will trigger several groups of enemies charging out from two doors on either side of the emblems. Clear them out, and then take out the bigger, major enemy that comes after them. You can and should use Power weapons on this last guy to deal with him quickly, as he’ll always drop additional power ammo.
When everyone is cleared, another of those psionic orbs, similar to the buffs you saw in the Royal Baths, will appear at two locations on opposite sides of the room, in front of the Beast and Chalice symbols. The runners will pick up those orbs and be transported into the outer ring that surrounds the room. This is the gauntlet, a game show-like running challenge.
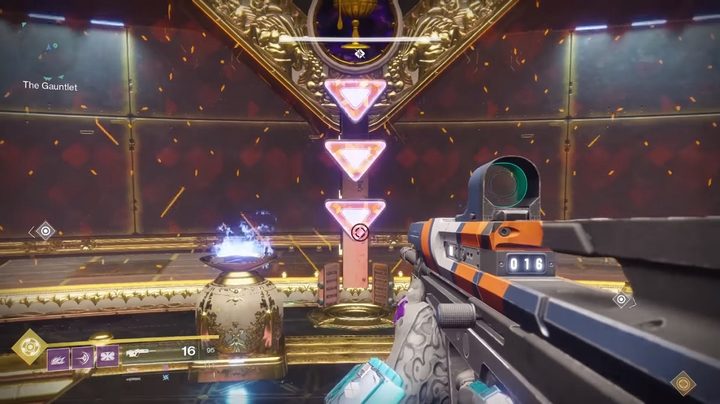
The path forward inside the each runner’s ring will be frequently blocked by a wall with nine circular holes. The players on the outside will need to shoot targets at each emblem in order to clear this barrier, using information from the runner. With each person standing on their column or emblem symbol, the runner will see one of the circles on the barrier turn red, rather than green. The runner needs to tell the people outside which symbol they’re at, and which row the red circle appears in — Top, middle, or bottom.
On the outside at each emblem on the wall are three triangular targets. Two people need to shoot the two targets that don’t correspond to the row the runner called out, and do so at the same time. If the runner tells the team that the Beast barrier’s red circle is in the top row, for instance, then two people outside that barrier would shoot the bottom two targets. That will clear the barrier, allowing the runner to pass through.
After the runner passes each barrier, a floating Projection will appear in front of the column of the corresponding barrier back in the main room. The person standing on that column needs to run down, punch the Projection, and then return to their column, or the Projection will kill the entire team.
There are additional caveats for the runners. The psionic orb they’re carrying is on a timer, and if the runner holds it too long, it explodes, killing them. The way to prevent that explosion is to jump through the red circles in the barriers. If the outside players have shot the correct targets, the barrier will clear and the circle that was formerly red will have a new orb buff in it, resetting the runner’s timer and keeping them alive.
When the runner makes a complete circuit, they’ll get one last buff that will teleport them back into the main room. When that happens, run to the weird golden fixture at the center of the room, the one in the middle of the elevator. Dunk your psionic orbs into it to fill it with light. You need to repeat the process three times to trigger the next phase.
The best way our team found for dealing with the barriers was to assign everyone rules about which targets to shoot. When a runner calls out a barrier emblem, the person on that emblem shoots whichever target is the upper-most of the two they need to fire. Otherwise, each person shoots at the barrier to their right, and shoots the lower-most of the two targets.
Let’s try an example. Say the runner reaches the Beast barrier and calls out that the middle row as the lit row. The person standing on the Beast emblem shoots continually at the top target of the three. The person to their left, standing at the Crossed Axes emblem, shoots continually at the bottom target of the three. When the barrier is cleared, the runner jumps through the circle that gives them the buff and continues. Outside, the person assigned to the Beast emblem immediately leaves their column and runs forward toward the outer ring, where the Projection spawns. They punch the Projection and kill it, return to their column, and turn toward the barrier to their right, where they wait to hear which row the runner calls out.
You’ll repeat the process three times. After the first run through the outer ring, it will change to become more difficult, with portions of the ground falling out to create pits the runners can fall into. Be wary, especially when jumping through the barrier, to make sure you always land on solid ground.
Once everyone on the team understands how the fight goes and which targets to shoot, the Gauntlet becomes a ballet of coordination that’s not all that tough. Staying alive during the phase in which enemies flood the room is the toughest part, as is remembering to kill the Projections at each barrier.
Once you’ve dunked six total psionic orbs into the center of the room, repeating the cycle three times, everyone should head to the center, where six new psionic orbs will spawn. Everyone grabs one, and then everyone will be transported into the outer ring for one last run. Only three people need to make it through this last part, and in truth, not everyone will.
In the last run, everyone will have to jump through the barriers, but only four buffs will appear in the wall, rather than six. That means two people will have to go without. The problem is that, if two players’ psionic orbs explode, their deaths will start a 30-second timer. When it reaches zero, the entire team is wiped. In order to make sure you have enough time to make it to the center, each player has to receive at least one buff, and the three that make it to the end have to grab no fewer than three in total.
The simple solution our raid team found was to make sure that everyone who gets a buff in the first barrier skips the buff in the second. You can make it through the gauntlet on three of the four buffs, but no fewer than three. By skipping the second one, the two people who didn’t get buffs on the first barrier will be guaranteed to get one. From there, whoever is fastest on the team should continue on the run, grabbing all the buffs they can. The gauntlet run is too fast to adequately coordinate who should be buffed and who shouldn’t be, and it’s not really necessary to do so anyway.
Note that part-way through this last run, the ground will give out, restoring the pits the runners saw in their last two trips through the ring. If everyone is able to grab at least one buff, you’ll have enough time for the three or four people who are able to snag three to make it through the entire ring. As before, they’ll then be transported back into the main room, and will need to run to the center and dunk their orbs one last time. If they make it, you’ll complete the Gauntlet challenge and finish the encounter.
Your last stop is Emperor Calus himself. If you don’t know the tricky way through the Underbelly to get there, it’s back to the Leviathan Castellum for one last fight.
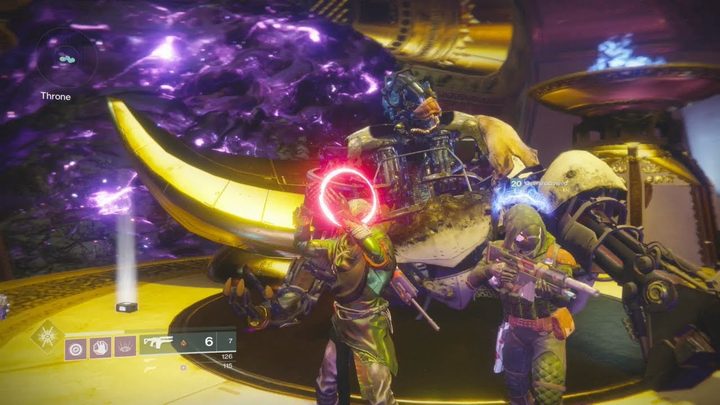
Emperor Calus
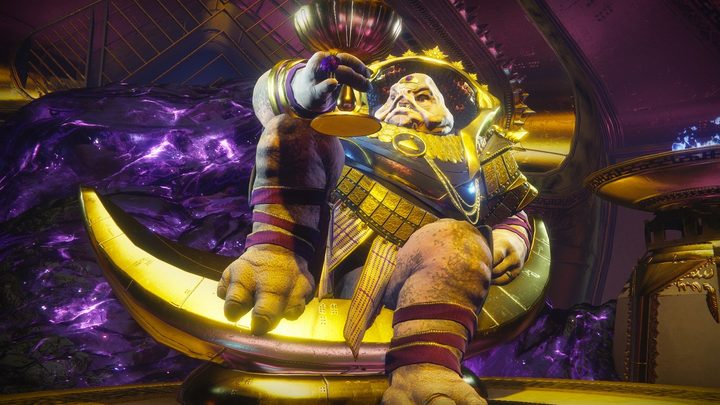
Finally, it’s time for a major boss fight. Like all of the past Destiny raids, this one is going to be a ridiculous, multi-part battle with several assigned roles and lots of stuff to remember to do. You’ll die a lot, people will mess up a lot, coordination will break down, and it’ll take a while. Remember to be nice to each other.
The fight with Calus is triggered, hilariously, by shooting the wine chalice out of his hand. He’ll first summon a ton of guards into the room, from doors to the right and left of him, and doors underneath his throne. Clear them out, but be careful — dying here, like in the other encounters, should be avoided at all costs, because your team only has six total resurrections.
Note before you start the four pedestals in the room, each marked with the same four emblems you’ve been seeing throughout the raid. Memorize their locations, because you’ll need that information later.
Once you’ve triggered the first phase, in which enemies flood the room, you’ll specifically want to watch out for three yellow-healthed Major enemies that show up. These big guys are tougher to kill, and each cycle you run through this fight will feature a new kind. The first set are Flamethrower majors; the second are Legionary majors; and the third are Centurion majors. They’re all shielded, so ready your energy weapons, and use your power weapons on them, because you’re guaranteed a drop of ammo.
After you clear out all the enemies in the room, four Projections will appear, one on each of the emblems. Run around and punch them immediately to kill them. They drop power ammo, so get yourself filled up.
Next, Calus will clap, transporting everyone to a strange purple dimension where a huge version of his head is located at the far end of the area. Break into two teams. Three people to stay in the purple dimension, and three to grab the three floating psionic orbs in front of you. Those will transport you back to the throne room, where you’ll need to fight a ton more enemies — including a constant flood of majors.

In the purple dimension, the Calus head will start sucking everyone toward it, and you’ll be drawn forward until you hit an ankle-high barrier that will keep you from advancing. It’s key that you stay at this barrier, because jumping or anything else that takes you in the air will make you go past it, killing you. Watch out also for Cabal psions that spawn in this area, because they’ll use their purple grenade powers to try to lift you over the barrier, sending you careening toward Calus’ face.
The purple dimension team has several jobs. First, each player needs to look at Calus’ forehead, where an emblem will appear corresponding to the pedestals in the throne room. Each player sees a different emblem, so they’ll need to call out their emblem in turn. Back in the throne room, Projections will appear on each pedestal. The three people in the purple dimension will call out their emblems, leaving one unnamed. In the throne room, one player needs to run up and punch the Projection on this fourth, unnamed pedestal as quickly as possible. Punch the wrong Projection, and the barrier protecting the team in the purple dimension will disappear, killing everyone. Coordination here is key.
In the purple dimension, two Projections will also appear, and that team needs to kill both as quickly as they can to avoid the Projections wiping the team. After a few seconds, the barrier protecting the purple dimension team will disappear, and they’ll be swept toward Calus’ head. If the throne room team has successfully (and quickly) punched the Projection on the correct pedestal, a new barrier will appear, saving the purple dimension team from being sucked into Calus’ mouth.
The cycle then repeats, with the purple team calling out their emblems, and the throne room team eliminating the Projection on the fourth, unnamed emblem pedestal. Starting with the second cycle in the purple dimension, psions will appear, so the purple team might want to divide their fire, putting two players on psion duty to immediately eliminate them before they turn their attention to the Projections. The third player should immediately try to kill Projections, with everyone finishing them off when they’re ready.
When the purple team goes through four cycles of naming emblems, they’ll be drawn toward Calus, where he’ll start to puke out flying skulls that will attack the team. The purple team needs to shoot these skulls to survive, but each one they manage to destroy will also count toward a buff for dealing damage to Calus in the next phase, so shooting lots of them is as essential as staying alive.
Back in the throne room, in addition to punching the proper Projections, the team’s major goal is to clear as many enemies as possible, most specifically, the majors that appear in the room. Staying alive is essential, because each team only has three resurrections. In fact, if players die when all six of your Fireteam members are together, the best solution is for members of the purple dimension team to spend their revives on saving them. This way, the throne room team, which is in more immediate danger of getting killed, will be able to save their resurrections for emergencies.
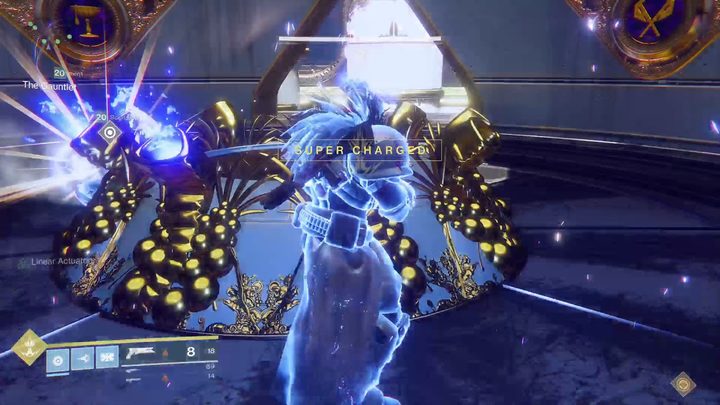
The throne room team also has to deal with Calus shooting at them with a powerful laser, which will be upgraded over time, and with an area-of-effect explosive attack that he triggers at different points in the room. The best solution we found was to stay toward the back of the room, clearing enemies as fast as possible, and assigning one player to each side of the room to sprint out and punch Projections. Supers are useful for clearing enemies here as well, and you shouldn’t be afraid to use your Power ammo, because majors and Projections will continue to drop more. You’ll also want to have one Warlock who can lay down a healing circle in emergencies.
During the portion of the phase in which the purple dimension team is shooting skulls, Calus will raise his arms, creating a field that will continually damage all players on the throne room team. At this point, a Warlock healing circle is great, because it will protect the throne room team indefinitely from Calus’ field. Calus also raises a shield around himself, which the throne team needs to shoot to knock out.
Destroying Calus’ shield transports the purple dimension team back to the throne room, so working out the timing here is essential. You want to give the purple dimension team as much time as possible to shoot skulls and raise the damage buff on Calus, and the Warlock circle will protect you so they can do it. But if you don’t shoot Calus’ shield before 30 or so seconds has passed, he’ll wipe out the whole team automatically. We found that destroying Calus’ shield at around a 60x damage buff (or at least using that for the timing of when to knock out the shield, as it’ll likely be higher) is pretty optimal for damage.
Lastly, you’ll be ready to damage Calus. You can only do that while standing on one of the four emblem pedestals, where you’ll receive the Force of Will buff and deal damage equal to how many skulls the purple dimension team destroyed. The purple team tends to teleport into the far end of the room, near where you first entered. For that reason, our team started on the back-left pedestal, the Crossed Axes.
All six players need to jump on the same pedestal and lay into Calus. Do as much damage as possible, aiming for his head for critical hits, until he raises his arm. When he does, he’s readying an explosive attack that kills anyone on the pedestal, so quickly jump off and head to the next one. We went clockwise around the room, starting at the Crossed Axes, then heading to Beast, Sun, and Chalice in succession. The buff on each pedestal is timed, so it’s essential every player be on the same one at the same time for maximum damage.
Once you’ve done damage at all four pedestals, you’ll complete one cycle. The room will again flood with enemies for you to clear, before Calus claps again to send you back to the purple dimension. Repeat the whole process again.
When Calus hits two-thirds health, his armor will blow off, revealing a new, glowing critical hit spot on his chest, so be sure to adjust your aim. He’ll also gain a new, big gun, which will replace his laser and explosion attack, and does explosive area damage when he fires it. At one-third health, he’ll gain a ridiculous area attack that rains fire down and burns the ground. He’ll deploy both against the throne team while they’re punching Projections, so be careful not to get caught in any of them.
It took us three cycles to completely wipe out Calus’ health (we nearly did it in two). In the final moments, he’ll trigger a last stand, where he does the raised-arm pose that damages everyone again. Run to the center of the room to gain one last buff and fire away at Calus with everything you have. You should be able to damage him enough in the final moment to kill him, ending the fight and completing the raid.
Drop down through newly opened hole in the center of the room to find the final raid treasure chest. You’ll also learn some interesting secrets about the Cabal Empire.
The Underbelly
The last thing you might want to do (and you can come back and do it anytime) is run around in the maze that is the Leviathan Underbelly. This interior portion of the ship contains a number of hidden treasure chests you can only open with the help of special keys you get as drops for completing the raid’s encounters. One helpful Redditor went ahead and created a map to help you navigate it.
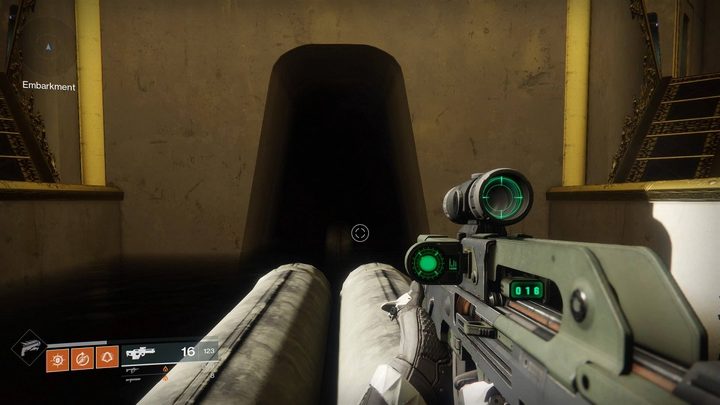
To enter the Underbelly, drop down right below the starting point of the raid on the Embarkment and look for an open door with six levers inside. You need to quickly pull the levers in the correct order. If the levers are numbered 1 through six starting with the one farthest to the left when you enter, the order is 1, 5, 3, 2, 4, 6. It’s possible to hit all the levers with a single (very fast) character, but doing it with several people is much easier.
When that’s done, climb up the Embarkment to where you’ll find a big pool of black water with a pair of pipes running through it. The wall in front of the pipes should have opened if you triggered the levers correctly, granting you access to the Underbelly. From here, you can travel throughout the ship and find hidden pathways into each of the raid’s encounters, allowing you to skip the repeated Castellum fights.
A few of the chests require you to carefully defeat all of the enemies in the rooms where they’re housed. You can do that by flipping the switch that opens the door to the room and avoiding being spotted by the Watcher robots inside — they project a red light that shows where they’re looking, and if they spot you, they’ll call reinforcements.
It’s possible to quickly destroy the Watchers before they raise their alarm if you’re coordinated with your team. Sneak up on the robots (you can stand right up behind them so long as they’re not facing you) and blast them with your strongest weapons to take them out. Look for gilded golden doors to find where the chests spawn in rooms such as the Engine and Armory.


