Have you ever bought a new monitor and thought it looked a little lackluster right out of the box? It might need calibrating. This is a problem faced by even some of the best monitors where their colors just aren't as rich as they should be, or maybe the monitor is too bright or sharp.
Calibrating your monitor can fix these problems and more. Here's how to do it.
Get ready to calibrate
Before you begin calibrating your monitor, it's important you get it, and the space around it, ready.
Step 1: Turn on your monitor at least a half hour before calibration so it can warm up to its normal operating temperature and conditions.
Step 2: Set your monitor’s resolution to its native, default screen resolution. Here's how to do it on Windows, and macOS.
Step 3: Make sure you’re calibrating in a room with moderate ambient lighting. The room doesn’t need to be pitch black, but you don’t want the sharp glares and color casts resulting from direct light. If in doubt, open a curtain or turn on a lamp.
Step 4: Familiarize yourself with your monitor’s display controls. They may be located on the monitor itself, on the keyboard, or within the operating system control panel. Some displays even have their own remote controls. Have a little play around or check your manufacturer's website to learn more about how to navigate the calibration menus.
Calibrate using built-in Windows and Mac tools
Both macOS and Windows have built-in calibration tools to help guide you step-by-step through the process, which is particularly helpful if you are new to monitor calibration. These free tools should be the first stop if you’re merely a casual image junkie or working on a tight budget. Keep in mind that the adjustments will be limited by the display type and model, though.
The assorted terms — gamma, white point, etc. — may seem a bit daunting at first glance, but each utility provides a relatively simple explanation of what they all mean. Realistically, you don’t need to know the ins and outs of the jargon to calibrate your monitor.
Windows display calibration tool
In the latest versions of Windows, the easiest way to find the color calibration tool is through the Windows search bar.
Step 1: In windows 11, type "Calibrate" into the Windows search bar and select Calibrate display color from the results. On Windows 10, search for "Color Calibration" and select the corresponding result.
In older versions of Windows, you can find the Color Calibration utility in the Display section of the Control Panel, which is listed under Appearance and Personalization.

Step 2: Now that you are in the calibration tool, follow the on-screen instructions to choose your display’s gamma, brightness, contrast, and color balance settings.
A sample image for you to match will accompany many of the settings. Simply make adjustments to mimic the sample as close as possible.
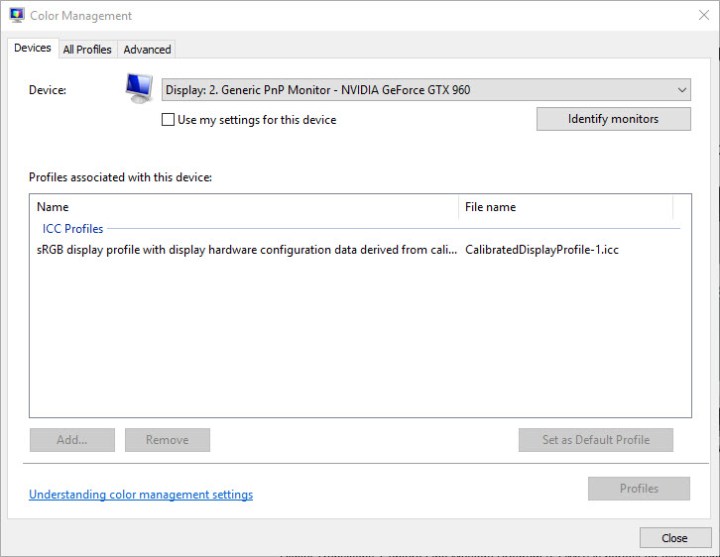
Step 3: Once the calibration wizard is complete, make sure to choose the Current calibration, or return to the previous calibration if you are unsatisfied with the results. The new calibration will be stored as an .ics file, or color calibration file, and will show up as a new International Color Consortium (ICC) Profile in the Color Management settings app.
Step 4: The easiest way to open this app is to type "color management" in the search box and choose the first result. Once it’s open, you can select your monitor from the device list and see which ICC Profiles are available.
Buying guides
MacOS calibration
MacOS has its own built-in calibration tool, too. Here's how to use it to calibrate your monitor.
Step 1: In macOS, the Display Calibrator Assistant is located in the system preferences under the Displays tab, in the Color section. If you are having trouble finding it, try entering calibrate in Spotlight to scan through your computer’s various folders and files. The results should show an option to open the utility in the System Preferences panel.
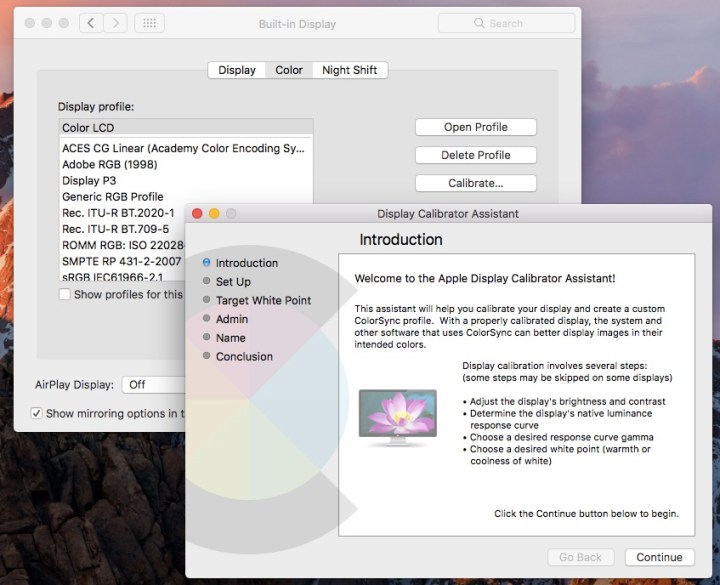
Step 2: Your Mac’s step-by-step instructions will walk you through the calibration process once you have found and opened the software utility. Just follow the on-screen instructions to choose:
- White point: The white point should typically be a standard D50 or D65 point to avoid weird tint issues.
- Color adjustments: White point is a given, but Apple will try to detect your display and offer a number of other color calibrations at this point … or it may skip the rest of the adjustment options entirely. Native Apple displays may be more likely to have fewer color calibrations at this point (because Apple already calibrated them).
- Administrator access: Only important if you’re worried about others changing your particular color profile.
- Name: Name the profile something distinct so you will know it in the future.
Step 3: This will create a new color profile for your display. If you couldn’t make the adjustments that you wanted to, then select this new profile and choose Open Profile. This will open a new window with all the tags associated with the color profile and their descriptions.
Step 4: You can choose each tag to see more information about them. Some tags will just be basic color data, but other tags can be altered to change specific color factors for the display.
Step 5: If you have a native display, look for the Apple display native information tag as a good place to start. As you can see, this can quickly become technical, so you will need to know your color data (phosphor values, response curves, etc.) to make accurate changes with this method.
Calibrate using online tools
There are a handful of web-based calibration tools that help you manually adjust your monitor settings. They can provide more precise, or more customized, calibration than the built-in utilities.
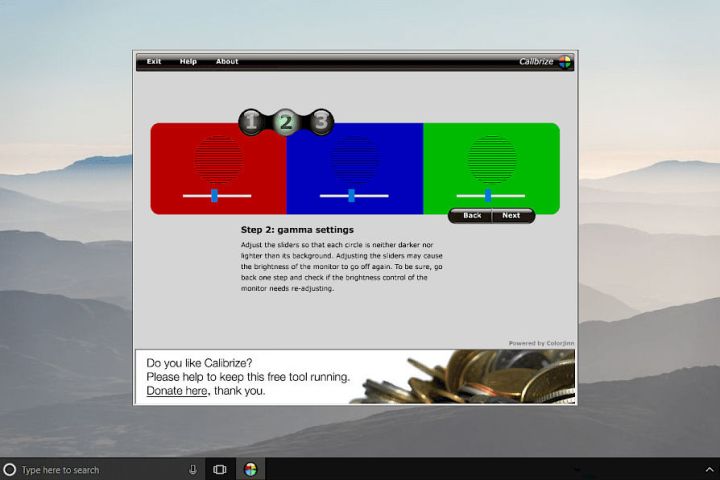
W4zt Screen Color Test: This simple webpage provides you with several color gradients and grayscale color boxes you can use for quick comparisons, along with an easy gamma test you can run. It’s nice to have so many tests on one page, making this solution great for fast and dirty calibration so you can move on.
Photo Friday: To adjust your brightness and contrast, Photo Friday has a simple calibration tool that will give you a great reference for your own calibrations. It won't do it for you, but it has all the information you need to get your contrast, gamma, and brightness just right.
FlatPanels Online Monitor Test: The FlatPanels range of online monitor tests are extremely comprehensive, with guides and tools to help you calibrate your monitor's contrast, brightness, various color strengths, gamma, and more.
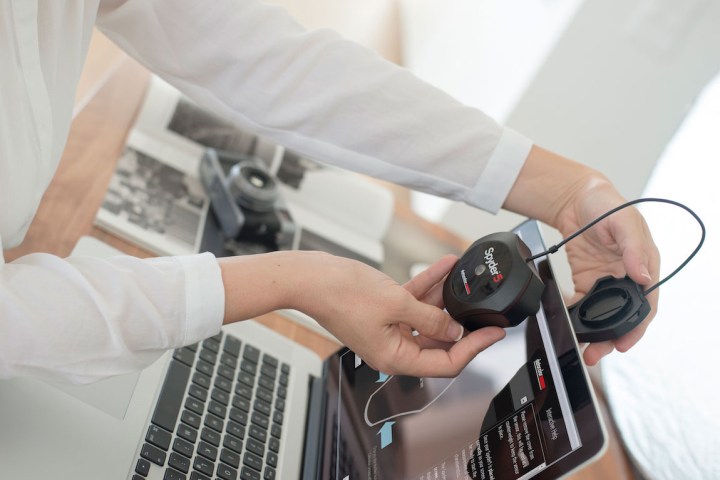
Calibrate using colorimeter hardware
While they’re better than a more temporary solution, built-in calibration utilities still have one major flaw: You. Since they rely on your specific color perception, what looks great to you might look thoroughly off to a friend.
The best way to avoid this problem and ensure that you calibrate your monitor correctly is by purchasing a calibrating device. You’ll need to spend a decent amount of money for the best control and precision. Still, there are affordable alternatives to help you achieve consistent color across all of your monitors.
If you’re looking for a calibration tool, we recommend either the X-Rite ColorMunki Smile ($99) or the Spyder5Elite ($200). Both devices boast a full-spectrum, seven-color sensor that can accurately display a range of standard and wide-gamut displays. If you have a bigger budget, you can look for upscale calibrators that have even more advanced options.
These devices are user-friendly, involving a simple three-step process of fastening the device to your screen, plugging it into a USB port, and opening the calibration software. When the software starts running, you just have to follow the setup procedure. It’s fairly intuitive, but if you have trouble, you can find tutorials online that will walk you through it.
Starting at $180, X-Rite’s Color Display Pro is another solid device. Just like the Spyder series, each of these three options is configured with automated calibration software. The more money you spend, the more additional features and other benefits you’ll get from the device.
Editors' Recommendations
- How to build a PC from scratch: A beginner’s guide
- How to change your Skype name
- How to check your fps (frames per second) in games on PC
- How to change your Google background in Chrome
- M4 vs. M3: How much better are Apple’s latest chips?


