
How to use AirDrop on a Mac

AirDrop is one of Apple’s most useful features for its ecosystem. AirDrop allows users to wirelessly send files between their Apple devices, everything from documents to photos and videos. It’s especially handy for sending files to your computer from your phone, but using AirDrop on a Mac is an equally simple and convenient feature.

Difficulty

Easy

Duration

5 minutes

What You Need

  • Mac with MacOS X 10.7 or later

Here is everything you need to know about how to use AirDrop on a Mac.

Make sure AirDrop is turned on

Before you can use AirDrop, you need to make sure that it is turned on.

Step 1: Open Finder and select AirDrop from the top left in the sidebar. You can also pull it up hitting Command + Space and typing "AirDrop" into Spotlight.

how to use airplay mac airdrop in finder
Image used with permission by copyright holder

Step 2: Once you are in the* AirDrop* menu, you should see some blue text at the bottom that reads Allow Me To Be Discovered By. Hit the Blue Down Arrow to the right of this text, and select either* Everyone* or Contacts Only. The latter is the safer choice if you don’t want unsolicited files while in public.

how to use airplay mac airdrop be discovered
Image used with permission by copyright holder

Step 3: Once AirDrop is on, you should see some options pull up if there is an Apple device nearby with AirDrop enabled.

Drag and drop files into AirDrop

Step 1: With the AirDrop window open, pull up another Finder by hovering your mouse over the Finder icon, clicking with two fingers, and selecting New Finder Window.

how to use airplay mac airdrop menu
Image used with permission by copyright holder

Step 2: In the new Finder window, find the file you want to send and drag it into the* AirDrop* window. Hover the file over the appropriate device icon and release it. The file should automatically AirDrop to that device, and the user can either accept or decline it.

Step 3: Alternatively, if the file is on your desktop, you can just drag and drop it from the desktop to the AirDrop menu.

how to use airplay mac airdrop shortcut
Image used with permission by copyright holder

Double-click and share

If dragging and dropping is too much of a hassle, there is an easier way. In the Finder window, hover over the file you want to share and click with two fingers. Scroll down to Share and then select AirDrop from the submenu.

A new window will pop up showing potential devices. Select which one you want to AirDrop to, and the file should send automatically.

how to use airplay mac airdrop preview
Digital Trends

AirDrop with the file open

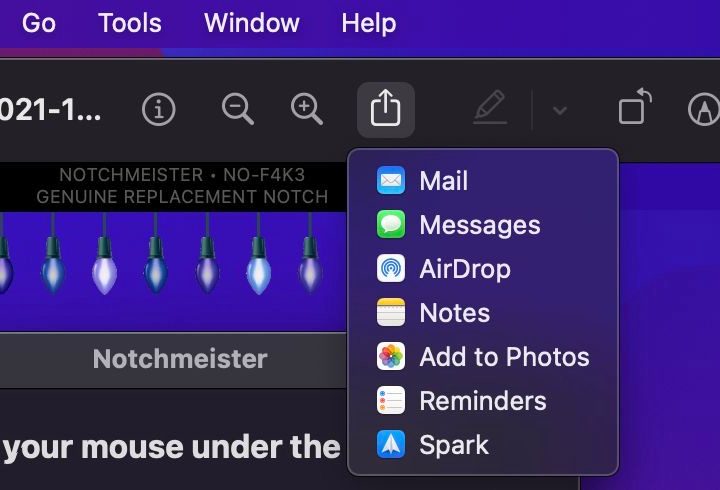
If you have the file open in front of you, you can typically AirDrop from right there. If you are viewing a document or photo in Preview, you can find the Share button in the top-center of the window. It looks like a square with an arrow pointing out of it.

how to use airplay mac airdrop quicktime
Image used with permission by copyright holder

AirDrop with QuickTime

If you’re viewing a video in QuickTime Player, the Share button is in the media controls.

Those are the main ways to use AirDrop on Mac. For more on the Mac, check out our guide on how to use AirPlay, as well as our review for the latest MacBook Pro.

Editors' Recommendations

Caleb Clark
Former Digital Trends Contributor
Caleb Clark is a full-time writer that primarily covers consumer tech and gaming. He also writes frequently on Medium about…
You can still buy the M1 MacBook Air, and it’s cheaper than ever
Apple MacBook Air M1 open, on a table.

Apple deals are rarely particularly cheap but Walmart is continuing to sell the Apple MacBook Air M1 with 13.3-inch screen for just $699. The lowest price ever, it’s the perfect entry point for anyone considering checking out macOS. It feels like stock must be starting to run low here so if you don’t want to miss out on one of the better laptop deals around, hit the buy button now before you miss out. Otherwise, here’s what the MacBook Air M1 has to offer.

Why you should buy the MacBook Air M1
The MacBook Air M1 isn’t considered one of the best laptops any more but just because its processor is a few years old doesn’t mean you should ignore it. MacBooks are typically built to last with support for macOS continuing for a number of years. With the MacBook Air M1, you get the M1 chip with an 8-core CPU which is sure to outperform Intel chips of the same era. The leap between Intel-based MacBooks to Apple silicon was pretty huge which is why the M1 chip remains highly potent.

Read more
How to select multiple files on a Mac
An open MacBook Pro on a table.

macOS is an intuitive and innovative operating system. Over the years, Apple has revamped and evolved its tried and true platform numerous times, but there are a number of core features that have been around since the beginning. One of these is the ability to select multiple files at once.

Read more
How to take a screenshot on a Mac
The keyboard and trackpad of the MacBook Pro 14-inch.

For most new Mac users -- especially if they're coming from Windows -- one of the first questions they need to ask is how to take a screenshot on a Mac? There's no dedicated Print Screen key like there is on Windows, but there is keyboard shortcut, and if you want something more akin to Microsoft's Windows Snipping tool, there are some great screenshot apps you can use, too.

Here's how to take a screenshot on a Mac in a few different ways.
How to take a screenshot using keyboard shortcuts
MacOS keyboard shortcuts are the quickest ways to take screenshots, whether you're capturing the entire screen or just a portion. By default, Apple's methods save your screenshot to the desktop, but if you want to copy the screenshot to the clipboard, there's a keyboard shortcut you can use instead.
How to capture a selected area

Read more