
How to use System Restore in Windows 7

how to use windows system restore in 7 header copy
Image used with permission by copyright holder
If your computer is on the fritz, acting weird, or behaving sluggishly, you may be able to revert to a time in your PC’s history when it was symptom free, using System Restore in Windows.

System Restore essentially acts like an undo button for your PC, tapping into automatically saved restore points.

Here’s our breakdown of System Restore and how to use it. Additionally, feel free to check out our guides for recovering deleted files and making an administrator account on Windows 8, along with our in-depth comparison of the best cloud storage services.

What does System Restore do?

System Restore automatically creates markers on your computer called restore points, which are made regularly without input from you, though you can also create restore points manually. When you do decide to use System Restore, it will provide you with a list of points to revert your PC to. You can always try multiple restore points in the event that you’re still experiencing issues when you revert to a particular state. Keep in mind that System Restore always creates another restore point prior to reverting, so you can always reverse the changes if need be.

How to use System Restore in Windows 7

Step 1: Open System Restore — Click the Start button (or press the Windows key on your keyboard) and enter “System Restore” in the search bar at the bottom. It should be the first result that pops up. Click on it.


Step 1 final

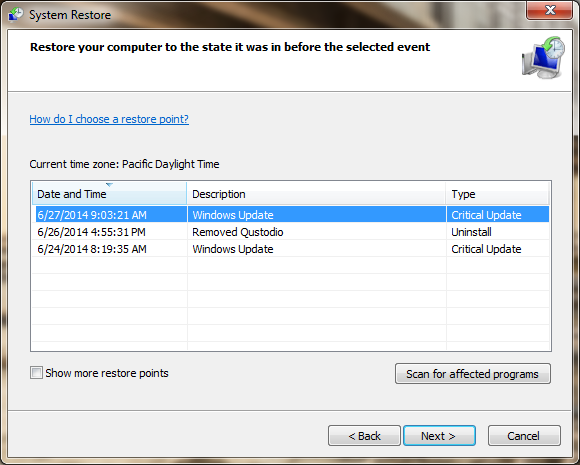
Step 2: Revert to a previous state  — Click “Next,” and select your desired restore point from the list of options. Each restore point tells you what type of restore it is, and has a time stamp that tells you when the point was created. If you want to see all of the available restore points, click the box at the bottom labeled “Show more restore points.” Once you pick a point to restore to, click “Next,” and then click the “Finish” button to begin the process. Once done, you’ll be placed back at the desktop.

Select Restore State
Image used with permission by copyright holder

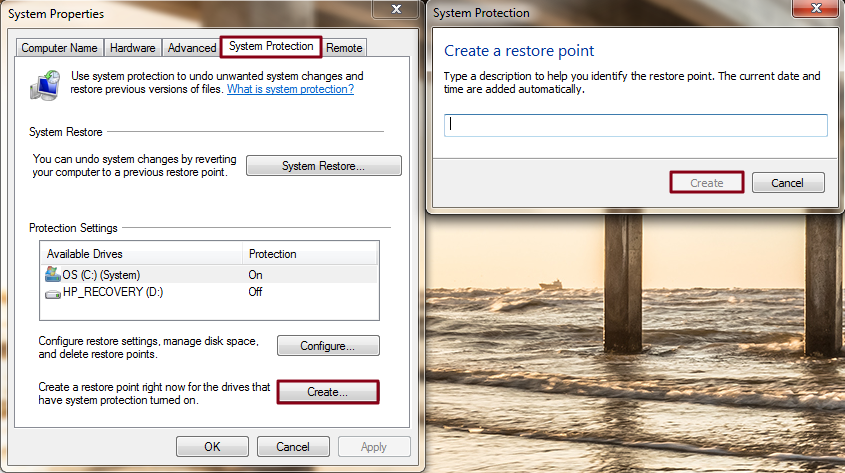
Step 3: Manually create a restore point (optional) —  To manually create a restore point, press the Windows key (or click the Start button), type “Create a restore point,” and click the option of the same name. Click “Create” at the bottom of the System Protection tab in the new “System Properties” window that pops up, and enter a description for your restore point. Then, click “Create” to begin.

Create Restore State
Image used with permission by copyright holder

[Image courtesy of Serg64/Shutterstock]

Emily Schiola
Former Digital Trends Contributor
Emily Schiola is an editorial assistant at Digital Trends where she covers mostly social media and how-to pieces. In her…
What is the BIOS and how to use it
AMD showing Curve Shaper in the BIOS.

When your computer first starts up, it uses the BIOS (or UEFI in more-modern PCs) to find out everything about itself, from the components its running, to the voltages they should receive. Although you rarely need to access the BIOS, it can be useful for changing the way your system works, or updating it when you install a new component.

If you haven't delved into a PC BIOS before, or if you just want a refresher, here's what a BIOS is, how to access it, and how to make changes to it.

Read more
How to share an external hard drive between Mac and Windows
The WD Easystore 14TB External USB 3.0 hard drive on a desk next to a monitor and near a plant.

While using a Windows PC over a MacOS system (or vice versa) was once fairly limited in terms of crossover, such towering walls no longer exist. Still though, if you’ve ever wanted to use the same external hard drive with both Windows and MacOS, you know how big of a burden this process can be.

Incidentally, the term "external hard drive" generally refers to portable storage devices. They're as fast as the best SSDs, but you can connect them to your computer using a USB cable.

Read more
Here’s how much RAM Windows 11 actually uses
A man sits, using a laptop running the Windows 11 operating system.

Upgrading to Windows 11 comes with a few requirements, and that includes a bump in random access memory (RAM). And with Windows 10 nearing the end of support, many users will soon need to consider switching to Windows 11 regardless of how much memory it consumes.

Windows 11, while it introduces a host of new features, may consume more RAM than its predecessor, but the amount of memory that it uses is not universal. Below, we'll explain what RAM is, explore how much RAM Windows 11 actually uses, and how to lower that amount if your PC is having a hard time.
Windows 11: RAM usage when idle

Read more