
Destiny 2: How to unlock and upgrade the Hammer of Proving

Destiny 2‘s Season of the Chosen is here, kicking off the first season of the game’s fourth year. It’s clear Bungie has a lot of plans for the season, and even in the first week, there’s a lot to do. Before you can do anything else, though, you need to know how to unlock and upgrade a new artifact for the season: The Hammer of Proving.

The Hammer of Proving is at the heart of Season of the Chosen’s progression system, allowing you to earn season-exclusive gear and net a little more loot from the new Battlegrounds activity. It’s critical to the new season, so make sure you follow the steps below before jumping into any playlists.

Just starting in Destiny 2? Our Destiny 2 beginner’s guide has all the tips and tricks you need, and our Destiny 2 leveling guide will get you to the level cap in no time.

Further reading

How to equip the Hammer of Proving

Image used with permission by copyright holder

To unlock the Hammer of Proving, you need to complete the Decrypting the Darkness quest, followed by the Challenger’s Proving quest. As long as you’ve played Destiny 2 after February 9 (when the Season of the Chosen launched), you should already have the first step done. These quests walk you through the new Battlegrounds activity, reintroduce players to Umbral Engrams, and unlock the Hammer of Proving.

They’re both very straightforward, asking you to complete a few Battlegrounds tasks and activate the various vendors and services available in the HELM. For your efforts, you’ll earn a few Umbral Engrams, as well as rewards for the Battlegrounds activities you have to complete.

You don’t need to equip the Hammer of Proving to use it. It’s an artifact that you can find in the Quests screen, and it’s already available to you once you unlock it.

How to use the Hammer of Proving

Image used with permission by copyright holder

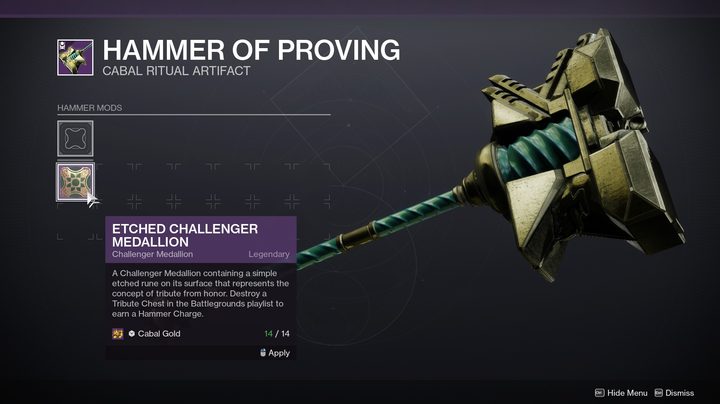
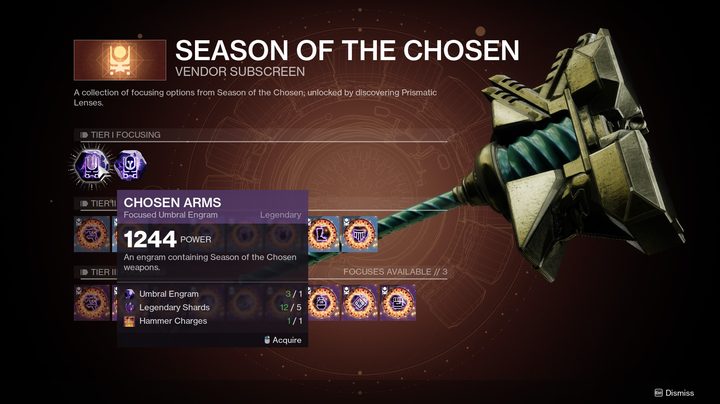
The Hammer of Proving is mainly around for Battlegrounds. After you unlock it and infuse it with an Etched Challenger Medal — more on that soon — you can use the Hammer to smash crates at the end of Battlegrounds activities. These caches award gear in addition to the loot drop at the end of Battlegrounds. Smashing a crate will also earn you a Hammer Charge, which you can use along with an Umbral Engram and some Legendary Shards to unlock season-exclusive gear.

You need to earn Cabal Gold to infuse the Hammer of Proving with an Etched Challenger Medal, and thankfully, you don’t need to go out of your way. As long as you’ve unlocked the Hammer of Proving and completed the Challenger’s Proving quest, you’ll start earning Cabal Gold for doing just about anything. Strikes from the strike playlist net the most efficient progress, giving you 14 Cabal Gold per strike. Gambit and Crucible award eight Cabal Gold per match.

You can also earn Cabal Gold from dungeons and public events, but Strikes are the best way to go about it.

Reason being: Strikes award 14 Cabal Gold, and you need exactly that amount to infuse an Etched Challenger Medal. After you have enough, go to the Quests screen and select the Hammer, then infuse an Etched Challenger Medallion in the mod slot.

Image used with permission by copyright holder

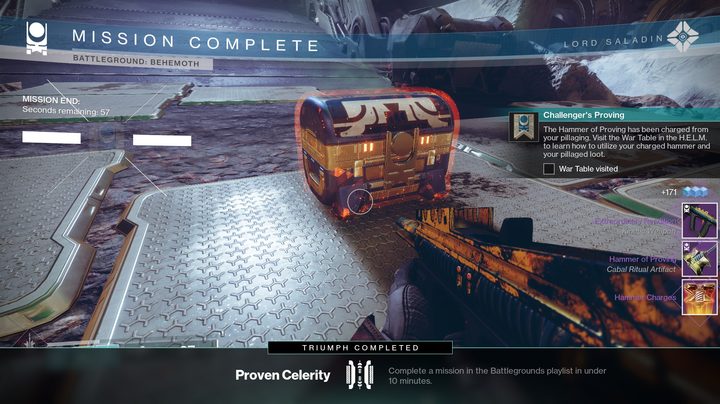
Once you’re set up, play through any Battlegrounds activity, and at the end, use your Hammer to smash one of the crates next to the main loot chest (there are three chests, one for each Fireteam member, but you can only smash one). You’ll get some extra gear and a Hammer Charge. Use the charge back at the HELM to unlock Season of the Chosen gear.

How to upgrade the Hammer of Proving

Image used with permission by copyright holder

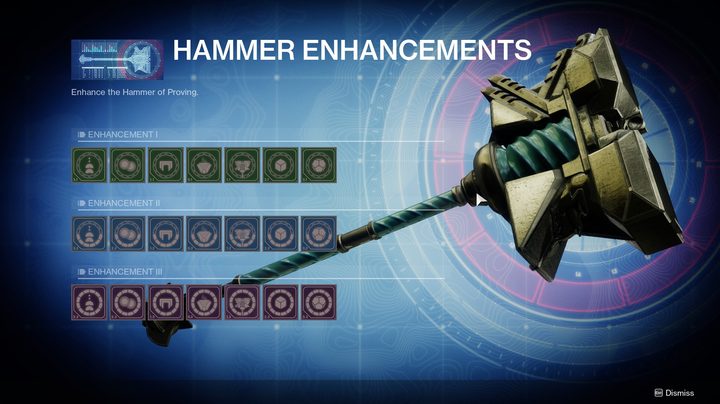
You need to increase your War Table reputation in the HELM to upgrade the Hammer of Proving. The War Table is a Vanguard vendor, but you don’t use Vanguard Tokens to increase your reputation. As of the start of the season, the only way to increase your War Table reputation is by completing weekly challenges. In the first week, there are three challenges that award War Table reputation, but there should be more as the season continues.

Head to the War Table to unlock the Tribute Chest I enhancement after your first rank, which gives you a single Cabal Gold for every chest you smash. Each other enhancement has a prerequisite, so you have to unlock Tribute Chest I first. From there, you’ll be able to unlock a new enhancement for every War Table rank.

It seems like completing the weekly challenges is the only way to increase your War Table reputation, so make sure to complete the challenges that give War Table reputation as soon as possible. The weekly challenges will reset every Tuesday until mid-April, 10 weeks into the season. After that, you’ll have about a month to complete any lingering weekly challenges you may have missed before Season of the Chosen ends on May 11.

Finishing all 75 of them by the end of the season will complete the Master of All seasonal challenge, awarding you a Large Bright Dust Pile.

Editors' Recommendations

Jacob Roach
Senior Staff Writer, Computing
Jacob Roach is a writer covering computing and gaming at Digital Trends. After realizing Crysis wouldn't run on a laptop, he…
The best Skill Cards in Dead Island 2
A deck of skill cards.

You may not think a first-person game about bashing zombies with all sorts of melee weapons would be an RPG, but Dead Island 2 is a little deceptive like that. Each of the six playable Slayers has its own base stats, but once you've selected them, there's not much else to worry about in that regard. What will really define your build is the Skill Cards. These act as a mixture of abilities and buffs you can slot into your character, but unlike a traditional skill tree where you simply unlock new skills as you go, cards can be swapped in and out whenever you like. While that's great for versatility, the sheer number of cards can make creating an effective build more intimidating than a swarm of flesh-eaters. Before you take on the horrors of Hell-A, take a look at the best Skill Cards in Dead Island 2.
How to get Skill Cards

Before getting into the deeper aspects of Skill Cards in Dead Island 2, you need to know how to actually get more of these bad boys. You'll start with two Innate Skills for your chosen Slayer, and get your first one when you hit level 2, but the system won't open up to you until you hit level 3.

Read more
Which character should you pick in Dead Island 2?
Dani lights a cigarette as zombies attack her from behind in Dead Island 2 key art.

After a brief introductory sequence showing how each of the playable characters, referred to as Slayers in Dead Island 2, end up on the doomed evacuation plane at the start of the game, you are forced to pick who you will play as. If you hadn't played the first game -- and considering it came out over 10 years ago we wouldn't blame you if you hadn't -- then you may not know that your choice of character is more than just cosmetic. Each of the six playable Slayers not only starts off with its own stat distribution from the others but with two ability cards as well. In a narrative sense, almost nothing is different depending on who you pick, so this decision all comes down to choosing the right character for how you prefer to play. Don't let the excitement of bashing in some zombie heads rush your decision and first make sure you understand just how important this choice is in Dead Island 2.
Can you change characters in Dead Island 2?

This is the main reason your character choice is so important. In Dead Island 2, once you choose a Slayer, you're locked in for the duration of the game. If you want to try out a different character, you will need to start the game over from scratch, so unless you're okay with undoing all your progress, or want to do a second playthrough, give this decision a good deal of thought so you don't have any regrets.
Every character's stats and skills

Read more
All Curveball locations in Dead Island 2
A pipebomb with kaboom written on it.

Your bread-and-butter method for dispatching the undead in Dead Island 2 will always be the strongest blunt or bladed melee weapon you have on hand. There's certainly no shortage of shovels, knives, gardening equipment, and even swords to choose from, but you can also mix things up with some throwable items as well -- and we don't just mean throwing your weapon. Curveballs, as the game calls them, are more like skills that can be equipped than weapons since they work on a cooldown timer rather than ammo. Your character can only hold two at once, but there are 13 in total to experiment with. You'll be given one by default, but the rest are up to you to collect. Here's a full list of all the Curveballs in Dead Island 2 and where to find them.
How to get all the Curveballs in Dead Island 2

We'll list off the Curvballs, their locations, and their effects in the order you should naturally come across them while playing Dead Island 2. If you miss one, you can always fast travel back to the area to collect it later. While you can only have two Curveballs equipped at any time, you can swap them out no matter where you are, so feel free to try them all out and change up your loadout depending on your current situation.
Meat Bait
Given as part of the story by Carlos in Emma's house, this lets you throw out a chunk of meat that explodes on impact into a pool of meat(?) that attracts all nearby zombies to it.
Shuriken
On your way to the Halperin Hotel, the Shuriken are lodged into a car door directly in front of you. Using these throws out three Shuriken in a horizontal spread that travels a short distance before falling. They don't do a lot of damage, but can stagger and even remove limbs if you aim them well.
Chem Bomb
This is the second unmissable Curveball and is given to you inside the Halperin Hotel to put out a fire. It is good for more than just fire control, though, since you can use it to make zombies wet and susceptible to electricity.
Caustic-X Bomb
Keep your eye out for "The Rav-Ages of Caustic-X" sidequest if you want to add this to your arsenal. Completing this quest will reward you with a bouncing bomb that deals some damage, but is mainly used for applying the Melting status on zombies and leaving behind damaging acid.
Electric Star
You'll be taken to the Brentwood Water Reclamation Project plant during the "Justifiable Zombicide" mission. While there, make sure to snag the Electric Star sticking out of the safety sign on the fence. If you missed it, you can also purchase it from Rodriguez later on. This Curvball is a straight upgrade over the Shuriken since it functions exactly the same, but is electrified.
Pipe Bomb
While going through the checkpoints between Beverly Hills and Monarch Studios, keep an eye out for an open crate with the Pipe Bomb in it on one of the tables. This is a basic timed explosive, so toss it into a group for maximum damage.
Molotov Cocktail
When you're brought into the Brentwood Sewer during "The Heart of Darkness" mission, the Molotov will be in the office next to the Filtration Access and Servicing room. If it wasn't obvious, this flaming bottle will light any zombie hit with it on fire, plus leave a lingering patch of fire on the ground.
Electric Bomb
This is another Curveball tied to finishing a sidequest, this time the "Jo's Rainy Day Stash" quest. Think of it as a Pipe Bomb, only replace the explosion with a dome of electricity that is great for stunning groups.
Flashbang
You'll need to pony up $2,500 and buy this Curveball from Rodriquez once you've completed the "Cremains of the Day" sidequest. What you get is a weapon that inflicts Traumatized on zombies, meaning they're stunned and available to be counterattacked.
Sticky Bomb
Bring Dougie at the Serling Hotel $1,500 and he'll part ways with the Sticky Bomb. This is just your old Pipe Bomb, but now it will stick to any surface -- or zombie -- it hits.
Bait Bomb
This is another item Dougie will sell you, this time only after you beat "The Search for Truth" main mission. For just $3,500, you can get what is essentially your Meat Bait and Pipe Bomb stuck together. Zombies will all close in on the bomb before it detonates
Nail Bomb
For the final Curveball you need to invest your cash in, you can buy the Nail Bomb from Ezekiel for $1,500. This is a simple explosive, but with the added benefit of inflicting Bleeding on anything it hits.
Military Grenade
Once you complete the "Boz Makes a Bang" sidequest for Hana, which you can only get after beating "The Rav-Ages of Caustic-X" and "Dez and the Mother of Satan" quests, you will be given the final Curveball in Dead Island 2. This high-explosive detonates on impact no matter what, which could be a good or bad thing depending on the situation. It isn't all that much more powerful than any other explosive, but the utility of it not having a timer makes it useful.

Read more