The more recent Far Cry titles have all straddled a line between mostly serious and dark main stories with wild and over-the-top gameplay. Far Cry 6 places you in the role of a freedom fighter trying to overthrow an oppressive government run by a corrupt dictator, but in between those main campaign missions are plenty of opportunities for off-the-wall antics and mayhem. It’s thanks to that balance that the game doesn’t become too self-serious and remains fun to play for the dozens of hours you can spend roaming the map completing optional objectives and searching out all the collectibles.
One of the wackiest new mechanics in Far Cry 6 is called Amigos. In past games, you could occasionally recruit other soldiers to fight with you, and in Primal even tame a wild animal to temporarily join you. Now there are uniquely named animal companions that you can unlock and take with you on your fight against the military powers of Yara. Each Amigo has its own advantages and abilities that you can level up to make them even more powerful. Plus, some are just downright adorable. Here’s a full breakdown of all seven Amigos to unlock in Far Cry 6, including the DLC ones.
Further reading
- Far Cry 6 beginner’s guide: Tips and tricks for overthrowing the government of Yara
- Far Cry 6: Where to find all USB Song Sticks
- The best weapons in Far Cry 6 and how to get them
Guapo
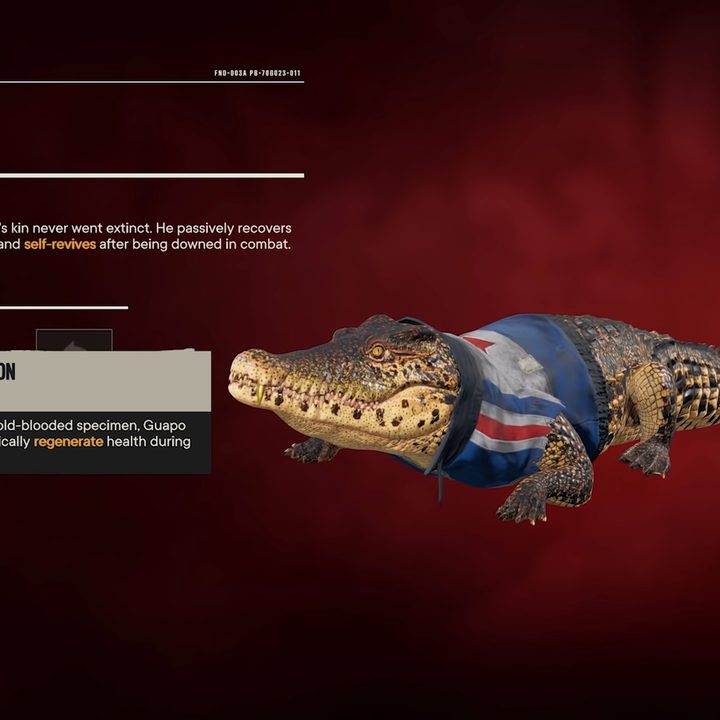
Guapo the crocodile is your introduction to Amigos and will be automatically unlocked for you as you play through the main campaign. He will become available specifically as part of the Juan of a Kind mission during the game’s prologue, so you won’t have to wait long at all to add this scaly pal to your team. His base perk is called Ancient Survivor. This gives him the ability to restore health over time as long as he’s not actively engaged in combat, plus he can revive himself once if he should get taken out during a fight. He’s a very tanky, set-it-and-forget-it kind of Amigo.
Guapo’s three abilities are: Body Regulation, Corner Beast, and Reptile Metabolism.
Body Regulation is unlocked by allowing Guapo to use his self revive five times, which should happen naturally as long as you bring him along on missions. Once you unlock it, it is basically an upgrade to Ancient Survivor. Now he will be able to regen his HP even while in combat.
Corner Beast can be unlocked only after you get Body Regulation. To get it, Guapo needs to regenerate a combined total of 3,000 HP while in combat. Again, this is one that will just happen if you continue to use him. The ability itself makes Guapo take less damage when he drops below 50% HP.
Reptile Metabolism is his final ability. Once Guapo reaches 50 total kills, he gets this buff to his self revive. Now, if he does go down, his self revive will bring him back up to 90% of his max health.
Chorizo
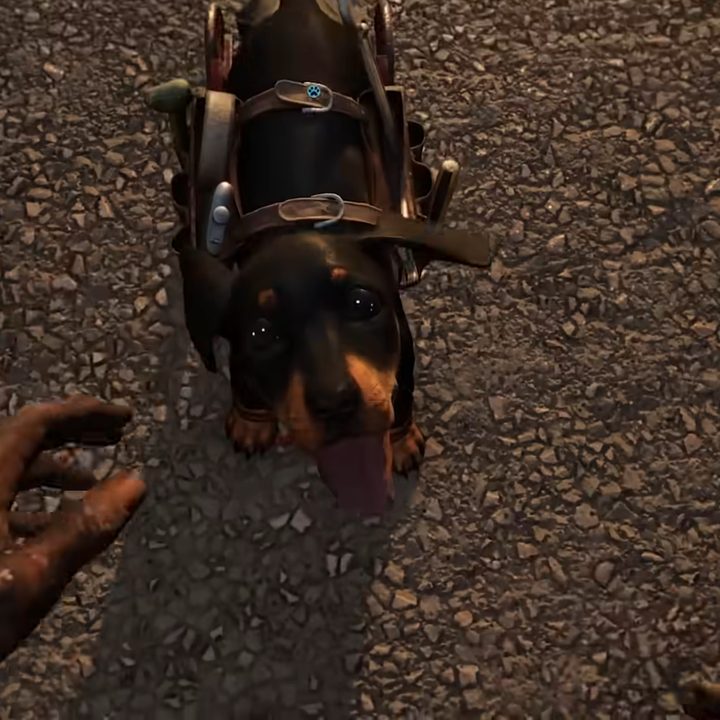
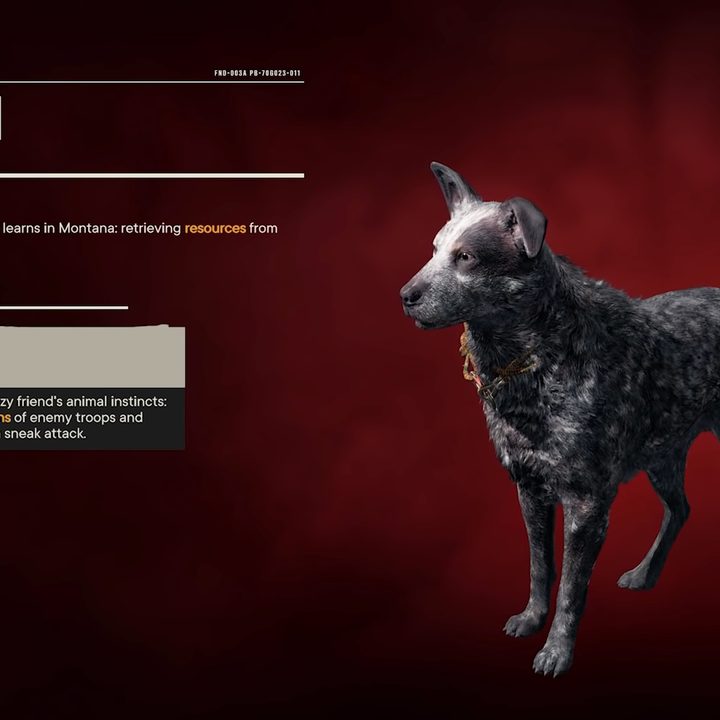
Who can honestly look at this little guy running around with his little tool bag and wheels and not immediately want him on your team? Chorizo the puppy was shown off extensively in the marketing for Far Cry 6, and for good reason. He’s fully aware of the effect he has on people and is ready to use it to your advantage. His main perk is The Attention-Seeker, which he uses to draw the attention of enemies so you can sneak past or up to for an easy stealth kill. To add this pupper to your team, you will need to do the Who’s A Good Boy and Fetch Quest Yaran Story missions on Madrugada, which become available once you do the Meet The Monteros main mission.
Chorizo’s three abilities are: Bloodhound, Yes, You Can, and Keen Senses.
Bloodhound will be quick and easy to unlock. Just have Chorizo do what he does best and distract 10 enemies to unlock this ability. With it, he will passively start marking any resources in your area on the map.
Yes, You Can is tied to Bloodhound. Keep Chorizo around while exploring to let him mark 36 loot containers for you and you will be able to restore some of his health every time you pet him. And let’s face it, you’re going to be petting this guy quite often.
Keen Senses will unlock after you heal him up with pets 50 times. Once you do, Chorizo will sometimes find some resources underground that he will dig up for you.
Chicharron
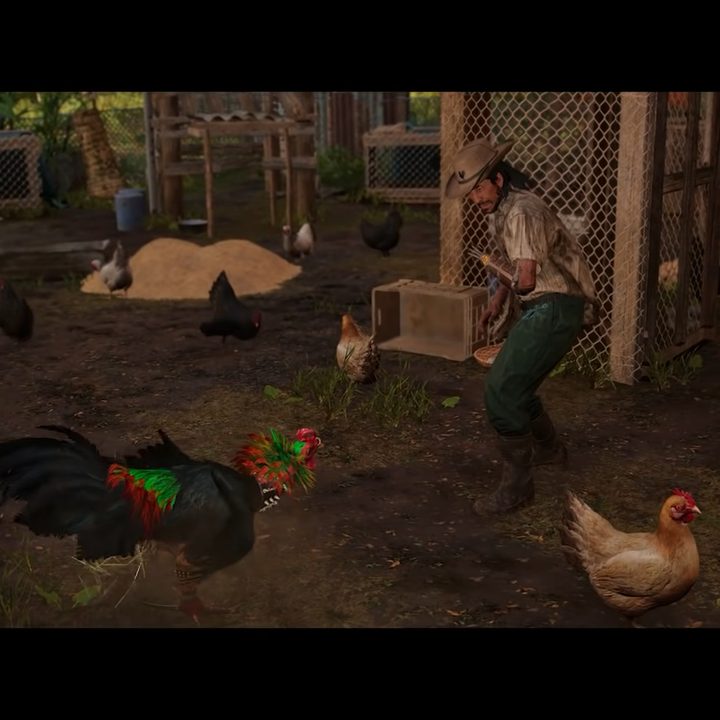
Don’t judge a book by its cover. Sure, no one would think a rooster would make a powerful Amigo, but Chicharron is not a bird you’d want to mess with. Unlike the other roosters you can only bring into cockfighting, this champion is ready to take down men multiple times his size. The trait of Angry Bird is more than just a cheeky reference since it allows Chicharron to literally launch himself at enemies to attack. To add this rambunctious rooster to your roster, you will need to complete three side missions that unlock after the main story mission called Meet the Legends on El Este. These are Man’s Best Enemy, Pecking Order, and Wingman, which begin on the Vacia Coast in Sierra Perdida.
Chcharron’s three abilities are: Roid Rage, Angrier Bird, and Chicken Feet.
Roid Rage makes this already aggressive bird even more frightening. Once he gets a taste for blood, specifically after getting 12 kills, Chicharron will get a buff to his attack speed plus deal double damage once his health drops below the 70% mark.
Angrier Bird will be a fairly quick unlock after getting Roid Rage. Once Chicharron gets 24 more kills while getting the buffs from Roid Rage, his launching attack will start to knock enemies off their feet.
Chicken Feet again requires the previous ability. Have your feathery friend knock over a total of 50 enemies with his Angrier Bird skill and he will have a higher chance of dodging attacks while Roid Rage is active.
Boom Boom
Fans of Far Cry 5 will recognize this Amigo right away. Don’t ask how, but somehow Boomer has changed his name to Boom Boom and arrived on Yara to help you in your adventures. He functions a lot like DD from Metal Gear Solid V, but with some extra tweaks here and there. The main perk Boom Boom starts with is called Fetch Boy, where he can go and loot some resources off of dead bodies for you. It only takes completing one side mission, Boom or Bust, to unlock him. You can get this mission after the main story mission called Meet Maximas Matanzas and heading to Valle De Oro, Balaceras.
Boom Boom’s three abilities are: Pointer, Expert Tracker, and Thick Coat.
Pointer can be unlocked by using Boom Boom’s natural skill to loot 10 dead bodies. With it, he will begin to mark any enemy nearby, soldier and animals alike.
Expert Tracker follows up on Pointer. Once he’s marked 24 animals specifically, Boom Boom’s range he can mark things for you will expand.
Thick Coat will be unlocked last, once Boom Boom has tagged a total of 50 enemies. This is just a nice buff to his defense so he can take more abuse from enemies without going down in combat.
Oluso
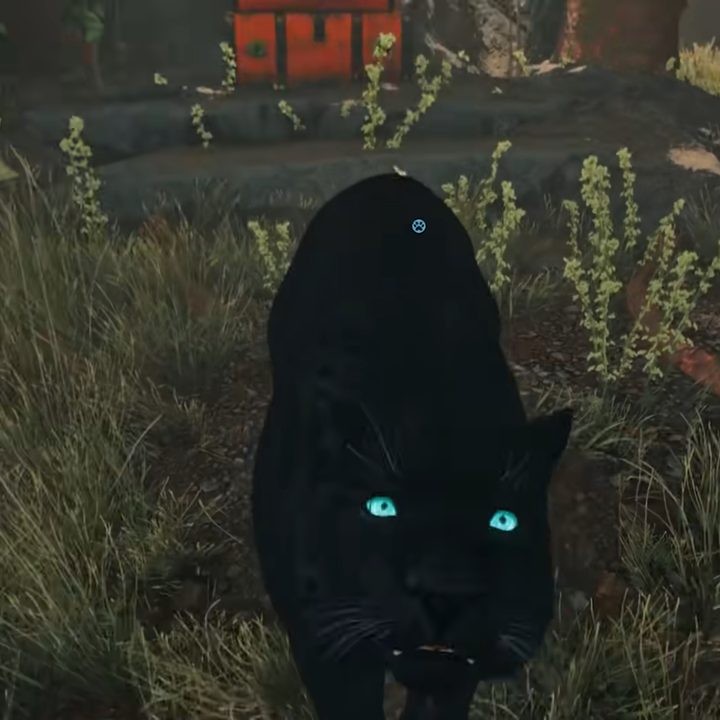
The last Amigo you don’t need any DLC for is the beautiful black panther Oluso. This deadly cat is as quiet and deadly as you are in some cases, making it a fantastic partner for stealth-focused players. Her starting perk is called Shadow Striker, which allows her to take down enemies in a flash without making noise; plus, any bodies she kills will vanish. However, getting Oluso isn’t easy. You need to complete all the Triada Blessings missions to unlock her, which include Triada Blessings Part 1, Ida’s Triada Relic, Oku’s Triada Relic, Mimo Abosi’s Triada Relic, and finally, Triada Blessings Part 2. These missions start on Isla Santuario in Oluwa Cave.
Oluso’s three abilities are: Mimo Abosi’s Luck, Rage of Ida, and Mist of Oku.
Mimo Abosi’s Luck can be unlocked by having Oluso use her Shadow Striker skill on 12 enemies in restricted areas. This training will make her more likely to silently kill her targets.
Rage of Ida requires 24 total takedowns to unlock. Once you have it, though, any time Oluso performs a successful takedown, any other enemies nearby will become terrified and try to run away.
Mist of Oku can be gained once Oluso scares the pants off of 50 enemies with Rage of Ida. This passive coats her in a shroud of smoke if her health drops below 50%, which not only increases her stealth but also makes her completely immune to damage and regenerates health much faster.
K-9000
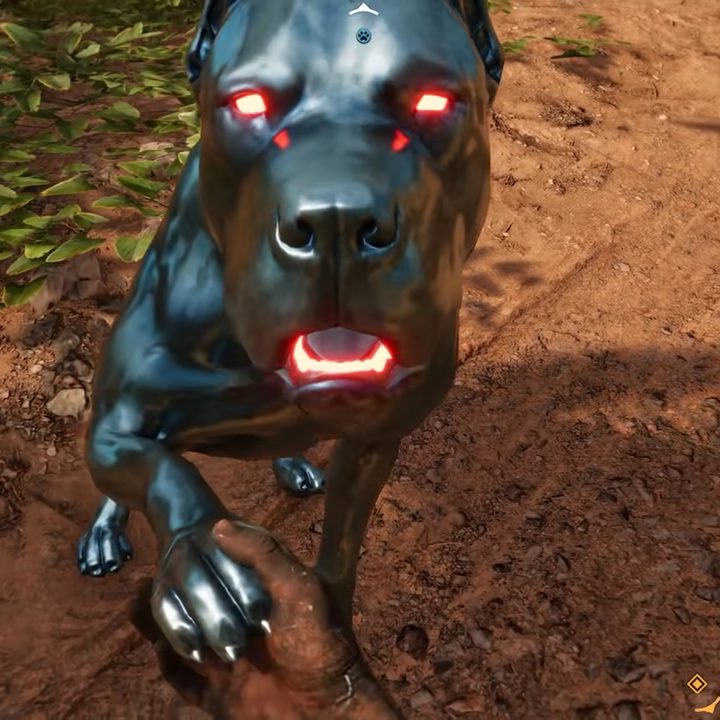
The first of two DLC exclusive Amigos is K-900. This metallic dog with glowing red eyes can only be obtained, for now anyway, if you purchase the Blood Dragon Pack. His standard perk is simply called Iron Skin, which makes him take less damage from bullets and absolutely no damage from fire and poison. Naturally, that makes him quite the tank even though he’s technically classified as a stealth-type Amigo.
K-9000’s three abilities are: Enhance, Enhance!!!, and Termination Protocol.
Enhance should pop in no time at all. The requirements for unlocking it are just for K-9000 to take 100 points of damage total. Once he can Enhance, K-9000 will start tagging alarms, tripwires, turrets, and security cameras for you.
Enhance!!! will unlock once K-9000 tags 24 security cameras specifically. With this upgrade, he will deal bonus damage to any tagged enemy he attacks.
Termination Protocol is the result of your robo dog killing 50 enemies that have been tagged. This failsafe will make your loyal mechanized dog self-destruct when he runs out of health.
Champagne
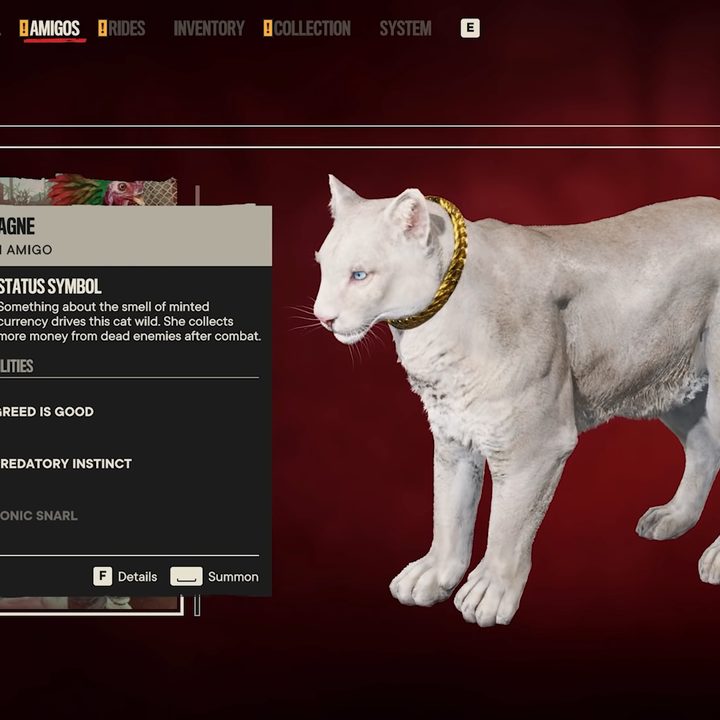
Last up is the yin to Oluso’s yang. Champagne is the white panther you can unlock by buying the Vice DLC pack. This high-class beauty’s starting ability is called Status Symbol, which lets her pick up more money from enemy bodies. She’s good for more than just earning cash, though, but the more you have, the better.
Champagne’s three abilities are: Greed Is Good, Predatory Instinct, and Sonic Snarl.
Greed Is Good unlocks itself once Champagne gets 12 kills. This ability increases the chances she will perform a successful takedown as the amount of money you have in your bank goes up.
Predatory Instinct will open up when Champagne gets her 24th takedown. A great passive skill — now, when she performs a silent takedown, she will also automatically loot the enemy’s body.
Sonic Snarl is Champagne’s last ability. It unlocks by having her loot 1,000 Yaran Pesos from killed enemies and makes it so that whenever Champagne is damaged in a fight, there’s a chance she will let out a Sonic Snarl that can knock down surrounding enemies.