
Agent builds and specializations are some of the most important aspects of The Division 2. It’s what makes the grind for new loot both enjoyable and addictive. With an intricate gear system and a myriad of different stats to pay attention to, though, it can be a lot to figure out. Our builds and specializations guide details everything you need to know and what you need to pay attention to while upgrading your loadout.
For more on The Division 2, check out our beginner’s guide, leveling guide, and skills and perks guide.
Six gear tiers

Weapons, Gear, and Armor are split into six color-coded tiers: Worn, Standard, Specialized, Superior, High-End, and Exotic.
At first, you’ll mostly find Standard gear, with a few Specialized pieces here and there. As you dive deeper into the story, you’ll start to acquire Specialized and High-End gear.
While it’s not always the case, usually the higher the tier, the better the gear. For example, a level 25 Superior automatic rifle typically deals more damage than a level 25 Specialized automatic rifle. Additionally, rarer tiers like Superior and High-End tend to have more Talents (which we’ll discuss later).
Weapon bonuses

The Division 2 has seven core gun types, six primary weapons and sidearms. The six primary types each have their own stat bonus built in:
- Assault rifles: Health damage bonus
- Light machine guns: Out of cover damage bonus
- Submachine guns: Critical hit chance bonus
- Rifles: Critical hit damage bonus
- Marksman rifles (snipers): Headshot damage bonus
- Shotguns: Melee damage bonus
None of these bonuses should influence your decision on what to equip, but each bonus does adhere to the preferred style of each weapon type. For instance, if you use a sniper, you best be aiming for headshots. If you’re using a shotgun, you’re going to be up close and personal when firing.
How to get the best DPS
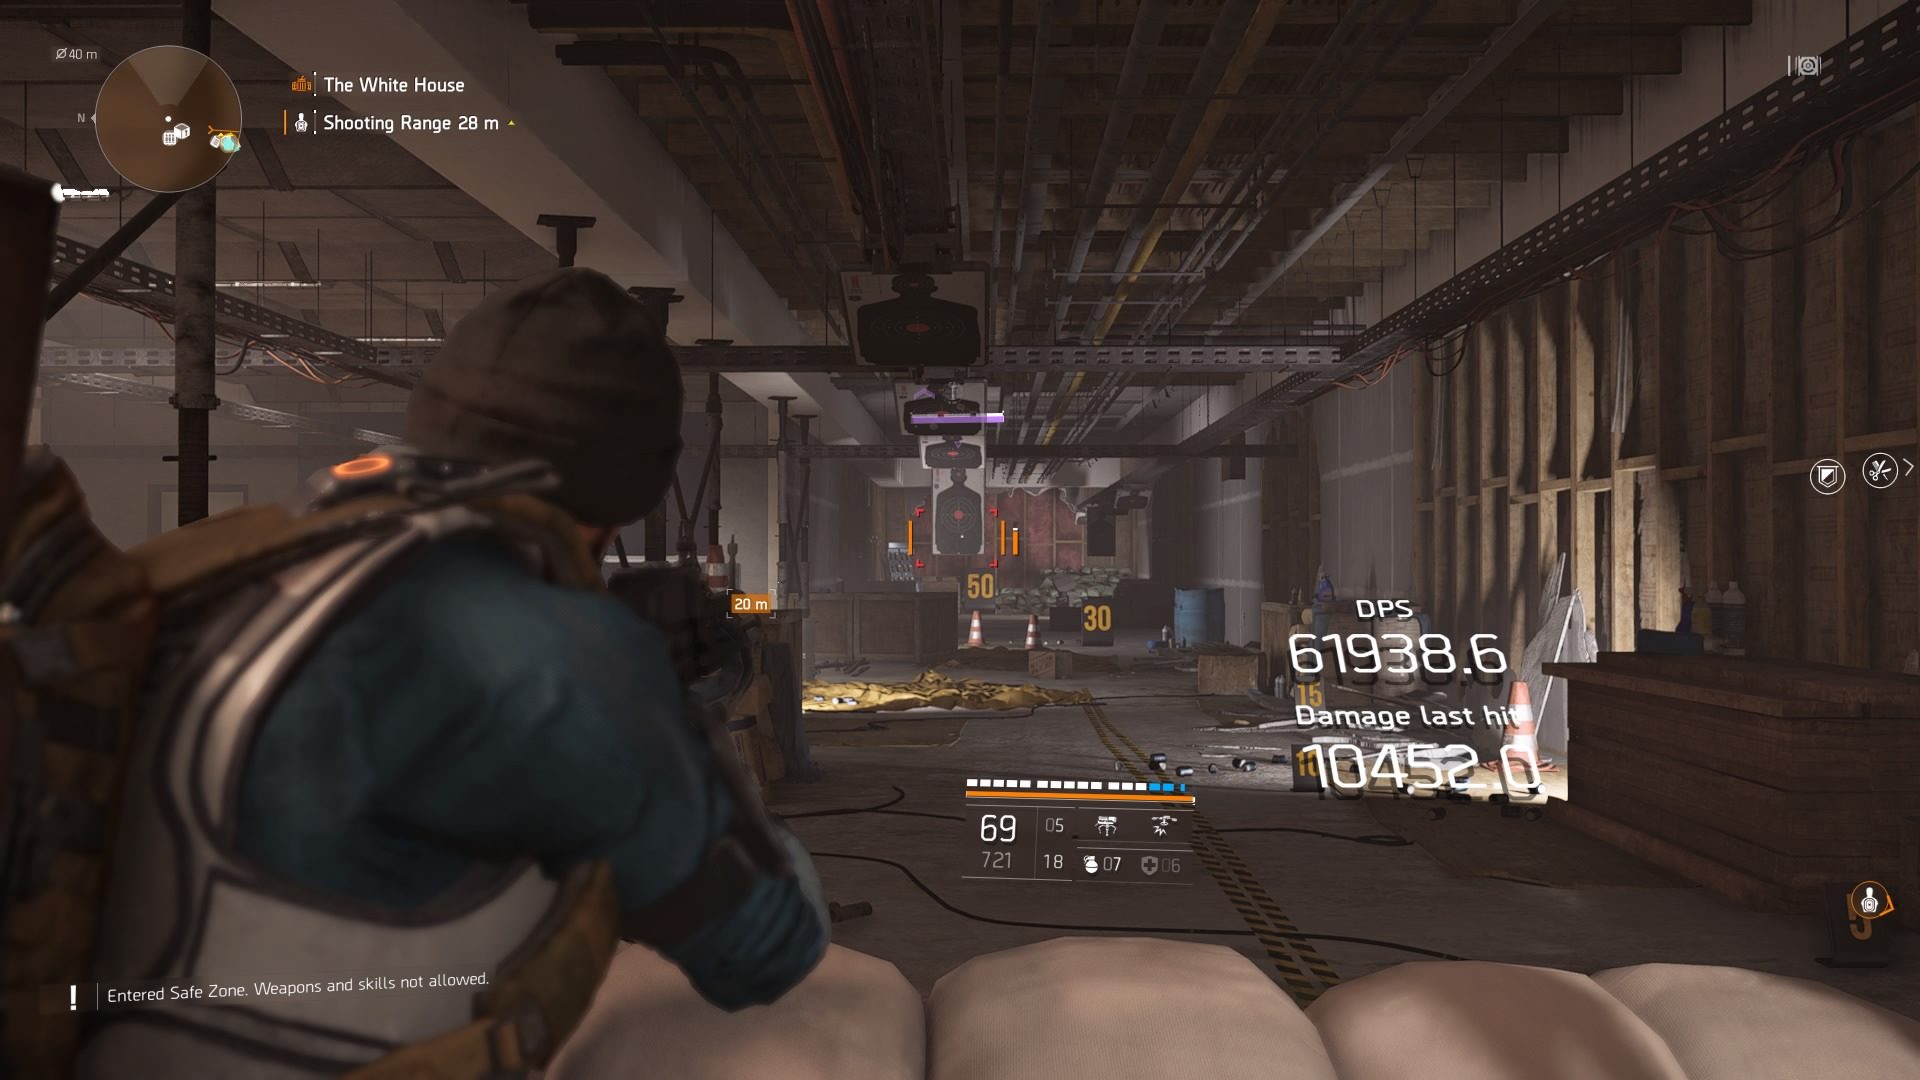
Each weapon has three core stats: DMG, RPM, and MAG. DMG measures overall damage, RPM tells you how many rounds per minute a gun can fire, and MAG is how many bullets the magazines hold.
These figures, particularly damage, give you a general idea of weapon strength, but they don’t tell the whole story. While automatic weapons have a much lower DMG value than their semiautomatic cousins, that doesn’t mean they’re better. And even a light machine gun with higher DMG than, say, a submachine gun, may not be the better choice of the two.
You should be concerned with DPS — damage per second.
After completing a handful of missions, you’ll unlock the firing range in the bottom floor of the White House. Here you can shoot at targets and see how much DPS each gun deals.
Your best build should feature your weapon that delivers the most damage per second in one of two primary slots. This will invariably mean having an assault rifle, submachine gun, or light machine gun equipped at all times. Your second primary slot can then be filled however you please.
Standard rifles are more accurate than automatic weapons and great for both mid and long range, so we tend to stick with one of those. We only use shotguns and snipers in special scenarios. The former we used when up against hatchet-carrying elites, and the latter we used in missions where we were up against similarly long-range enemies.
Accuracy and stability

Right below DMG, RPM, and MAG are bars measuring accuracy and stability. These don’t technically affect DPS, but they are important to pay attention to.
Accuracy reflects how likely the bullet is to stay right on track through the air, while stability influences recoil. Guns with high recoil are harder to control and keep on target.
If you have two very close weapons in the same class, going with the one with higher accuracy and stability is the play — even if it actually deals less DPS. This is simply because you’ll probably wind up inflicting more damage with a more accurate and stable gun when battles get intense.
Damage Drop Off, Reload Time, and Critical Strike Range
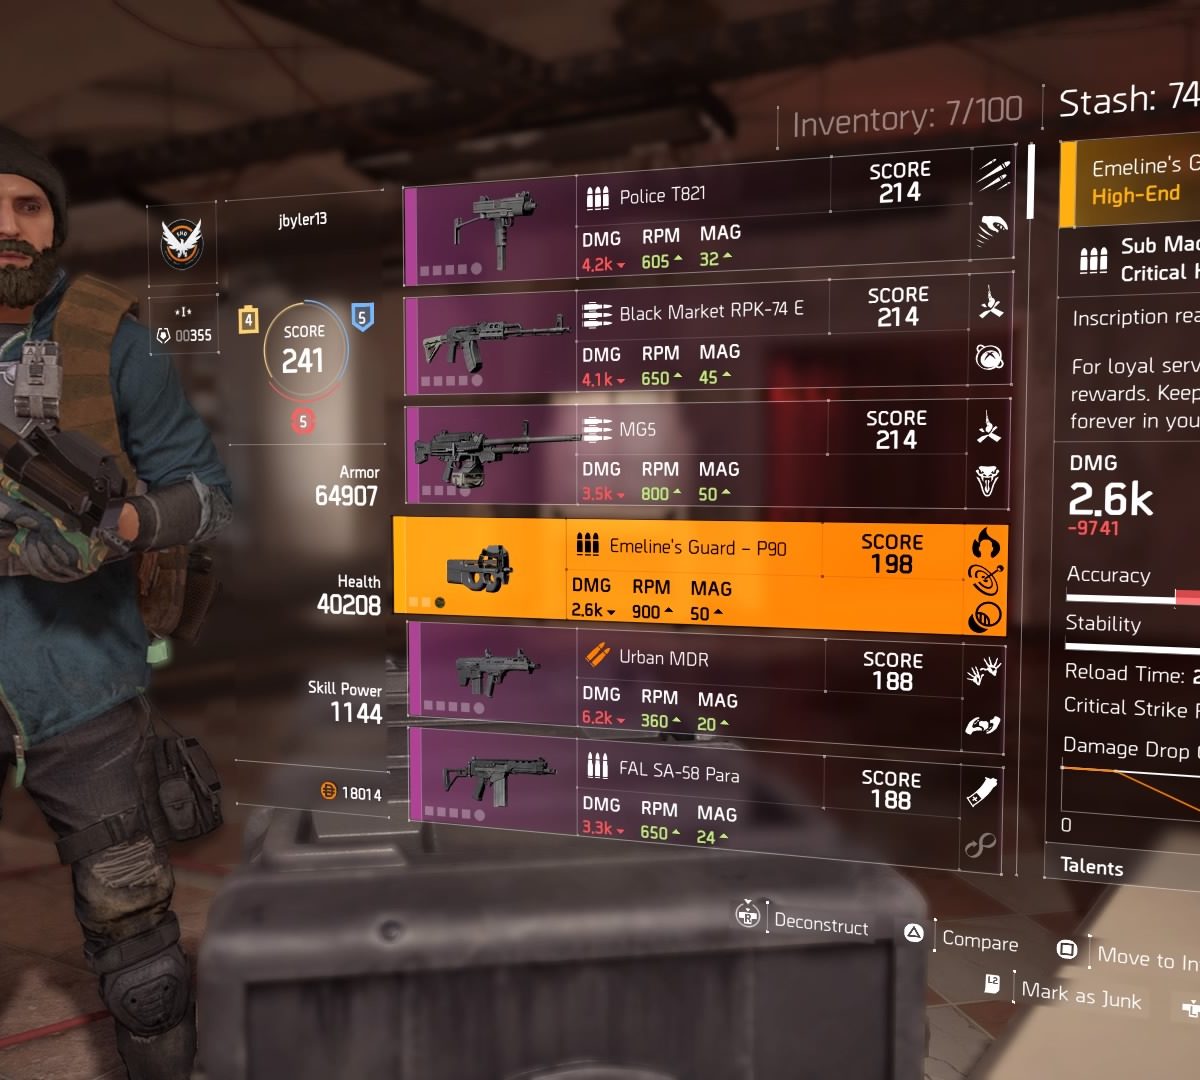
If you want to get really nitty-gritty, check below accuracy and stability at reload time, critical strike range, and damage drop off. Reload time is measured in seconds. It’s best to weigh both reload time and MAG together.
For example, we have an awesome light machine gun that takes nearly six seconds to reload, but it holds 100 bullets per magazine. So the long reload time is certainly worth it.
Critical strike range, measured in meters, tells you the range at which each gun works best. These figures are more for guiding you on the best way to use a weapon. If you’re trying to use a light machine gun long distance, it’s not going to perform nearly as well as a rifle from the same spot.
Damage drop off looks at how the DMG value is affected the further you move away from a target, all the way to 100 meters. Again, this is more to show you how to use each weapon effectively.
The line graph shows both your currently equipped weapon and the weapon in your inventory you’re comparing it to. It is especially helpful when comparing guns of the same class, though.
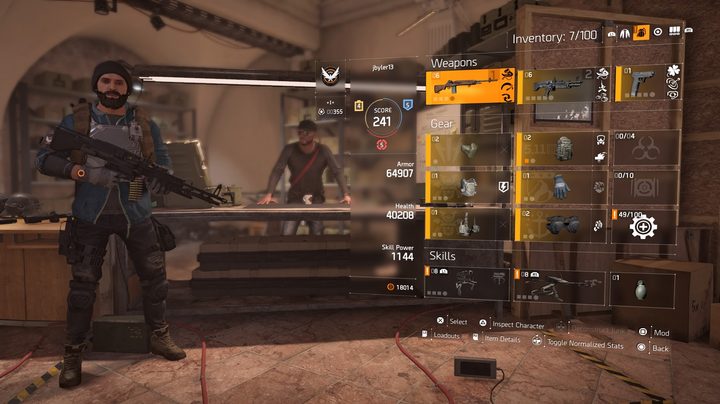
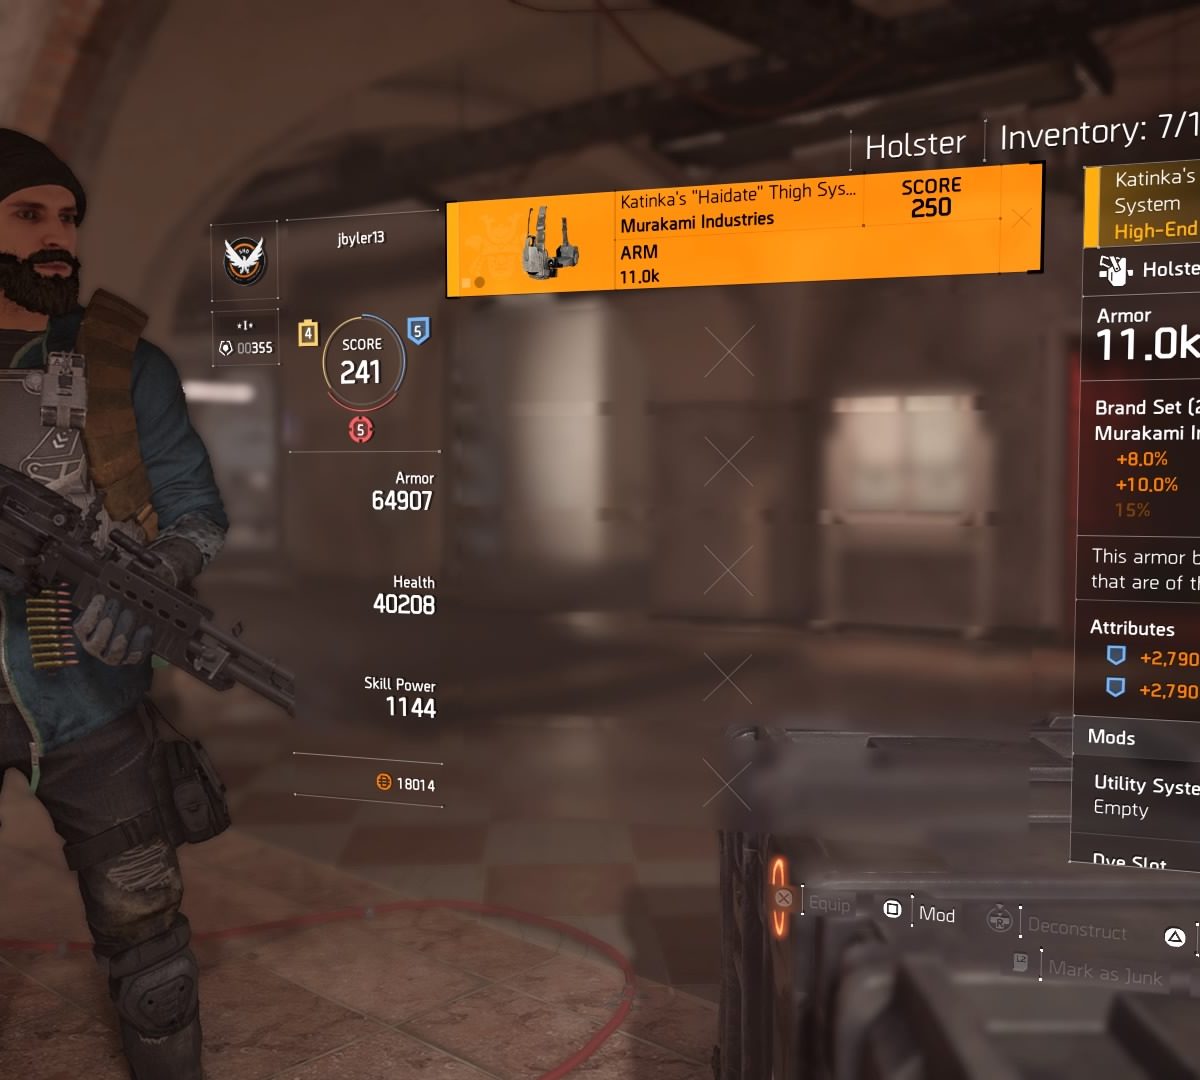
Armor values and attributes
Your Division agent has six pieces of armor: Mask, backpack, vest, gloves, holster, and kneepads. Each piece of gear has an armor value that contributes to your overall armor value just below your level in the lefthand pane of the character menu. Gear also affects your health and skill power, which are just below your overall armor value.
At least at first, the higher the armor value, the better it is for your build. But as you get closer to the end of the game, it’s not so cut and dry. When sifting through new pieces of armor, you can see how each piece would change your armor, health, and skill power.
Often times, you’ll see that gear that seems better on the surface, but is, in fact, not for your current build. A backpack with a 1,000-plus armor bump from your current one can actually lower your overall armor score.
How? From various additional stats such as attributes. Each piece of gear has up to three bonus attributes. The rarer the gear, the more attributes it is likely to have, so High-End gear more often has two or three bonus attributes, while Specialized gear might only have one or two. Each piece of gear is different, despite how similar they may look.
There are many different attributes, including bonuses to armor score, skill power, weapon damage, health, critical hit chance, and damage to elites. Pay attention to how gear affects your overall build (armor, health, skill power).
One good rule to follow is to always worry about increasing armor over health. Some pieces of gear may raise armor by a bit and health by quite a bit more. It may not seem logical to equip that piece of gear. It’s almost always worth it, because frankly, once your armor is down, your health will deplete quickly no matter what. The goal is to keep your shields up.
Armor Brand Sets
Armor Brand Sets provide further bonuses. Each piece of higher level gear has a brand. Equipping one piece of armor from a brand will unlock an additional bonus across similar categories seen in attribute bonuses. Equip two pieces of the same brand and you’ll unlock the second bonus. A full three piece set gives you three additional bonuses.
Pay attention to brands when mixing and matching armor. Swapping one piece of gear may lower your build, but swapping that same piece of gear alongside an additional piece of the same brand can strengthen your build. Some experimentation is required to find the right build.
On a general note, attributes and Brand Set bonuses that increase elite damage are really, really helpful. Elite, highly armored enemies and bosses are tough as nails. But you can turn their armor into jelly quicker than you’d expect with the right bonuses.
Talents

Have you had enough with stat bonuses yet? Wait, there’s more. See the icons next to your armor and guns? Those are called Talents, and each piece of gear can have up to three.
Unlike attributes and Brand Sets, however, Talents aren’t always present in High-End gear. Talents cover a wide array of very specific bonuses. For example, the Ranger Talent grants a two percent weapon damage bonus for every five meters between you and your target.
Some Talents in the endgame only activate if you have a certain battery power. We’re not actually sure they are called batteries, but the green icon next to your overall level looks like a battery.
When looking at Talents, you’ll see that some of them might be grayed out, meaning that you need a higher battery level to activate them.
From what we’ve figured out, you can raise your battery level by equipping mods gear mods.
Mods

Speaking of mods, many pieces of armor and weapons can be modded. Not all armor can be modded, but if eligible, you can equip general system mods that offer small bonuses across a wide range of stats.
Weapon mods, however, offer both bonuses and reductions. Each mod improves one stat while diminishing another. For instance, attaching a scope to a long rifle can increase its accuracy but lower its critical hit chance. Or you can increase critical hit damage while reducing reload speed. Or you can hasten reload speed but reduce the number of bullets in a magazine. The list goes on and on. The give and take here is interesting to tinker with.
Agent skills can also be modded to increase skill power.
Once you start diving into mods with late-game gear, you’re going to want to visit the recalibration bench next to the crafting station in the White House. Here you can easily swap mods from one piece of gear to another quickly.
How to improve your build
You’ll constantly acquire gear throughout missions and open world activities. We recommend capturing Control Points in particular, because clearing them unlocks supply rooms, each holding numerous pieces of gear (typically two weapons and two pieces of armor at your current level). Here are a few other avenues to take to better your build:
- Play missions on hard: After completing a mission, you can replay it on hard mode. Playing on hard mode is naturally a challenge, but the loot drops are better.
- Crafting: That crafting station we mentioned? Use it. You’ll acquire blueprints from missions and activities that can be turned into new gear with the help of materials and E-credits.
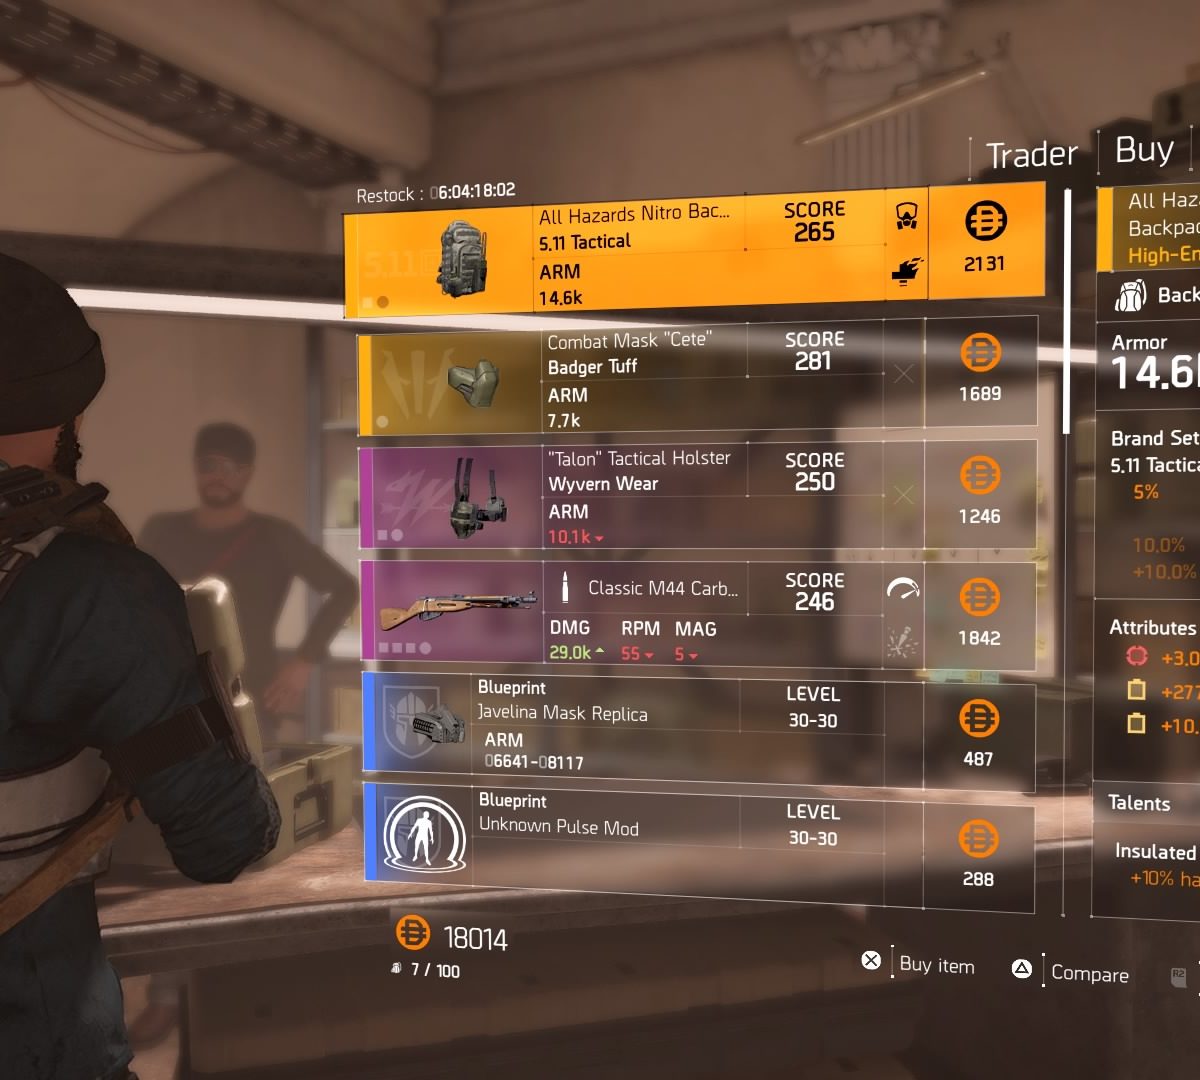
- Vendors: Sure, you probably sell unneeded gear to vendors already, but their personal stock perpetually changes. We often find at least one piece of gear for sale that is better than what we already have.
Gear score (endgame)
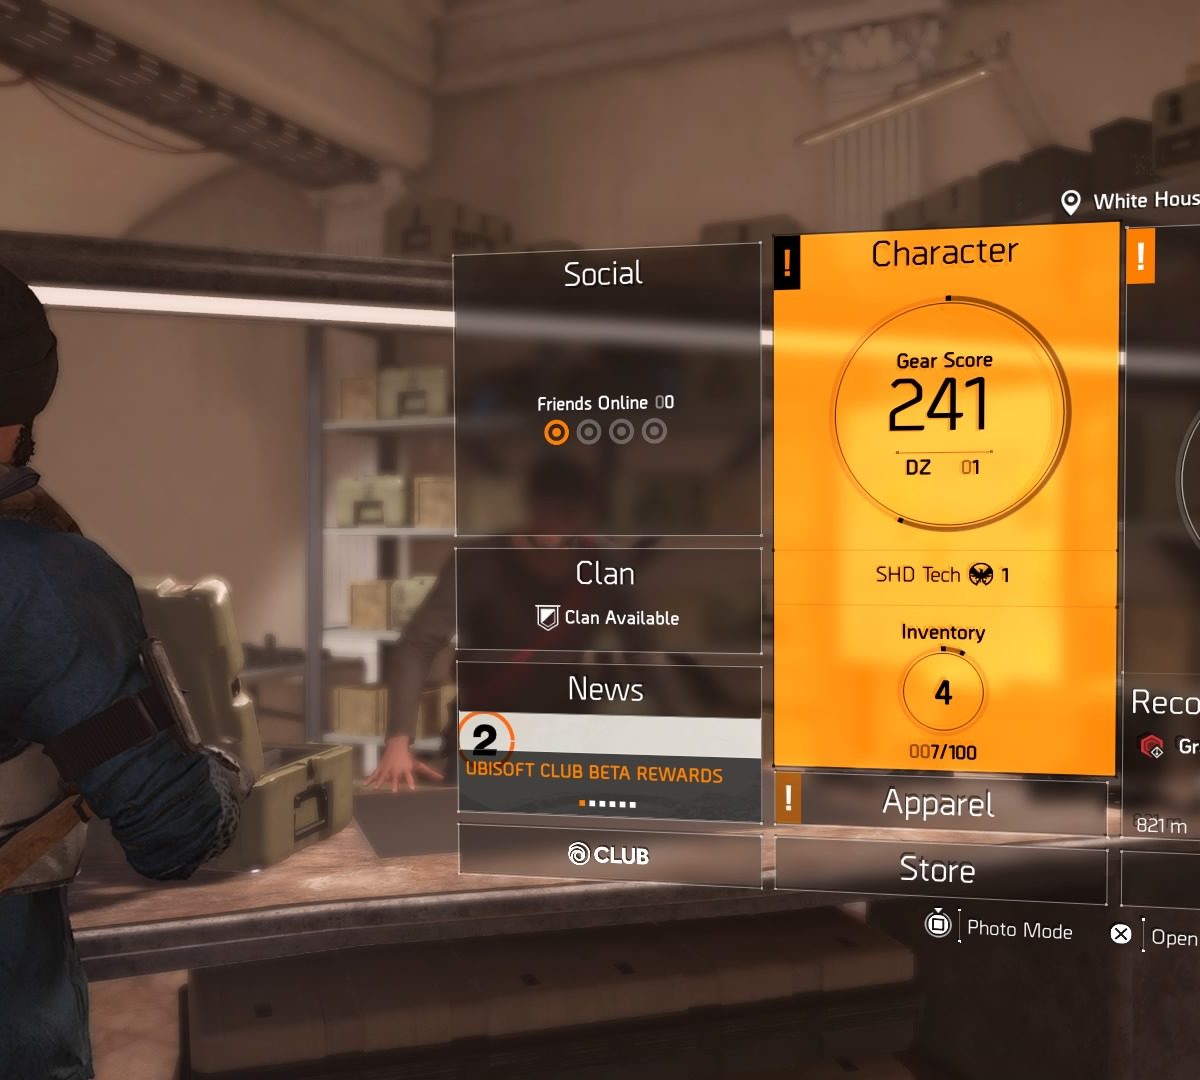
Once you complete the campaign, you enter the endgame. Gear no longer has a level 1-30 in the endgame. Instead, gear is assigned a numerical score. You also have an overall gear score which averages your total build.
It’s important to note that weapons and gear with higher scores aren’t necessarily better. Just like before, you want to check how each piece of gear affects your health, armor, skill power, and DPS.
You do however need to obtain certain thresholds to enter specific missions and events. So the overall goal should be to increase your gear score while not compromising the power of your build.
You’ll have plenty of opportunities to fortify your build in the endgame since a plethora of new and challenging challenges opens up when the main story wraps.
Specializations (endgame)
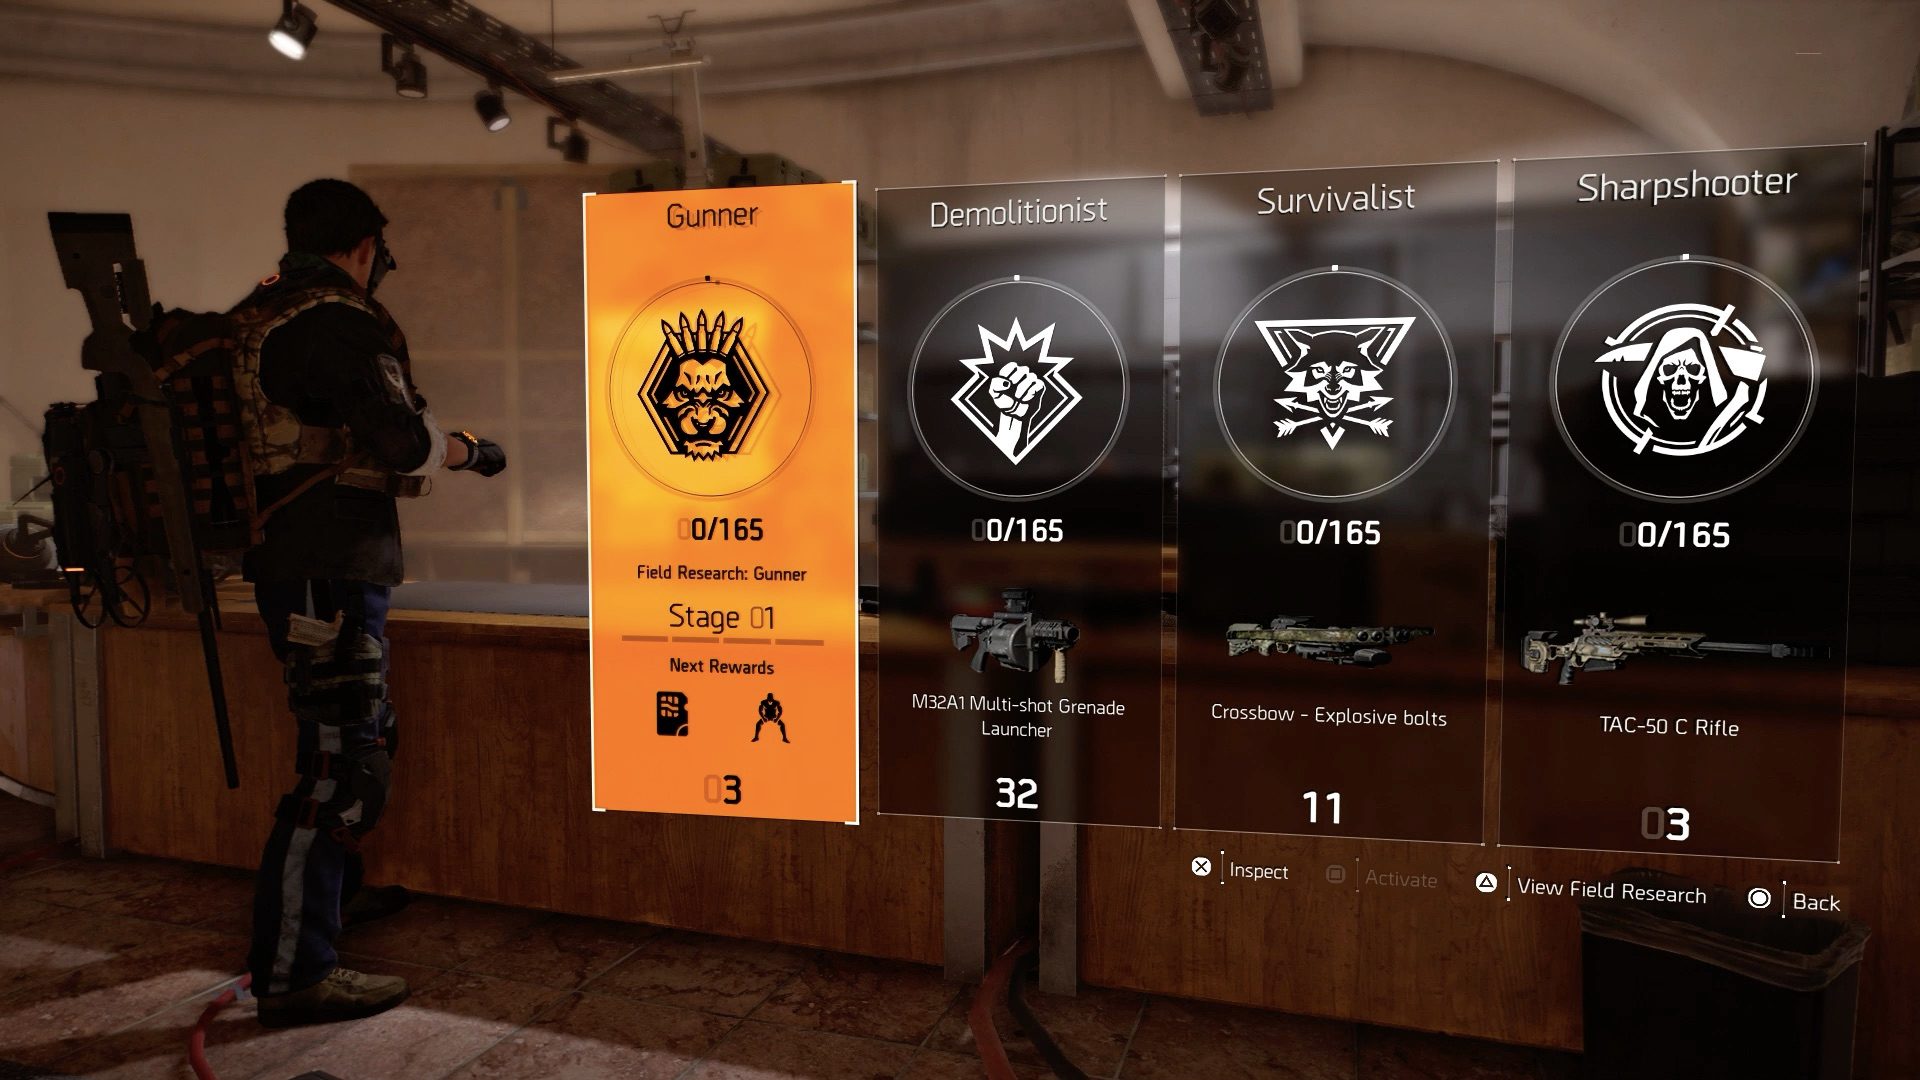
When you enter the endgame, you’ll be asked to choose a specialization at the table next to the Quartermaster in the White House. These build paths are new to The Division 2. You can choose from Demolitionist, Survivalist, Sharpshooter, and Gunner. Each one comes with their own unique weapon.
- Demolitionist: M32A1 Multi-shot Grenade Launcher
- Survivalist: Crossbow – Explosive bolts
- Sharpshooter: TAC-50 C Rifle
- Gunner: Minigun
An important note about Gunner: This specialization was added as post-launch DLC. While all players can access it, you need to complete a lengthy series of in-game challenges to use Gunner if you don’t own the Year 1 pass ($40).
Each specialization also has a unique skill tree. You’ll eventually unlock new variants for agent skills, a unique specialization pistol, a class-specific grenade, and plenty of stat bonuses for both you and your squad. Specializations won’t drastically change how you play the endgame, but they do give you additional goals to work towards.
You’re not restricted to one specialization, so don’t fret about your initial choice. You can acquire and switch between specializations at any time.
We suggest browsing through the skill tree for each one before making your decision, though. That way you can see which one aligns with your playstyle the most, and then start chipping away at making yourself the best Demolitionist, Survivalist, Sharpshooter, or Gunner you can be. It’s probably advisable to focus on leveling one up fully first before jumping around.


