If you've just upgraded to a new gaming PC or want to make the most of your older one, then optimizing Windows 11 and 10 for gaming can go a long way to maximize what your PC can do. It ensures you're getting the most for your money, and aren't leaving performance on the table which could make your game playing experience that bit more fun.
You can squeeze extra performance out of your Windows PC by tweaking a few settings, along with optimizing settings in apps like Discord, Steam, and your GPU's control panel. Not all of these tips will boost your frame rate in games (read our guide on the graphics settings to change in every game for that), but they all make it a little easier to use a Windows PC for gaming.
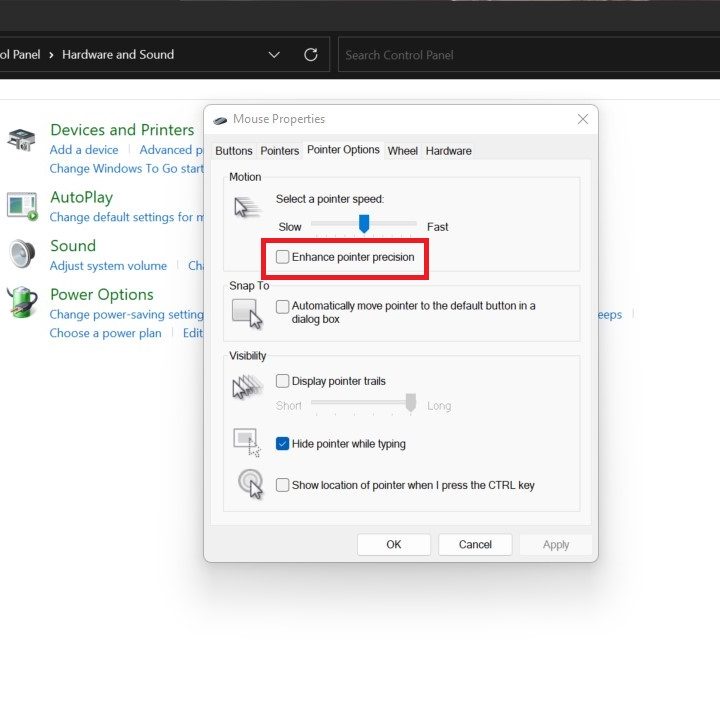
Turn off the Enhance Pointer Precision option
The best place to start optimizing Windows for gaming is your mouse. By default, Windows has an option enabled called Enhance Pointer Precision, which is a form of mouse acceleration. In short, Windows will speed up or slow down how quickly your cursor moves based on how fast you're moving the mouse.
It should go without saying that this is pretty terrible for gaming, where a quick mouse flick or short correction can make all the difference. It seems basic, but I've seen people who have played games on a PC for months before realizing that mouse acceleration was turned on.
Step 1: Open the Control Panel by pressing Windows + S and searching for "Control Panel."
Step 2: Select Hardware and sound, and then select Mouse under the Devices and printers section.
Step 3: Select the Pointer options tab, and then uncheck the box next to Enhance pointer precision.

Use Game Mode or a game optimizer
Windows 11 and Windows 10 include a feature called Game Mode, which will automatically allocate resources toward your game whenever you're playing. At least, that's what it's supposed to do in theory.
In some rare case, Game Mode can actually cause performance issues. I still recommend turning it on, but alternatives like Razer Cortex offer performance-boosting benefits without potential drawbacks.
Step 1: Open the Settings screen by using Windows + S and searching for "settings."
Step 2: Select Gaming from the left menu, and then select Game mode.
Step 3: Tick the slider to On.
Step 4: If Game Mode isn't working for you, you can use a third-party tool like Razer Cortex. We detail how to do that (along with some other helpful tips) in our guide on how to boost frame rate without a new GPU.

Pause automatic Windows updates
It's a bad idea to disable automatic updates in Windows, as Windows updates can solve major issues you may not have known about. You can't disable them, in fact, without some registry hacks.
Microsoft still allows you to pause automatic updates for up to five weeks, and Game Mode will make sure they don't interrupt your gameplay session.
Step 1: Open the Settings screen by using Windows + S to search for "settings."
Step 2: In the left menu, select Windows updates.
Step 3: Under More options, select Pause updates.
Step 4: While you're on this screen, make sure to check for updates, as installing new drivers and Windows updates can vastly improve your gaming performance.

Pull in background downloads in Steam
Steam is the DRM platform where most PC games live, and it will automatically update your games in the background. It can even install games while you're playing, which can vastly cut your performance.
Step 1: Open Steam and select Steam in the upper-left corner. Then, select Settings.
Step 2: Choose the Downloads tab in the menu, and uncheck the Allow downloads during gameplay box.
Step 3: Check the Only auto-update games between box and select a range of time where you're not using your computer.
Step 4: By default, all games will automatically update on Steam, and you can't disable that universally. That's why I recommend setting an automatic update time. You can turn off automatic updates for individual games, though.
Select the game you want and right-click it. Choose Properties and then select the Updates tab. In the first dropdown, choose Only update this game when I launch it. We typically leave this setting off, as there's nothing worse than waiting for a huge update to finish when you want to play a game.
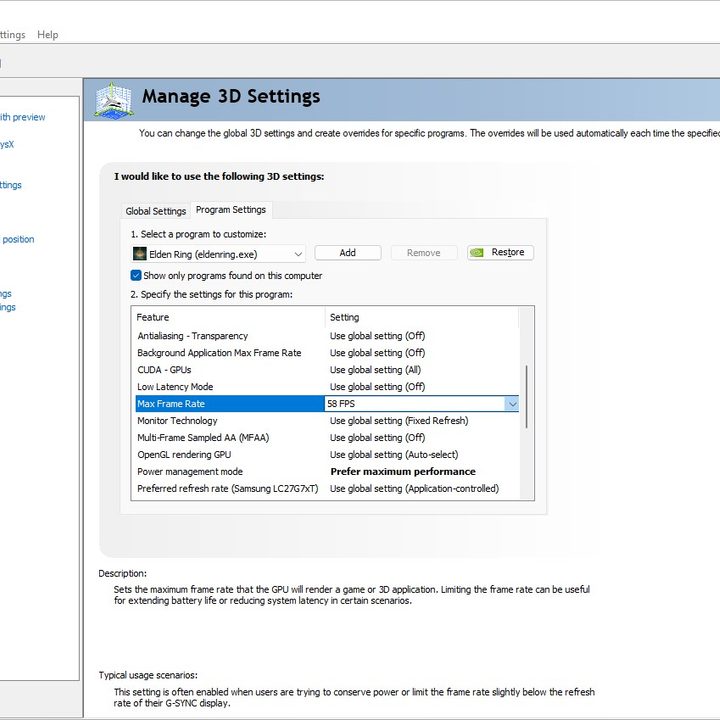
Configure your GPU software
AMD and Nvidia include software for their GPUs, and optimizing the settings in these apps can do a lot for your gaming performance. If you have one of the best graphics cards, rest assured it's supported by equally as impressive software.
Step 1: If you have a Nvidia GPU, follow our guide on the best Nvidia Control Panel settings. There are a few things you can quickly tweak, though.
Select Manage 3D settings and ensure you're on the Global settings tab. Set Power management mode to Prefer maximum performance and set the Max frame rate to the refresh rate of your monitor. Those are the two settings you need to change, but experiment with the others following the guide linked above.
Step 2: For AMD GPUs, you have a lot more options. Click the Settings icon and select Graphics from the menu. Turn on Radeon boost and Radeon anti-lag for the smoothest experience.
You have several other options here, but I'd recommend leaving them off universally. You can create profiles for individual games in Radeon Software, where you can adjust these settings at a more granular level.

Update all of your drivers
Although you'll want to turn off driver and other updates while you're gaming, it's still very important to keep everything up to date. In some cases, bugs and other issues can massively impact the performance of your PC, so staying up to date with your drivers is one of the most important things you can do to optimize Windows 11 for gaming.
Step 1: Start by searching for new GPU drivers. You can find new drivers in Radeon Software for AMD and GeForce Experience for Nvidia. If you're lost, read our guide on how to upgrade your GPU drivers.
Step 2: Windows update will catch most of your other drivers. Go to Settings, select Windows update, and choose Check for updates. Install anything new when you restart your PC.
We have a dedicated guide on how to update drivers in Windows if you're having trouble.
Step 3: Windows should catch most of the drivers you need. However, it's a good idea to check for chipset drivers from your motherboard manufacturer or your CPU brand.

Disable Windows notifications
Notifications can kill your gaming experience immediately. Not only are they annoying, but they take over full-screen applications, and with some games, that can cause a full-on crash. Game Mode and apps like Game Booster can disable notifications temporarily, but you'll need to go through Windows to kill them outright.
Step 1: Go to the Settings menu by using Windows + S and searching for Settings.
Step 2: Select System, then choose Notifications.
Step 3: Select Notifications once again to expand a dropdown. Configure your settings here. If you want to turn off all notifications, tick the slider to Off.
Step 4: You can adjust the notification settings or individual apps below, which I recommend you do. One Microsoft Teams problem notification, for example, takes over the screen while playing Destiny 2, so disable those notifications when you're not using the app.

Get into the internet fast lane
Windows uses something called Nagle's Algorithm, which essentially smooths your internet connection. It's great for day-to-day browsing, but it can increase your latency if you're playing games online with a Wi-Fi connection.
You can disable Nagle's Algorithm through the Windows Registry. Before going forward, though, keep in mind that messing with the registry can use issues, so proceed at your own risk.
Step 1: The first thing to do is note your IP address. Right-click the Windows Start menu and select Windows terminal.
Type ipconfig and hit Enter. Note the IPv4 address for your default internet adaptor (it should be the top one).
Step 2: Right-click on the Windows Start menu again and select Run. Enter regedit and then press Enter to open the Registry Editor.
Step 3: Navigate to the following path: HKEY_LOCAL_MACHINE\SYSTEM\CurrentControlSet\Services\Tcpip\Parameters\Interfaces
You'll find a collection of folders with random letters and numbers. Click through these folders until you find one with the DhcpIPAddress entry. There should only be one, and it should have your IP address noted in the Data column. Double-check against the IP address you noted earlier.
Step 4: In this folder, right-click and select New DWORD (32-bit) value.
Step 5: Name the value TcpAckFrequency and set the value to 1. Then, click OK.
Step 6: Right-click again and select New DWORD (32-bit) value another time.
Step 7: Rename the value to TCPNoDelay and set the value to 1. Click OK.
Step 8: That's all you need to disable Nagle's Algorithm. If you want to go back, set the values of your new entries to 0 or delete them from the folder.

Turn off Xbox Game Bar (and other overlays)
Overlays are a problem with PC gaming, and it's hard to get rid of all of them. The one you've almost certainly encountered, though, is Xbox Game Bar. It's a useful tool, but it has a tendency to interrupt your gameplay (especially if you're playing with a controller). Thankfully, you can turn it off.
Step 1: Go to the Settings menu by using Windows + S and searching for "settings."
Step 2: Select Gaming, and choose Xbox game bar. In Windows 10, you can turn it off completely. In Windows 11, you can only disable shortcuts from opening the overlay.
Step 3: You can uninstall the Xbox Game Bar if you don't want to use it at all (though reinstalling is a bit of a hassle).
To do so, open Windows PowerShell and enter the following command: Ge-AppxPackage Microsoft.XboxGamingOverlay | Remove-AppxPackage. Tap Enter and wait for the uninstall the finish.
Step 4: There are other overlays you may want to disable. For Steam, open the app and follow Steam > Settings to enter the proper menu. Select In-game and uncheck the Enable the Steam overlay while in... box to disable the overlay.
Step 5: Discord also has an overlay that can be annoying. Open the app and navigate to the Settings menu. Select Game overlay under the Activity settings section and uncheck the box next to Enable in-game overlay.

Kill background processes
It's no secret that background processes can eat up system resources on your PC, but it's tough tracking everything down. Killing apps from the taskbar is a hassle, and even then, other services may still be running in the background.
Windows gives you the option to configure these services so they never start in the first place.
Step 1: Right-click on the Windows start menu button and select Run.
Step 2: Type msconfig and hit Enter.
Step 3: Select the Services tab and check the box next to Hide all Microsoft services.
Step 4: Uncheck boxes next to the services you don't want running. Note that some services are critical to running apps, so make sure to search for what your PC is running before disabling the app.
Use a higher power plan in Windows
If you're playing games on a gaming laptop, a higher power plan in Windows is a good idea. This won't do much for your desktop, but it's still a necessary step if you're gaming on the go.
Step 1: Open the Control Panel and select System and security.
Step 2: Select Power options, and switch to the High performance plan. Some older laptops may not have this option. In that case, consult your manufacturer's included utility for power plan settings.
Optimize your games
One of the biggest ways to improve in-game performance, is to manage your game and graphics settings. You can do this on a game by game basis on their built-in menus, or through your graphics card drivers -- whether Nvidia or AMD.
Although the specific settings you should use will vary based on your PC's components and the games you're playing, there are some different settings worth configuring in certain ways. Take a look at our guide on optimizing PC performance for gaming, to find out the best settings to adjust for maximum performance.
We also have performance guides for specific games, including: