A Mac computer is a versatile device, and one of its biggest productivity boosters is called Hot Corners. This convenient feature is somewhat hidden away in System Preferences, but it's easy to access and quick to set up when you know where to look.
It's easier to navigate on MacOS when using Hot Corners, eliminating the need to remember keyboard shortcuts, and this can even speed up drag-and-drop operations. The feature can be a bit confusing in some circumstances, but a few tips can make using Hot Corners painless once you're familiar with them and the muscle memory is built up.

What are Hot Corners on a Mac?
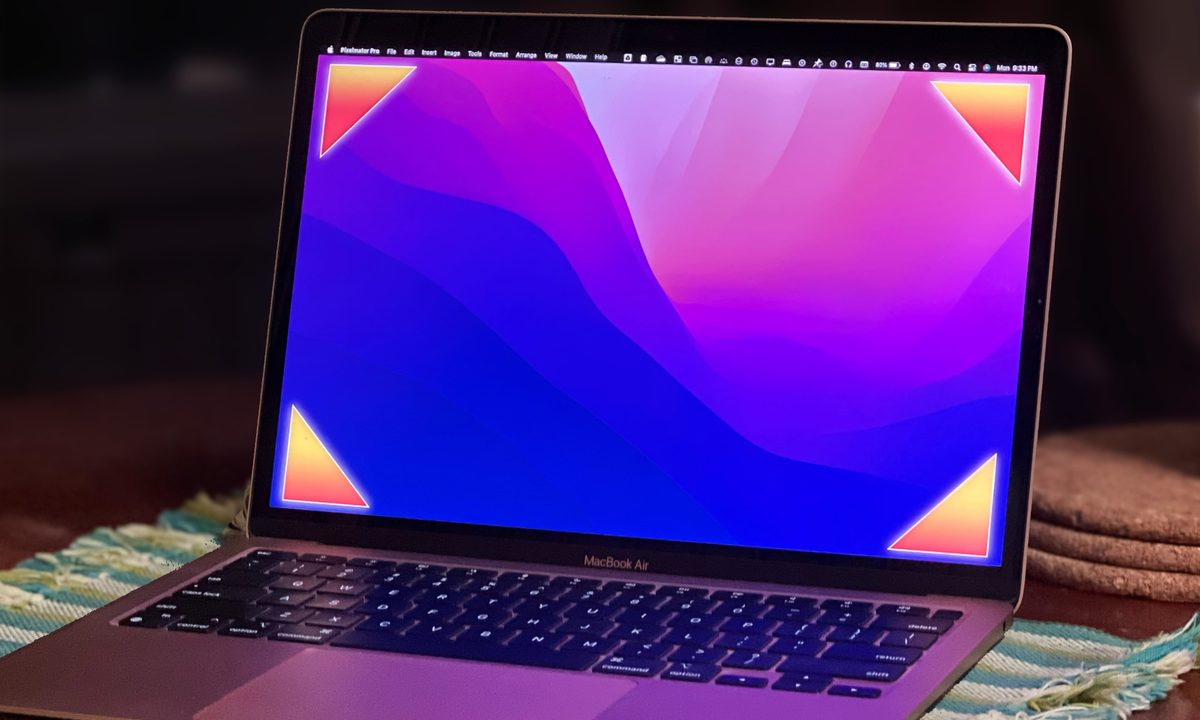
On a Mac, the term Hot Corners means something special happens when moving the pointer into a corner of the screen. There are four Hot Corners and 10 possible actions for each corner along with the option to disable a corner. Opening Launchpad, creating a Quick Note, putting the display to sleep, and more can be done simply by using a Mac's mouse or MacBook's trackpad to slide the pointer to a corner.
How to set up Hot Corners
Step 1: To enable Hot Corners, open System Preferences and type "Hot Corners" in the search box at the upper right or open the Desktop & Screen Saver pane, select Screen Saver, and open Hot Corners options by using the button at the lower-right.
If Hot Corners are disabled, you will see four menus with hyphens surrounding a tiny Mac display and positioned beside each corner. If any Hot Corners are already assigned, the currently selected actions will appear beside the corner that activates them.

Step 2: Choose one of MacOS' Hot Corner menus to show a list of actions. Any corner can be set to open Mission Control, which shows all open apps; Application Windows, the windows of the current app; the Notification Center; or the Desktop.
You can set a Mac's Hot Corner to control the screen saver, starting it without waiting several minutes for it to come on or disabling it when you're reading.
You might want to instantly put the display to sleep or lock the screen of your Mac with a Hot Corner.
There are also two app launch options, one that opens Launchpad to see a list of all apps, and Quick Note, which opens a small window for notes.

How to use MacOS' Hot Corners
You can activate any of the actions assigned to a Hot Corner by moving the pointer into a corner. Don't worry about this interfering with normal usage since getting close isn't enough. You have to push all the way into the top-left, top-right, bottom-left, or bottom-right corners to trigger the action.
Use MacOS' Hot Corners for easier drag and drop
You can use Hot Corners when dragging text, files, or images to another window. This saves a huge amount of time and effort if you often have several overlapping windows open. Rather than rearranging to place the source and destination side by side, you can use Hot Corners. This makes MacOS’ drag and drop much more powerful.
If a Hot Corner is set to Desktop, Mission Control, or Application Windows, dragging to that corner shows those locations as a drop zone. It's like being able to reach behind other windows to drop almost anywhere.

What if your Mac's Hot Corners don't work?
Sometimes your Mac's Hot Corners might not work as expected. In most cases, this is because one or more extra monitors are connected and setup as an Extended display. This might be a standard monitor, or you might be using an iPad as a second monitor.
In this mode, MacOS treats the two screens as a single large display and that means some Hot Corners might be located on the secondary monitor. For example the left Hot Corners might behave normally but when you move to the right corner or edge, the pointer appears on the extended second screen.
In other cases, the power management system needs to be reset to clear the problem. Here's how to resolve both issues.
Step 1: Open the Displays pane of MacOS' System Preferences and drag the position of the secondary display so it isn't exactly aligned with the primary display.
If a corner of the main screen extends beyond the corner of the other display, you'll be able to use that Hot Corner on both the primary and secondary screen.
The trade-off is that the extra monitor's physical location might not match where MacOS thinks it is. That means when you move the pointer to the other display, it might appear to jump instead of transitioning smoothly.

Step 2: If multiple monitors are not causing the problem, you might need to reset the system management controller (SMC), which controls how your Mac manages power. Since Hot Corners are related to the Screen Saver and Sleep, the SMC might be preventing normal operation of this feature. On Apple Silicon Macs, simply plug it into power and restart the Mac to reset the SMC.
If you own an Intel MacBook, a special keyboard combination is required. Press and hold Control, Option, and Shift for seven seconds, then hold the power button to turn off the MacBook. Keep holding all three keys and the power button for another seven seconds. Then wait a few extra seconds and power on again.
For desktop Intel Macs, the SMC can be reset by removing the computer from power. After unplugging your Mac, wait 15 seconds then plug it in again, wait five more seconds, then power on.
Resetting the SMC should resolve any lingering problem with the Mac's Hot Corners feature.

MacOS's Hot Corners are great time savers. Navigating the Mac becomes much easier and drag and drop is super-charged when a Hot Corner is used. Your screen saver won't come on unexpectedly if the pointer is moved to the disable corner and it can quickly lock a Mac when you're stepping away.
It's worth taking a few minutes to become familiar and setup Hot Corners on your Mac to make everything a bit easier. If you like to use your Mac more efficiently and productively, make sure you're familiar with these keyboard shortcuts.