The M13 sits in a curious place in Call of Duty: Warzone‘s lineup of weapons, usually taking a backseat to the much more popular M4A1. It trades damage for low recoil and a high rate of fire, making it great for downing enemies at close- to medium-range encounters, but lousy at doing so in long-range ones. With a proper M13 Warzone loadout, though, you can morph the gun into whatever you want. Attachments like the Tempus Marksman barrel give the weapon greater range and accuracy, while the FSS Close Quarters Stock makes the gun very aggressive. The M13 is a powerful weapon — you just need to build it correctly.
There isn’t a de facto best M13 Warzone setup, but our three M13 builds cover the main types of weapons you’ll want to take into Warzone. We’ve included a full build, fit with perks and equipment, so you know what to take into battle if you’re playing Modern Warfare or Plunder. In Warzone itself, you’ll have to use what’s available to you (or call in a loadout drop if you’re lucky enough). Still, with our best M13 loadouts, you’ll know what to look for.
More Call of Duty: Warzone
- The best Akimbo pistols in Call of Duty: Warzone
- How to get the armor satchel in Call of Duty: Warzone
- The best perks in Call of Duty: Warzone and what they do
All-around
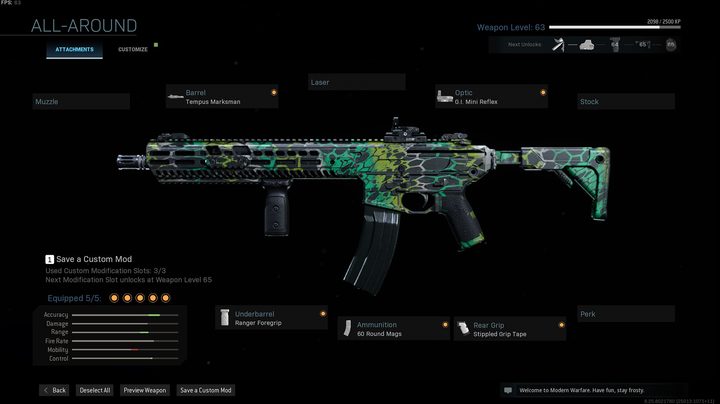
Attachments
- Barrel: Tempus Marksman
- Underbarrel: Ranger Foregrip
- Optic: G.I. Mini Reflex
- Ammunition: 60 Round Mags
- Rear Grip: Stippled Grip Tape
Secondary
- Renetti
Equipment
- Lethal: C4
- Tactical: Heartbeat Sensor
Perks
- E.O.D.
- Ghost
- Amped
You can take the M13 a lot of different ways, so the best M13 build for Warzone and Modern Warfare will depend on how you like to play. This all-around build leans into the M13’s already high accuracy and recoil control without sacrificing too much mobility. The Tempus Marksman barrel is a house, increasing damage range and bullet control while reducing recoil. It does, however, limit your movement and ADS speed. If you prefer something a little more aggressive, swap the barrel out for the Tempus Cyclone.
In the chamber, we have 60 Round Mags, which is the only attachment we recommend in every build in this guide. Simply put, the standard 30-round magazine isn’t large enough, and the M13 has a decently long reload time. It’s better to have double capacity than to have, say, Slight of Hand as a weapon perk. The optic comes down to personal preference, but we went with the G.I. Mini Reflex. If you don’t care for optics, either add the Monolithic Suppressor for increased range or the M13 Skeleton Stock for better mobility in close-range encounters.
The other two attachments are mainly focused on balancing the weapon. The Ranger Foregrip sacrifices some ADS speed for better recoil control and aiming stability, while the Stippled Grip Tape adds ADS speed — giving back what the Ranger Foregrip takes away — while improving sprint to fire speed. These two attachments almost cancel each other out, but you’re still left with a few upsides without any sacrifices. Between the two, you get better sprint to fire speed and better recoil control with essentially no downsides.
For a sidearm, we chose to run a Renetti, but feel free to swap it out for a handgun you like (or a launcher, if that’s more your speed). Equipment-wise, the combination of C4 and the Heartbeat Sensor is tough to beat. C4 is versatile as a trap, but you can use it as a Semtex, too. Throw and detonate right away to blow away enemies before they have time to react. The Heartbeat Sensor isn’t as obvious a choice as C4, but it’s still great for spotting enemies, especially in the wide, open areas of Warzone.
For perks, we have a little bit of everything. E.O.D. reduces damage; Ghost takes you off of UAVs, personal radars, and Heartbeat Sensors; and Amped allows you to quickly swap between weapons and deploy equipment. E.O.D. and Ghost are a solid combination, but feel free to experiment with the tier-three perk. Spotter and Tracker are the best alternatives.
Close-quarters
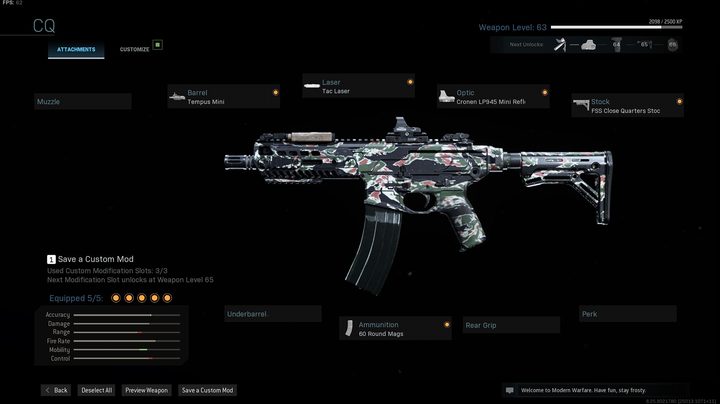
Attachments
- Barrel: Tempus Mini
- Laser: Tac Laser
- Ammunition: 60 Round Mags
- Optic: Cronen LP945 Mini Reflex
- Stock: FSS Close Quarters Stock
Secondary
- HDR
Equipment
- Lethal: Semtex
- Tactical: Flash Grenade
Perks
- Double Time
- Overkill
- Shrapnel
This build is all about mobility. The key to it is the Tempus Mini barrel. Over the Tempus Marksman, the Mini has vastly improved ADS speed, allowing you to quickly pop in and out of your sight whenever opponents come up. The barrel combines nicely with the FSS Close Quarter Stock, which further improves ADS speed at the cost of some aiming stability. We gave up some of the ADS speed with the Cronen LP945 Mini Reflex optic, which offers a nice wide field of view for spotting opponents while aiming. If you don’t mind the ironsights, swap this bit out for Stippled Grip Tape. That will boost your ADS even more while increasing sprint to fire speed.
Don’t discount the Tac Laser, either. Although giving away your location is usually an exorbitant cost when outfitting your weapon, it doesn’t make much of a difference in a build like this. You’ll be sprinting, jumping, and sliding around the map anyway. The Tac Laser offers improved ADS speed, which is always great, but more importantly, it offers better aiming stability and steadiness when walking while aiming. Close-quarters builds usually sacrifice aiming stability, making for lousy weapons at medium- or long-range encounters. With the Tac Laser, you at least get some of your aiming stability back.
The Tac Laser helps when it comes to long-range encounters, but this build still isn’t ideal for them. That’s where the HDR comes in. There isn’t much in the second perk slot that really helps this build anyway, so Overkill is a free roll. We prefer the HDR for sniping, but feel free to swap your secondary out for a different rifle if you want to.
Minus the HDR, we kept the aggressive theme going with equipment and perks. Semtex grenades are basically small C4 charges, allowing you to quickly clear a room, and Shrapnel even gives you an extra use. We traded the Heartbeat Sensor for a Flash Grenade to stay aggressive. Pop a Flash Grenade before entering a room or to escape an encounter you can’t win.
We’ve already covered perks two and three. In the first perk slot, there really isn’t another choice for this build other than Double Time. Increased sprint and crouch movement speed will allow you to outrun your opponents and, hopefully, outgun them, too.
Silent range
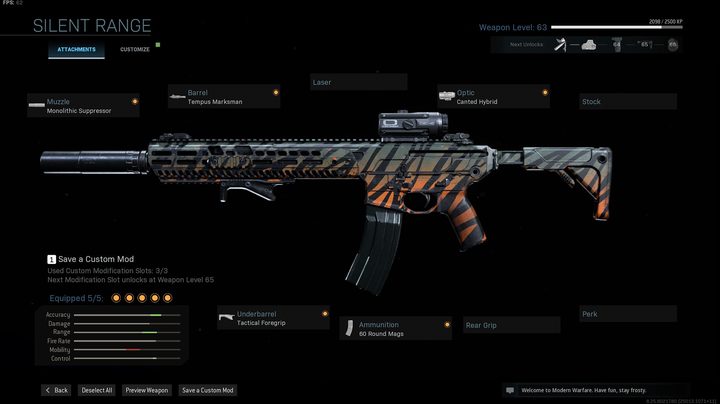
Attachments
- Muzzle: Monolithic Suppressor
- Barrel: Tempus Marksman
- Underbarrel: Tactical Foregrip
- Optic: Canted Hybrid
- Ammunition: 60 Round Mags
Secondary
- .50 GS
Equipment
- Lethal: C4
- Tactical: Heartbeat Sensor
Perks
- Cold-Blooded
- Ghost
- Amped
The M13 can play a sniper rifle role with the correct loadout. The combination of the Monolithic Suppressor and the Tempus Marksman barrel gives the weapon incredible reach and accuracy, all while keeping your shots undetectable by your opponents. Of course, we have the obligatory 60 Round Mags in the chamber, this time combined with the Tactical Foregrip. The Tactical Foregrip offers increased aiming stability while only hindering movement speed. If you prefer a slower, more methodical approach, you can swap it out with the Ranger Foregrip. That attachment offers aiming stability and recoil control, though at the cost of ADS speed and walking speed while aiming.
The optic slot is a bit of a freebie. We included the Canted Hybrid for a 3.25x zoom when you’re firing at range and a side-mounted reflex sight when you’re caught in close- or medium-range encounters. You’re giving up some ADS speed with all optics, so that’s not much of a trade-off. The concern is that the Canted Hybrid optic isn’t specialized. Something like the Merc Thermal Optic is better if you’re only concerned about range, or even the Variable Zoom Scope if you really want to lean into the sniper theme.
Otherwise, this build is pretty stock. The .50 GS in the secondary slot is decent in medium-range encounters, which is great for opponents running up on your sniping spot. Like the optic, though, this one depends on how you want to play, so feel free to swap the sidearm for something else. In the equipment slots, we have the standard combo of C4 and the Heartbeat Sensor. You can actually use C4 as intended instead of using it as a pseudo-grenade in this build, with the Heartbeat Sensor tipping you off to any nearby opponents.
For perks, Cold-Blooded and Ghost basically make you undetectable by any equipment or killstreaks, while Amped allows you to quickly swap to your sidearm if any opponents sneak up on you. This spread is fairly standard for most sniper builds, so we recommend leaving it as is. If you prefer to use this M13 build aggressively, swap in E.O.D., Ghost, and Shrapnel.