
Destiny 2: How to unlock and upgrade the Splicer Gauntlet

Destiny 2’s Season of the Splicer brings a ton of new ways to play the game. The new Splicer Gauntlet is similar to last season’s Hammer of Proving, offering an interesting gameplay loop attached to the new Override activity. In this guide, we’re going to show you how to unlock and upgrade the Splicer Gauntlet, as well as how to efficiently gather Ether, craft Key Codes, and crack Conflux Chests.

More Destiny 2

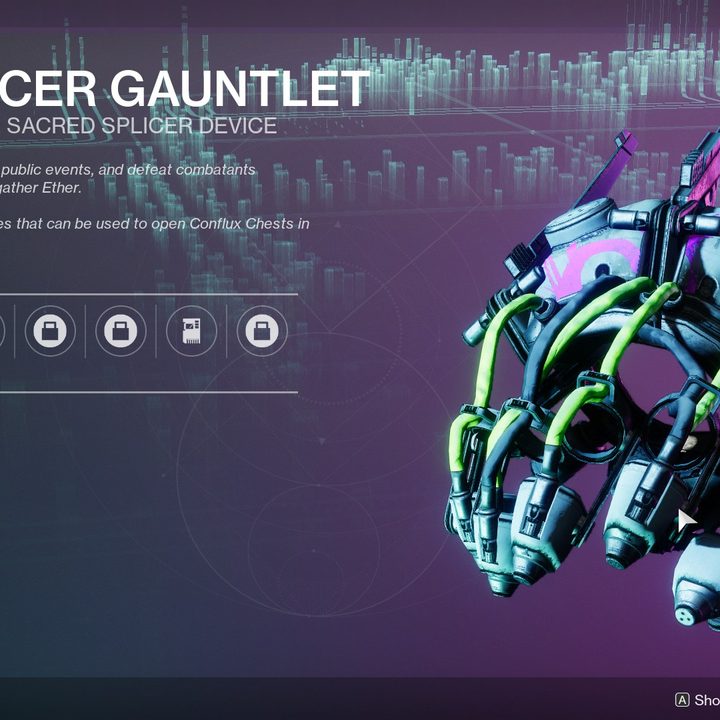
What the Splicer Gauntlet is, how to use it, and how to unlock it

Image used with permission by copyright holder

You will automatically earn the Splicer Gauntlet after starting Season of the Splicer and playing the first seasonal quest. Before you can get to that, you need to complete the season’s introductory quest, The Lost Splicer. It’s short and easy, and you’re booted directly into it the first time you start Destiny 2 since the new season began.

After it’s done, you’ll end up in an expanded version of the HELM with the first seasonal quest: Path of the Splicer I. Like most seasonal quests, this one shouldn’t take you too long (plus you’ll knock out a weekly challenge). Complete it to progress the story and to unlock the Splicer Gauntlet.

The Splicer Gauntlet is similar to last season’s Hammer of Proving. You can use it to unlock chests at the end of this season’s Override activity to earn season-exclusive armor and weapons, but you can only unlock chests if you have a special Key Code. Like any mechanic in Destiny 2, there’s a gameplay loop attached to the Splicer Gauntlet.

Here’s how it works: You earn Ether by playing Destiny 2. You use that Ether to craft a Key Code with the Splicer Gauntlet, and then you can use that Key Code to unlock a Conflux Chest at the end of an Override activity. It’s similar to how Armor Synthesis works in Season of the Splicer, just way less grindy.

How to gather Ether for the Splicer Gauntlet

Image used with permission by copyright holder

Before you can do anything, you need to gather Ether. The good news is that you can do, well, anything to gather Ether. Playlist activities, public events, and defeating combatants anywhere in the system will reward you with Ether. However, some activities reward you with more than others.

Hover over the Splicer Gauntlet in your Director to see where you can earn bonus Ether. At the time of writing, players can earn bonus Ether by completing strikes, but we imagine Bungie will update the bonus Ether drops throughout the season.

You don’t need to worry about that too much, though. The Splicer Gauntlet can only hold 100 Ether at a time, and you’ll hit that within an hour of doing basically any activity in Destiny 2. You don’t really need to focus on gathering Ether. You need to focus on using it.

How to craft Key Codes and use the Splicer Gauntlet

Image used with permission by copyright holder

After you hit 100 Ether, you won’t gather any more. To keep things moving as efficiently as possible, you need to use your Ether as it comes in. Open the Director and navigate to the Quests tab to find the Splicer Gauntlet. Follow to the Details page to start crafting Key Codes.

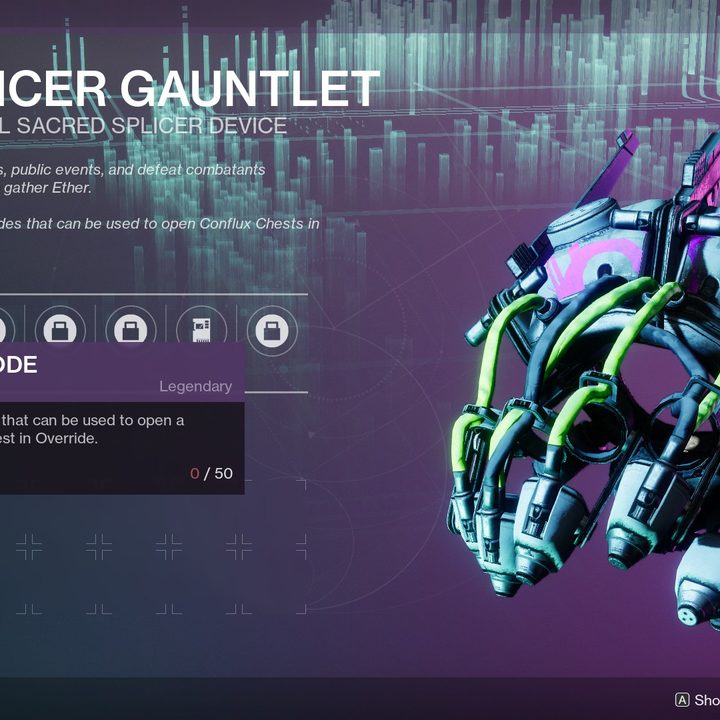
Under the Key Codes tab, you can spend 50 Ether to craft one Key Code, and the Splicer Gauntlet can store up to three Key Codes at a time. At the beginning of the season, this is the only way to craft Key Codes. However, there are empty slots next to where you can craft Key Codes, so it’s possible you can use some currency other than Ether to craft them down the time.

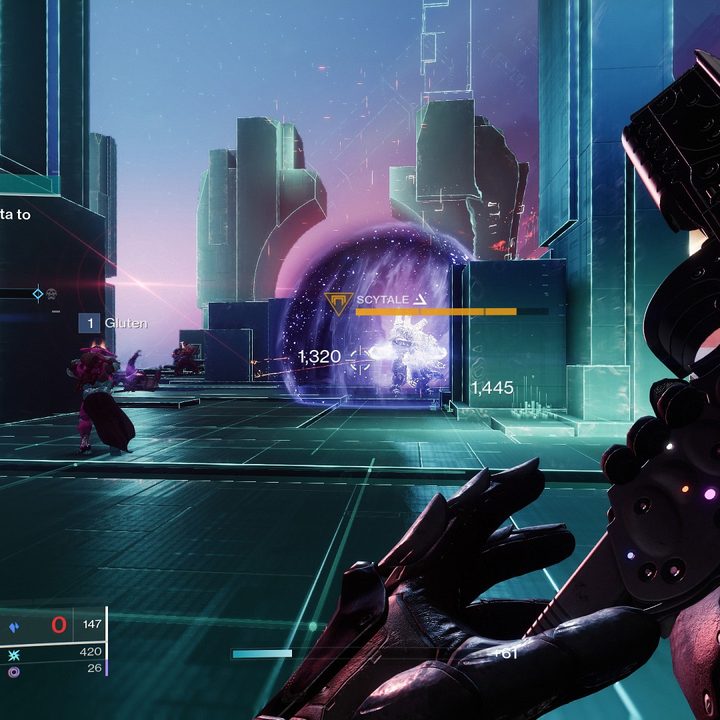
From there, all you need to do is complete an Override activity. At the end, you’ll find a Conflux Chest next to the main chest that will reward you with Season of the Splicer gear and another vague resource: Decrypted Data. This is the resource you’ll need to upgrade the Splicer Gauntlet.

How to upgrade the Splicer Gauntlet (and the best upgrades to unlock)

Image used with permission by copyright holder

You can purchase various upgrades for the Splicer Gauntlet with Decrypted Data. These upgrades are all focused around the Override activity and the Splicer Gauntlet itself, and they can make the process of gathering Ether and crafting Key Codes much easier.

You can purchase upgrades from the Splicer Servitor. Head to the HELM using the Director, then head to the new section for this season to find the Splicer Servitor. Interact with it and choose Splicer Gauntlet Upgrade from the menu to see the upgrades.

There are three tiers of each upgrade, and you need the previous tier to unlock the next. Tier I upgrades cost 100 Decrypted Data, Tier II upgrades cost 300, and Tier III upgrades cost 500. You, of course, earn Decrypted Data from Conflux Chests, but you can also earn it by completing weekly challenges.

Here are the upgrades you should invest that hard-earned Decrypted Data in:

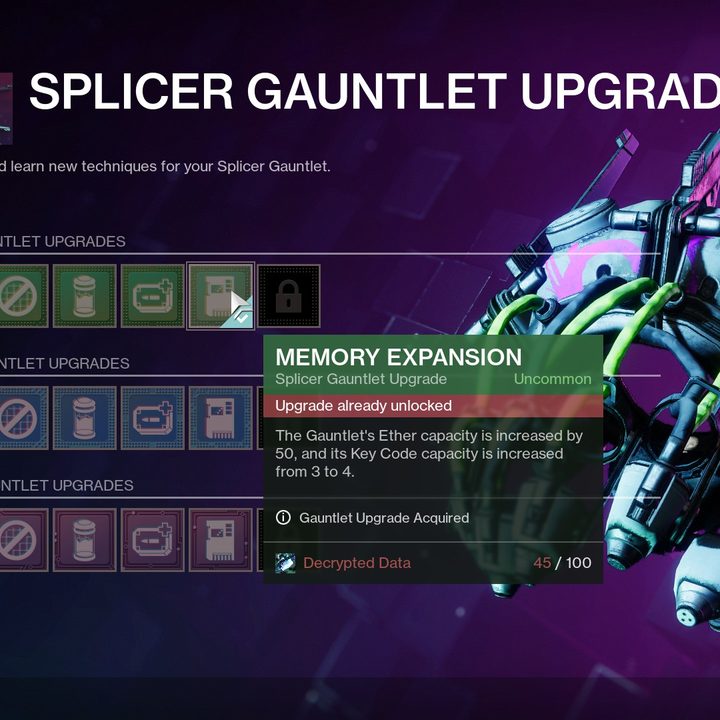
  • Memory Expansion: This is, without a doubt, the first upgrade you should pick up. The Tier I version increases your Gauntlet’s Ether capacity by 50 and gives you an extra Key Code slot. We recommend going straight to Tier III with this one, actually. With all three upgrades, your Splicer Gauntlet can hold 300 Ether and six Key Codes.
  • Override Efficiency: Override is a great way to get new seasonal gear, and this upgrade increases the rewards of Override chests. Additionally, the Tier I upgrade offers a chance for Vex chests to drop seasonal gear and increases the reward of Conflux Chests to have a chance to drop an Umbral Engram and up to one Focused Umbral Engram per week.
  • Codestrider: This upgrade opens up additional platforms in the Vex network during Override activities. It’s not really necessary, but it can make getting through the tricky Vex obstacle course a little easier. You could also invest in Deletion Exclusion, which reduces the damage of lasers and wall defenses in the Vex network.

Editors' Recommendations

Jacob Roach
Senior Staff Writer, Computing
Jacob Roach is a writer covering computing and gaming at Digital Trends. After realizing Crysis wouldn't run on a laptop, he…
The best vocations in Dragon’s Dogma 2
Dragon's Dogma 2 key art featuring a knight with a fiery hole in their chest.

Your Vocation defines your role in combat in Dragon's Dogma 2. Everything from your skills to what weapons and armor you can use is tied to this class. You will pick from just a handful at the beginning of the game, but can easily change Vocations later on, as well as unlock more than twice as many new options than what you start with. It can take a while to really get a feel for a Vocation and how it performs in combat, as well as to look through all of its skills and augments, before knowing if it's worth sticking with to level up. Personal preference will play a part to some degree, but these Vocations have the most potential to make you the strongest Arisen in history.
The best vocations in Dragon's Dogma 2

You can pick from 4 Vocations at the start of Dragon's Dogma 2, but will end up with a total of 10 by the end of the game if you unlock them all. New Vocations are unlocked by completing quests, but they are almost unmissable. Four Vocations -- the Magick Archer, Mystic Spearhand, Trickster, and Warfarer -- can only be used by your character and not any Pawns.
Warfarer
There's very little downside to being a jack-of-all-trades in Dragon's Dogma 2, which is exactly what the Warfarer is. This is the only Vocation that can use any weapon in the game AND learn any skill from other Vocations. This is the only Vocation that really lets you build whatever class you want and gives you the ability to adapt to any situation you find yourself in. The main downside to this class is it has the lowest base stats, but that is a small price to pay for how versatile you can be.
Mystic Spearhand
Hybrid Vocations are all quite powerful, but we put the Mystic Spearhand at the top of the heap. This class turns you into a fighter that can take advantage of magic to output crazy damage. The two almost overpowered abilities you get here are the ability to slow enemies for a short time and to create a magical mimic that doubles all your actions. It is great for both crowd control and large single targets, but takes a while to unlock and lacks some range.
Warrior
If you're going to be a straight-up melee fighter, you might as well hit with the biggest weapon you can, right? The Warrior swings swords large enough to make Guts blush and is a full-on tank. You won't be doing anything fancy with this vocation beyond charging up and swinging as hard as possible. The obvious drawback is any flying or ranged enemy will counter you, so bring some Pawns in those classes to cover your bases.
Sorcerer
For those who fancy themselves a pure mage, stick to the Sorcerer over the actual Mage vocation. While the Mage is more focused on healing, it is the Sorcerer who gets the best offensive spells you will want to be casting. If you have a second Sorcerer with you, you can even sync up and decrease your casting time. If not, you will need some tanks to take aggro while you deal with some slightly long casting times and low total health.
Thief
As far as the starting Vocations go, the Thief is the one we find the most fun and viable for the entire game. This is a light and speedy build focused on critical hits and being able to climb and hang on to large beasts. Once on, you have a number of great skills to stagger and knock down an enemy so the rest of your squad to gang up on it. Just don't get hit because you're one of the squishier Vocations.

Read more
All companions in Baldur’s Gate 3 and how to get them
Wyll with horns dancing.

There's a lot to see in Baldur's Gate 3, but you're not going to get far without a few good companions by your side. Thankfully, you'll stumble upon a wide assortment of NPCs that'd love nothing more than to accompany you on your journey. These friendly faces fill several different roles -- from mages and healers to archers and warriors, there's bound to be a companion that augments your playstyle.

Many of these companions also come with their own series of quests and unlockable skills, turning them into more than just faceless characters to help you in combat. In fact, you can spend hours unraveling their narratives, and depending on your actions, your companions might look very different at the end of Baldur's Gate 3 than when you first met them.

Read more
The best places to land in Fortnite (Chapter 5, Season 2)

Survival is key in Fortnite, and it all starts by picking the best starting location. Even if you're an expert player, your likelihood of coming out on top is greatly diminished if you start off on the wrong foot -- whether it be at a barren location with no loot or a hot drop that could lead to a swift death.

As part of Fortnite Chapter 5 Season 2, there's no shortage of fantastic landing spots, but which one is best comes down to your skill and preference. With that in mind, here are the best places to land in Fortnite for veterans, beginners, and everyone in between.
The best places to land in Fortnite
Before jumping into the list of the best places to land in Fortnite, it's important to be aware of what makes a good landing spot. Sure, any place with decent loot might serve you well, but there's more to consider than that. Does a spot have a consistent chest/loot spawn? Are there guaranteed materials? Is it close to other places of interest (POI)s? Is it out of the way? Of course, loot is the most important aspect, but it does you no good to have a stacked loadout if you're stuck in the storm. These recommended landing spots all have some degree of consistency and fantastic loot. they also typically have some quirk that makes them effective depending on your playstyle.
1. Mount Olympus

Read more