
Out of all of the levels in Hitman 3, Dartmoor is easily the most interesting. It turns the traditional formula on its head, tasking Agent 47 with solving a murder rather than committing one. The Dartmoor murder mystery is a bona fide whodunit, with clues, puzzles, and evidence scattered throughout the level. Put on your detective cap; we’re going to show you how to solve the Dartmoor murder mystery in Hitman 3.
There are three possible outcomes to the Dartmoor murder mystery. Many of the nessacary pieces overlap with each other, so we recommend going through all the steps below, even if you just want to find the true murderer.
Further reading
How to solve the Dartmoor murder mystery
Before solving the mystery, we highly recommend playing through the Dartmoor level at least once. One playthrough should get you to mastery level two, allowing you to bring a lockpick into the mission. You’ll need to unlock some doors to solve the mystery, and although you can pick up a crowbar in the level, it’s much easier to finish the job with a lockpick.
Step 1: Get the detective disguise
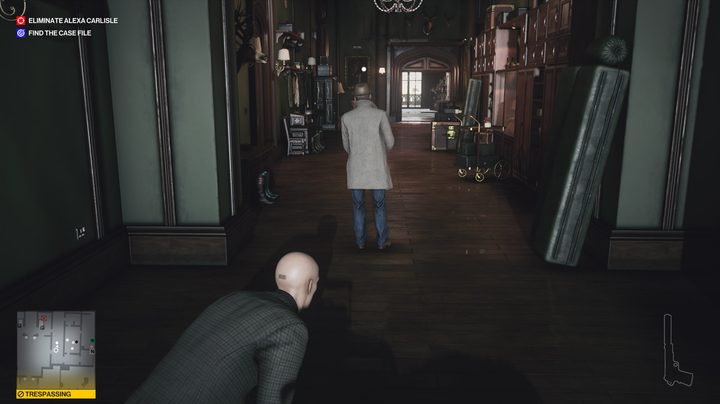
From the start of the level, follow the road until you can spot the private investigator, Phineas Witmer, entering the gate of Thornbridge Manor. Stick back, and you’ll reveal the “Means, Motive, and Opportunity” mission story. Stick around to hear the chatter, but don’t get spotted.
You need to subdue him to get a disguise. A path to the right just before the gate will guide you through the yard and into an open window. This path is fairly linear, so you shouldn’t have too many problems. The goal is to end up entering the manor through an open window to the right of the front door.
Taking out the investigator is a little tricky, but it’s best to strike early. Once you’re inside the house, head to the staff room located to the right of the window and hang out for a minute. Witmer will, eventually, enter the hall you entered when you came through the window. It’s free of threats, so use the opportunity to subdue him, hide the body, and pick up the disguise.
Step 2: Search Zachary’s room
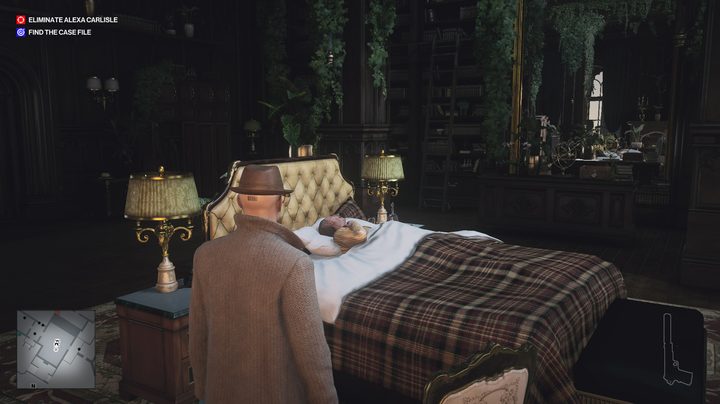
You don’t have to worry about anyone suspecting you now. Head to the main hall and meet with Alexa Carlisle and Mr. Fernsby, the butler. Mr. Fernsby will fill you in on some background details and lead you up to Zachery’s room. There are six clues here, and you’ll need all of them.
- Scan the body using your camera.
- Scan the whiskey sitting next to the bed with your camera.
- Pick up the suicide letter by the fire.
- Search Zachary’s laptop by the fire.
- Pull a book on the left side of the room to open a secret passage.
- Search the secret passage for the mansion floor plan.
Once you’ve found everything, head out of the other secret door and down the stairs to look for Mr. Fernsby. He has a path he’ll follow, but we found him in the main area by the front door.
Step 3: Pin the crime on Fernsby, or keep searching
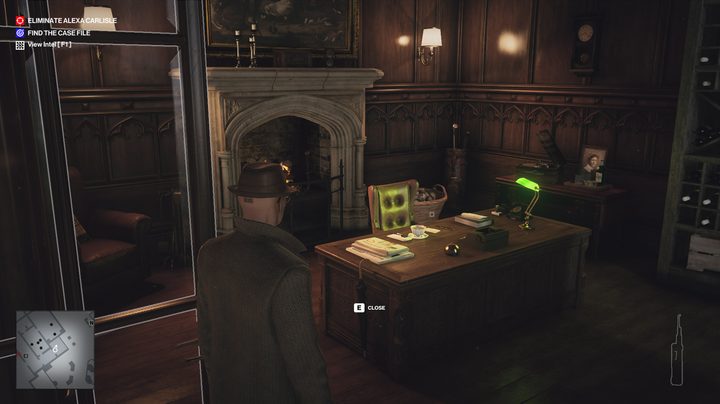
At this point, Mr. Fernsby will give you a list of suspects and locations. Head to Mr. Fersby’s office first, which is located in the staff room by the window you entered through. The door is locked, which is why we recommend bringing the lockpick. If you can’t be bothered, you can find a crowbar behind the greenhouse.
Inside, there are four clues:
- Search the fire for Zachary’s half-burnt journal.
- Pick up the mansion master key from a bookshelf near the door.
- Pick up the lethal poison pill jar from the windowsill.
- Pick up Mr. Fernsby’s list from the desk.
Between the journal and the poison pill jar, you have enough evidence to pin the murder on Fernsby. However, the handwriting from the letter on his desk doesn’t match Zachary’s suicide note, ruling Mr. Fernsby out. If you want to frame Mr. Fernsby for the crime, go back to the main area and talk to him. He’ll lead you to Madame Carlisle.
If you want to find the real murderer, continue on.
Step 4: Rule the crime a suicide, or keep searching
Even if you want to find the real murderer, going to Mr. Fernby’s office first allows you to find the mansion master key, making the rest of the investigation a little easier.
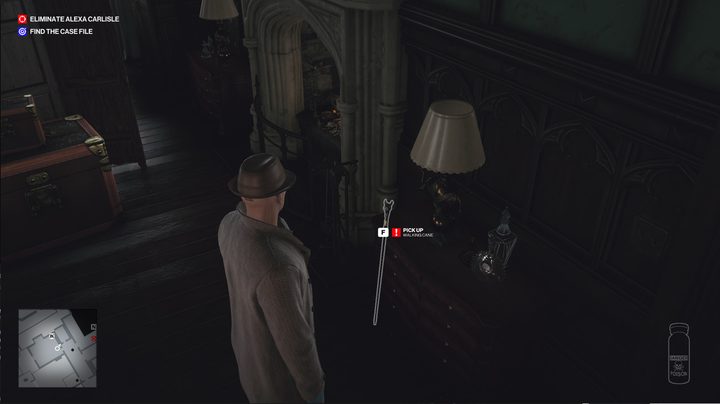
Go to Emma and Gregory’s room next, using the master key to unlock the door. There are a few clues in the room you’ll need, but we’ll circle back to them in the next step. For now, grab the cane by the fireplace. This cane is the key to the various hidden doors around Thornbridge Manor. It’s also an illegal item, so be careful carrying it around.
Head to the second level of the library (labeled as “level 1” in the map). You can find it by exiting Emma and Gregory’s room and heading down the hall to your right. In front of one of the shelves, you’ll find a switch on the floor. Use the cane to press the switch and open a secret passage. Inside, pick up Montgomery’s letter from a stack of books.
Again, you’re presented with an opportunity to return to Mr. Fernsby and conclude your investigation. With Montgomery’s letter, you have enough evidence to convince Madame Carlisle that Zachary committed suicide. He didn’t commit suicide, but you can convince her that he did. If you do, she’ll become distraught and throw herself off the balcony.
The real killer is a still a mystery, though.
Step 5: How to find the real killer in the Dartmoor murder mystery
If you want to find the real killer, head back to Emma and Gregory’s room and investigate further. There are four clues here, and you should already have one of them.
- Pick up the walking cane by the fire place.
- Scan the dirty shoes by the window using your camera.
- Pick up the letter from Emma’s mother from the nightstand.
- Pick up the Greenhouse keychain by the luggage in front of the fireplace.
Head to the back of the manor, toward the Greenhouse, next. You’ll need to break into the Greenhouse to find two more pieces of evidence, but it’s a little tricky. A guard patrolling the area will circle around the south door over and over. Wait for an opportune point in his cycle, and break in the south door. We highly recommend saving before you do, however. We were caught a few times.
Inside, go straight forward to trigger some dialogue about distillery gear. You can’t interact with it unless you have a wrench, but you don’t need to. Once that’s done, scan the open book on the desk using your camera. It reveals that someone poisoned Zachery and plans on poisoning Madame Carlisle next.
Head back to the house, taking the right-side stairs (coming from the Greenhouse). After your first set, take out your camera to scan some muddy footprints on the ground. Then, head inside the sitting room (right inside the door).
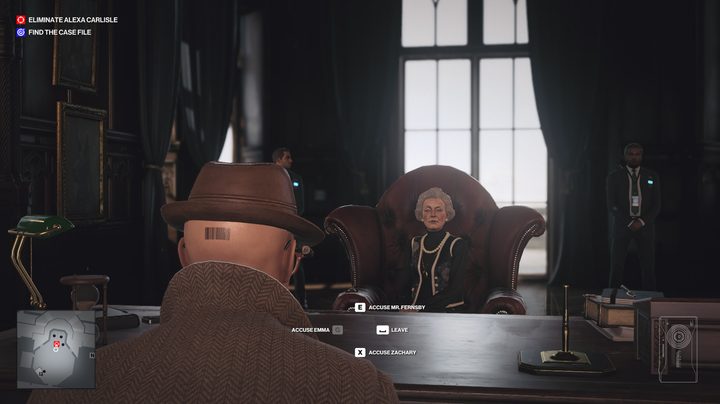
Talk to Emma inside the sitting room and exhaust all of her dialogue. Then, go back to Mr. Fernsby to conclude your investigation. He’ll lead you to Madame Carlisle’s office, where she’s surrounded by guards.
Even with all of the evidence, you’re still allowed to choose who you want to accuse of the murder. All three options have different feats, so save right before so you can circle back and get the others.


