Since the Call of Duty 4: Modern Warfare era, the MP5 submachine gun has been a fan favorite thanks to its ease of use and lightweight mobility. When Call of Duty: Warzone first launched, the MP5 (MW) (not to be confused with the Cold War MP5) was one of the best weapons in the game, but was later outclassed following substantial updates and the integration of Black Ops Cold War firearms. Well now, what’s old is new again, and the MP5 (MW) is once again the king of close-range SMGs.
This weapon was never bad, but now that many of the top SMGs in the game have been nerfed, including the MP5 (CW), the MP5 (MW) is the top dog for close-quarters use. To make the most out of this high-damage weapon, you’ll want to equip the best attachments that suit your play style. But how should you build it? And which perks/equipment should you use? We’ll answer all of that and more in this guide.
These are the best MP5 (MW) loadouts in Call of Duty: Warzone.
Recommended reading:
- Is Call of Duty: Warzone worth playing in 2021?
- How to unlock the Nail Gun in Call of Duty: Warzone
- How to unlock the OTs 9 in Call of Duty: Warzone
MP5 (MW) overview
Let’s first take a look at how this weapon works before getting into the builds. You’ll want to be aware of what the MP5 (MW) can and can’t do to see if it’s something that suits you. Since the MP5 (MW) is an SMG, you won’t be able to take enemies out at long range. According to TrueGameData, after about 21 meters or so, the weapon significantly loses power, so you’ll want to keep your engagements within that range to even stand a chance.
Where this weapon truly shines is within 10 meters. In fact, if you compare it to many of the best SMGs in the game including the MAC-10, PPSh-41, Milano 821, and LC10, the MP5 (MW) comes out on top when used within 10 meters. It has a baseline time to kill (TTK) of 526ms and is basically only outclassed by the OTs 9 (though this weapon is even worse than the MP5 at range, so it’s a tradeoff).
The other quirk with the MP5 (MW) is that it caps out at 45 rounds, which isn’t terrible, but it’s a far cry from the massive 71 round mags of the PPSh-41 and the Bullfrog’s 85 round mags. Because of this, you’ll want to be smart when challenging multiple opponents at once. It’s recommended to take on no more than three enemies at a time with this magazine size, simply because you’ll likely get caught reloading in the midst of facing off against larger squads.
Close range

| Barrel | Subsonic Integral Suppressor |
| Laser | Tac Laser |
| Stock | FTAC Collapsible |
| Ammunition | 45 Round Mags |
| Rear Grip | Stippled Grip Tape |
For the first loadout, let’s dive into the best MP5 (MW) build for close range. This will maximize how effective you’ll be able to perform within that 10-meter range. Start off with the Subsonic Integral Suppressor Barrel, a unique attachment that not only boosts your aim down sights (ADS) speed, but it also prevents you from appearing on the mini map when firing. Typically, you’d have to utilize two attachments to achieve this effect, but the Subsonic Integral Suppressor is essentially two for the price of one.
After that, we suggest going with the Tac Laser, which also improves your ADS speed, along with your aiming stability and aim walking steadiness. Having fast ADS speeds is key to a close-range build like this. Next, equip the FTAC Collapsible Stock for improved movement speed and ADS speed, at the expense of recoil control. Since you should only be using this weapon within 10 meters, having less recoil control isn’t as big of a deal.
Regardless of the build, we always recommend coming equipped with the 45-round mags to allow you to take on multiple enemies at once. Finish off the weapon with the Stippled Grip Tape Rear Grip for improved ADS speed and sprint-to-fire speed. While using this weapon, you’ll be quick on your feet, while being able to aim down sights fast, giving you the upper hand up close.
When it comes to a secondary weapon, we recommend bringing an explosive of some kind, like the RPG-7 or the Strela-P. If you plan on using the Overkill perk (more on that below) to have a second primary weapon, you should go with a long-range assault rifle like the FARA 83 or even a sniper.
As for perks, there isn’t a ton of room for experimentation here — our go-to perks are typically E.O.D. or Quick Fix for the first slot, Ghost or Overkill for the second slot, and Amped for the third slot. If you’re on Rebirth Island, you can get away with using the Tracker perk to temporarily see enemy footsteps on the ground, but aside from that, Amped is usually the best option for the third slot.
Semtex grenades or molotovs are great lethal equipment, but we’ve been gravitating toward the throwing knives lately, which quickly let you finish off a downed player without needing to waste ammo on them. And of course, stuns or a heartbeat sensor are solid choices for tactical equipment.
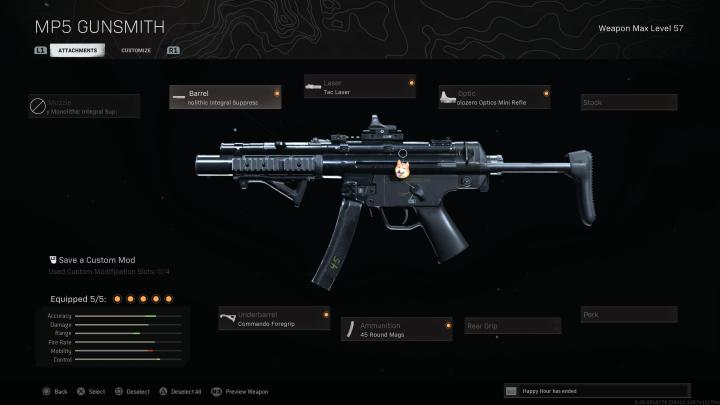
Mid-range

| Barrel | Monolithic Integral Suppressor |
| Optic | APX5 Holographic Sight |
| Underbarrel | Commando Foregrip |
| Ammunition | 45 Round Mags |
| Rear Grip | Rubberized Grip Tape |
What about a mid-range option for MP5 (MW) users? Well, as we’ve covered, this weapon isn’t great at longer ranges, but if you stick within 20 meters, you can still hold your own with the MP5 (MW). For this build, swap over to the Monolothic Integral Suppressor Barrel. This will keep you from appearing on the mini map while improving your bullet velocity. Remember, bullet velocity is how quickly a bullet travels — which impacts how much you need to lead your shots. The higher the bullet velocity, the less you’ll have to aim in front of your target. For a medium-range build, this is essential.
Since you’ll be using this weapon at mid-range, we advise using an Optic. The weapon’s iron sights aren’t terrible, but having some zoom will improve your odds at mid-range. We like the APX5 Holographic Sight Optic, but go with whatever you’re comfortable with. Also, make sure you customize the reticle to your liking when using an Optic.
To ensure your weapon is stable at 20 meters, we highly recommend switching over to the Commando Foregrip. This gives your weapon better recoil stabilization and aiming stability, which are key to mid-range battles. Keep the 45-round mags, as always, and then equip the Rubberized Grip Tape Rear Grip for improved recoil control. With this build, you’ll have the absolute best recoil control possible for the MP5 (MW).
Since this MP5 (MW) build is good for mid-range, you’ll want to bring a secondary weapon with you that works well from afar, like an LMG or lightweight sniper. We’ve been loving the Swiss K31 lately, but there are many long-range weapons to choose from in the assault rifle or LMG categories. If you don’t plan on using Overkill, stick with the RPGs or the Strela.
The perk setup will mostly be the same with this loadout, though we would advise picking the Quick Fix perk if you’re playing on Rebirth Island. This immediately starts health regeneration, and since Rebirth is so hectic, you’ll quickly reap the benefits of this perk. Other than that, stick with Ghost/Overkill and Amped.
Your equipment setup shouldn’t change much either, but if you’re on Verdansk, you might benefit more from semtex grenades rather than throwing knives, and a stun instead of the heartbeat sensor. It comes down to play style and personal preference.
All-around
| Barrel | Monolithic Integral Suppressor |
| Laser | Tac Laser |
| Optic | Solozero Optics Mini Reflex |
| Underbarrel | Commando Foregrip |
| Ammunition | 45 Round Mags |
Finally, let’s cover an all-around MP5 (MW) build. This is our personal favorite, because it works well in many situations, with versatility at the forefront. It won’t dominate at mid-range, but it’ll hold its own against others using similar weapons. For this loadout, start with the Monolithic Integral Suppressor Barrel, just like before. This will make the weapon effective at mid-range.
Then, swap back to the Tac Laser for that boost to ADS speed, aiming stability, and aim walking steadiness. This will offset some of the penalty from the previous attachment, balancing your ADS speed. We aren’t fans of the MP5 (MW) iron sights, so we utilize the Solozero Optics Mini Reflex Optic with this build. It’s a clean sight that makes it easy to line up a shot from close to mid-range. If you like the iron sights, save this attachment for something else like a Grip or Stock.
Follow that up with the Commando Foregrip Underbarrel for a boost to recoil control. This will once again help you at medium range since the MP5 (MW) has moderate recoil. And as always, make sure you use the 45-round mags with this weapon to ensure you’ve got as much ammo as possible before needing to reload.
For best results, we advise using Overkill to bring a long-range weapon with you such as the Kar98k or Swiss K31. If you aren’t a fan of snipers, you should have something that works well from afar like the Krig 6, Stoner 63, or the FARA 83. Otherwise, stick with your trusty RPGs.
The recommended perks are the same as above.
Since this is an all-around build, you’ve got a little more flexibility with your equipment, so bring either the throwing knife, molotovs, or semtex grenades, and either stuns or a heartbeat sensor.
Editors' Recommendations
- Call of Duty: Warzone is finally coming to mobile in March
- The best Call of Duty games, ranked
- Activision teases Call of Duty: Modern Warfare III’s biggest improvements
- The best Warzone FR Avancer loadout
- The best Warzone Carrack .300 loadout