As Photoshop is known for being one of the most powerful image editors available, it shouldn’t surprise you that it can take a toll on your PC’s hard drive.
Image editing is not confined to simple tasks like adding text and increasing brightness. Using the more demanding tools on Photoshop requires the use of your system’s memory in order to save temporary files. This element is largely controlled by the scratch disk feature. Without managing it properly, it can become overwhelmed with data, and thus lead to Photoshop malfunctioning.
Let’s take a look at how to clear a scratch disk in Photoshop.
Scratch disk error
Instead of using your system’s RAM, a scratch disk is Photoshop making use of your computer’s hard drive and solid-state drives for the purpose of saving data related to your images, such as edits.
Using the Purge tool
The Purge tool deletes all the cache files of a given Photoshop file. If you don't need access to those files anymore, use this method.
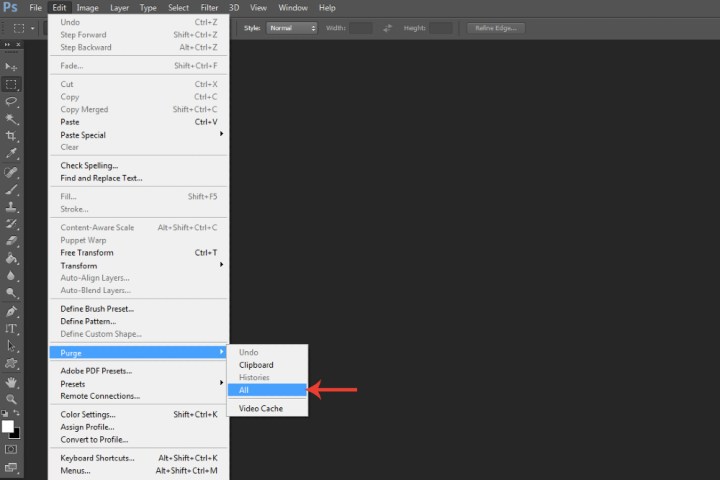
Step 1: Click Edit and then choose the Purge field.
Step 2: From the corresponding drop-down menu that appears, you can purge Clipboard, Histories, All, and Video cache. Click the All option.

Deleting temporary Photoshop files
I’m not exaggerating when I say that it’s entirely possible that your hard drive contains many GBs of temporary Photoshop files that no longer serve any purpose. In some cases, it may even reach a figure that exceeds 100GB. So if you’ve used Photoshop for many years without getting rid of such data, it can naturally take up a lot of storage space.
Deleting them will not only immediately clear a scratch disk, but it will also help Photoshop run more efficiently.
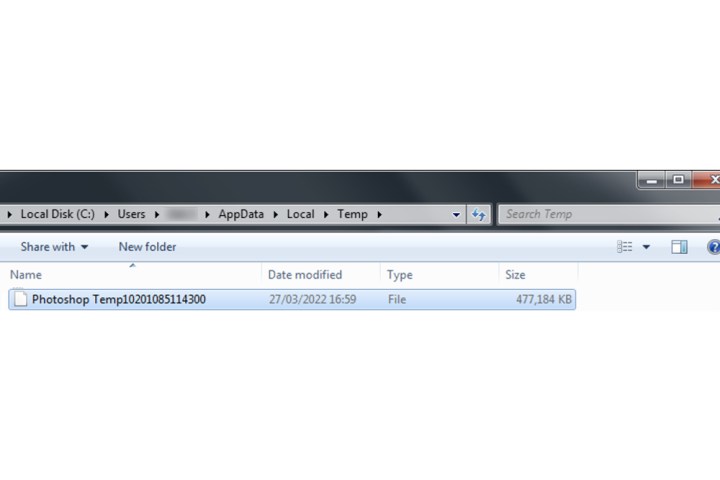
Step 1: You need to go to your Temp folder on your PC. Within your user folder, open AppData > Local > Temp. You can also reach this destination by entering %temp% in your start menu’s search bar.
Note: If you don't see the AppData folder there, you may need to enable hidden files.
Step 2: Look for all the files within that folder named either PST.tmp or Photoshop Temp. All these files will include some variation of numbers.
Select the files in question and delete them. Be sure to empty your trash to confirm their removal from your system. In the image below, a single Photoshop temp file I located is taking up nearly 500MB of disk space.

How to prevent a Scratch Disk from getting full
Now that we’ve explained a few methods for clearing a scratch disk in Photoshop, let’s take a look at how to prevent the situation (a scratch disk getting full) from occurring in the first place.
A scratch disk is automatically located in your main hard drive, which would be the C: drive for most of us. Photoshop provides an option to shift that location elsewhere, namely to another internal or external hard drive that has ample space to save Photoshop’s temporary files and data. You can also attach a scratch disk to multiple HDDs/SSDs.
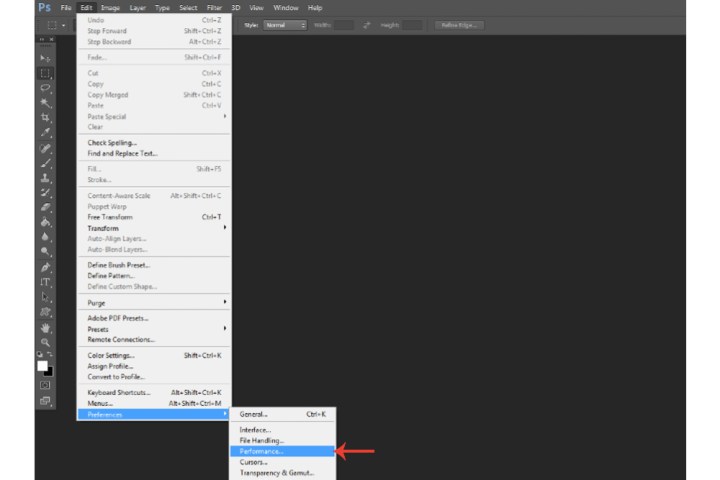
Step 1: Click Edit > Preferences > Scratch disks. If you’re running earlier versions of Photoshop, then the Scratch disks segment will be located within Performance.

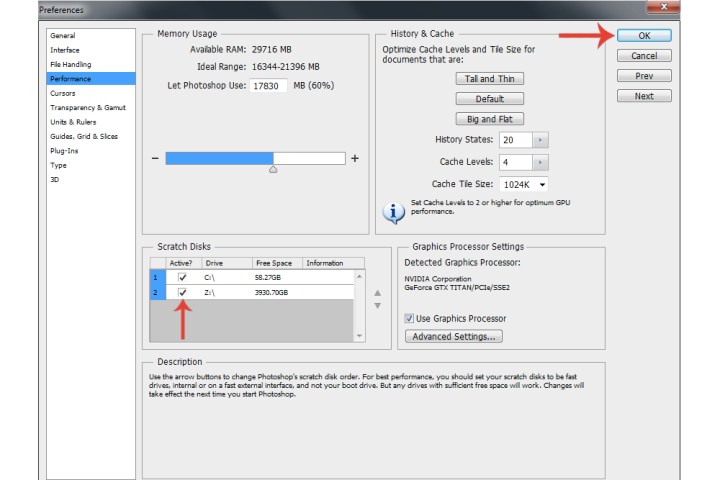
Step 2: Either deselect the C: drive and then select another drive you’ve installed onto your PC or tick the drives of your choice. As shown in the image below, I’ve selected my 4TB SSD.
As showcased within the description segment underneath the Scratch disks section, Adobe itself recommends you use reliable, fast external or internal drives as opposed to your boot drive to ensure optimum performance. If your system is equipped with a hard drive(s) to meet this criteria, unselect the C: drive and with your arrow key and position your newly selected drive to the top of the disk order.
Click OK and restart the program to confirm the switch.

Photoshop isn't alone in using your computer's storage for maintaining temporary versions of images. The best Photoshop alternatives also use this trick, and you can use similar methods to discard of this cached data.


