Google Chrome is one of the best web browsers around, packed with user-friendly features and controls. It’s also the default browser for pretty much any Chrome-branded product you purchase. Even if you prefer Safari or Firefox, we bet Chrome has one or two things you would dig. But what if you've added Google Chrome to your Windows or macOS machine, and you’ve decided you don’t like the dang thing?
You brought Google Chrome into this world, which means you can take it out! We’ve put together this step-by-step guide to teach you how to delete Chrome from Windows 11, Windows 10, and macOS.

How to delete Google Chrome on Windows 11
Removing Chrome in Windows 11 can be accomplished in just a few short steps. Here's what you'll need to do.
Step 1: Close Google Chrome and hit the Windows Key and I on your keyboard to open up Windows 11's settings app. Once there, click on Apps in the sidebar to the left of your screen.
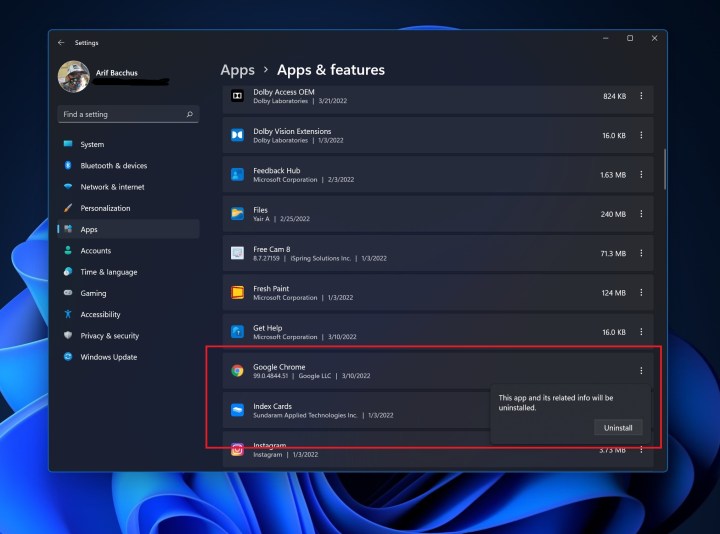
Step 2: Next, click Apps and Features and look for Google Chrome in the list. You might have to scroll down a bit.
Step 3: Click the three downward-facing dots next to Google Chrome, and then choose Uninstall. Confirm again with the Uninstall button once more.
Step 4: Agree to the pop-up prompt with Yes and enter your password if needed. Then, click the blue Uninstall button to end, and Chrome will be gone for good!

How to delete Google Chrome on Windows 10
Deleting Google Chrome on Windows 10 is as simple as visiting the Windows settings app. Find the browser in the list, and remove it from there. Here's how, step by step.
Step 1: First, quit Google Chrome. Then, open the Windows 10 Settings app with Windows Key and I keyboard shortcut. You can use this keyboard combination anywhere in the OS.
Step 2: Head to Apps in the settings app that opens up. Scroll down in the list.
Step 3: Choose Google Chrome and then click the gray Uninstall button. Click Uninstall once more.
Step 4: In the prompt that pops up, click Yes, and then provide your password if needed. You'll then get a prompt on the screen once again. Be sure to choose the blue Uninstall button, and Chrome will instantly be removed from your system.

How to delete Google Chrome in macOS
Unlike in Windows 10 and Windows 11, deleting Google Chrome in macOS is a lot easier. There's no settings menu involved. All you'll have to do is a simple drag and drop. Read on for more.
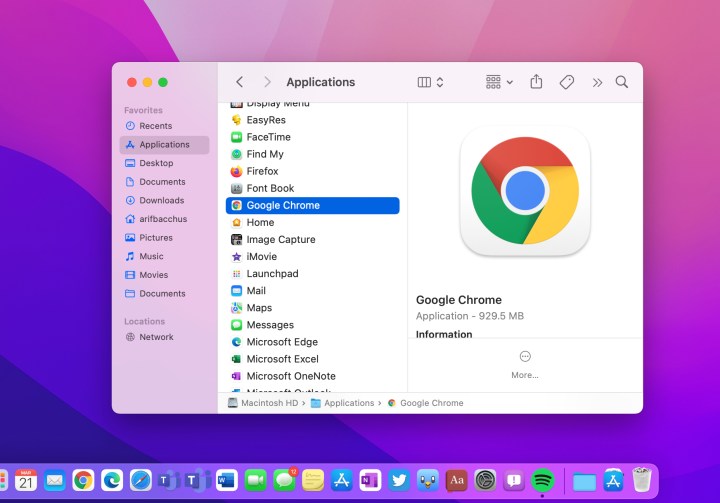
Step 1: First up, open up a Finder window. Finder is the icon at the bottom left of the dock at the bottom of your screen. It's a blue-and-white symbol with a smiley face.
Step 2: Click to the Applications folder in your Finder. It's usually the second from the top in the sidebar of Finder. Look for Google Chrome in the list. If you can't find it, go to File and then click Find and then search for Chrome.
Step 3: Once you find Google Chrome in the list, click the icon and drag it down to the trash can at the right side of your dock. Chrome will be gone from your system.
How do I re-install Google Chrome?
Having second thoughts about your removal of Google Chrome from your PC? Fortunately, adding the browser back to your machine is just about as simple as deleting it. All you have to do is head to the Google Chrome download page.
You should see a big download link at the top of the page. Once you click it, your PC will begin installing the version of Chrome designed for your operating system.
What other web browsers can I use?
Even if you’ve thrown Google Chrome to the curb for good, there are many other browser options out there. For starters, you could see how you like using the Windows and macOS default browsers: Microsoft Edge and Safari. Or you could focus on using one of the best privacy browsers.
Alternatively, you could download a third-party browser that suits your wants and needs. Opera, Firefox, and Vivaldi are all great choices for this category.
If for any reason you're having trouble deleting Chrome, and our above methods do not work, then you might want to visit Google's Chrome support page. The forum has detailed troubleshooters and methods to remove Chrome on other operating systems, as well as Windows and macOS.


