How to reset the Nanoleaf Skylight

The Nanoleaf Skylight is a unique piece of hardware. Unlike most Nanoleaf products that are quick to install or easy to move and replace, the Skylight is designed as a permanent fixture in your home. Instead of simply plugging it into an electrical outlet, you'll need to hardwire it onto your ceiling – and once it's in place, you'll want it to stay there for years.

However, like all electronics, it's possible for your Nanoleaf Skylight to start acting up. And since there's no easy way to get the entire unit down from your ceiling, you might be wondering how you can quickly solve the problem. Thankfully, Nanoleaf designed a simple way for you to reset the Nanoleaf Skylight without the need to disassemble the entire setup.

Here's a look at how to reset the Nanoleaf Skylight to help troubleshoot minor issues or perform a factory reset to clear all your settings.
Difficulty

Easy

Duration

15 minutes

What You Need

  • Flathead screwdriver

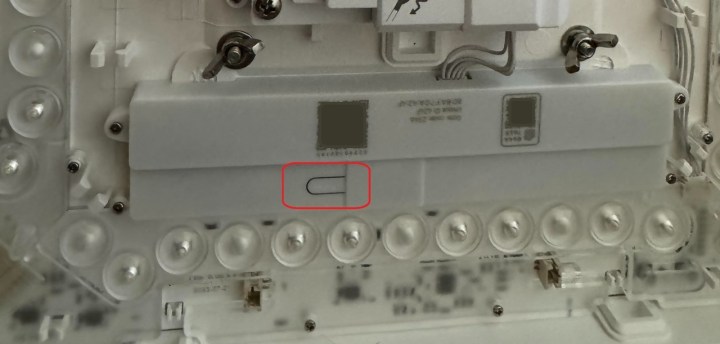
The reset button circled in red on the Nanoleaf Skylight.
Jon Bitner / Digital Trends

How to reset the Nanoleaf Skylight

The processes for performing a soft reset and factory reset on the Nanoleaf Skylight are almost identical. Performing a soft reset will reset the Wi-Fi connection and any paired connections. Your saved scenes, however, will remain untouched. A factory reset wipes your Wi-Fi connection, paired settings, and your saved scenes.

Step 1: To perform a soft reset, pop the cover off the main controller of your Nanoleaf Skylight. This can be done by inserting a flat object into one of the many notches on the side of the cover, then giving it a slight twist.

Step 2: With the cover removed, look for the small reset button. It's shaped like a tab and is easy to miss – consult the above picture if you need help locating it.

Step 3: Press the reset button for5 seconds.

Step 4: The Skylight should restart at a lower brightness than usual. After it finishes booting up, it'll turn up to full brightness and is ready for pairing.

Step 5: Wrap up the process by deleting the old device from your Nanoleaf app and re-pairing it.

You can perform a factory reset by following the same steps as above, but instead of holding the reset button for 5 seconds, you'll hold it for 10. Once again, the Skylight panels will glow at a low brightness before shining brightly. This indicates that the unit is ready for pairing. Delete the device on the Nanoleaf app, and you can then re-pair it.

Nanoleaf notes that if neither of these resets fix your problem, you may need to contact customer support. And if you're getting the "unreachable error," be sure to look into the troubleshooting process for that particular issue, as it follows a slightly different procedure.

Editors' Recommendations

Jon Bitner
Jon Bitner is a writer covering consumer electronics, technology, and gaming. His work has been published on various websites…
This is the best smart accessory you didn’t know you needed
Nix Mini 2 color scanner used to capture precise color tones on a toy

Vibrant colors are everywhere — in nature, our daily lives, and even our homes. Sometimes, you come across a color or a shade you really love that you want to recreate, whether for a new paint job, crafts or creative work. If you aren't a master in color theory, it can be tough to reproduce the more subtle and nuanced shades. But what if there was a small, portable smart device that could help you? I want to bring to your attention the Nix Mini 2. It's a color wizard that fits in your pocket and syncs with your phone. It has a built-in high-resolution and precise sensor that scans the color(s) you want and then transmits the data via Bluetooth to your Android or iOS devices. It also integrates with creative apps like Photoshop and Nix Toolkit to "bridge the physical and digital worlds." And get this: it's on sale today for $60, usually $99.

Here's why you would want the Nix Mini 2

Read more
What to know before connecting the Roborock S8 MaxV Ultra to your drainage system
The Roborock S8 MaxV Ultra model that hooks up to plumbing.

One of the coolest features of the Roborock S8 MaxV Ultra is its ability to connect to your existing plumbing. This allows it to automatically refill its clean water supply and drain its dirty water after each cleaning cycle. In other words, it turns the robot vacuum into a highly automated floor cleaner that needs little to no manual input.

The most demanding portion of owning this version of the Roborock S8 MaxV Ultra is installing it. Unlike the traditional model, which comes with water reservoirs and plugs into an electrical outlet, this model needs to connect to both your water and drain lines. And depending on how your home is set up, it might be more of a hassle than it's worth.

Read more
Roborock S8 MaxV Ultra vs. Roborock S8 Max Ultra: Which is the better robot vacuum?
The Roborock S8 MaxV Ultra placed in its dock.

The Roborock S8 MaxV Ultra and Roborock S8 Max Ultra are two of the newest additions to the Roborock family. Along with having almost identical names, these robot vacuums share much of the same spec sheet -- including the ability to mop and vacuum in a single cycle before automatically emptying their dustbin and cleaning their mops. They're impressive gadgets by all accounts, but since they're wildly expensive, you'll want to carefully compare the Roborock S8 MaxV Ultra and Roborock S8 Max Ultra before adding one to your home.

If you need help, here's a comprehensive look at these two premium robot vacuums, including a comparison of their vacuuming and mops skills, a look at their docking station perks, and a final determination of which is likely best for your needs. Keep in mind that you really can't go wrong with either product -- after all, they're two of the most expensive robots in the category -- but one might be a slightly better fit for your household than the other.
Pricing and availability

Read more