Modern webcams come with a host of settings you can adjust to customize your image quality, lighting, white balancing, and focus, among others. What you can change and by how much will depend on whether you have one of the best webcams or not, but you can change webcam settings for almost any webcam.
Here's how to change your webcam's settings in Windows.
How to change your webcam settings in Windows 11
There are a few key ways you can adjust webcam settings in Windows 11. They include the Camera app, the Camera section within the Settings menu, and any third-party software for your specific brand of webcam. Most apps that support webcams will also have settings that are specific to its use in that app that you can take advantage of.
Step 1: The Camera app has most of the important settings you'll want to change for your webcam. Search for "Camera" in Windows' search bar, and select the corresponding result. Then select the settings cog icon in the top-left.
Step 2: The specific controls you have access to here will depend on your webcam, but in Camera Settings you can choose to use a framing grid or not, and whether individual apps can adjust your camera settings.
In Photo settings you can choose the resolution the camera works at, and whether you want to use a time lapse timer. Video settings gives you options for video resolution and refresh rate. Related settings has a few options for choosing camera privacy settings in various apps, and whether the camera can access your location information.
Use the various drop-down menus to make any changes you wish to make and they will be immediately applied to your connected webcam.

Step 3: You can also adjust camera settings within the Windows 11 Settings menu. Press Windows key + I to open up the menu, then navigate to Bluetooth and devices > Cameras.
Step 4: Select the camera that you want to adjust the settings for.
Step 5: The various settings you can adjust will depend on the webcam you are using. In the case of this Logitech MX Brio, I have the option of adjusting its brightness, contrast, sharpness, and saturation. I can also rotate the video if I choose.
Use the drop-down menus and slider options to make any adjustments you want to make. They will be applied to the webcam automatically. If you don't like the changes you've made, you can select Reset settings to return them to defaults.

Step 6: The final way to adjust webcam settings in Windows 11, is with third-party software. Not every webcam has it, but most of the big-name brands do. In the case of my Logitech MX Brio webcam, the Logitech G Hub has additional options I can use to change the webcam's settings.
Those options include adjusting the framing of the image, its field of view and zoom, exposure and HDR settings, and whether to enable auto-focus or not.
You'll need to download the software for your webcam from the manufacturer's website and install it yourself to access your webcams additional settings.

How to change webcam settings on Windows 10
Changing the settings for your webcam in Windows 10 is very similar to Windows 11. The apps just look a little different.
Step 1: Search for "Camera" in Windows' search bar, and selecting the corresponding result. Then select the settings cog icon in the top-left.
Step 2: Select the Settings gear icon in the top-left.
Step 3: In the Settings menu that appears, you can adjust things like whether or not a framing grid appears, what kind of framing grid appears, the resolution of your photos, whether or not the time-lapse timer is enabled, the resolution of your videos, and flicker reduction.
If you want to be able to adjust the brightness, you'll need to enable Pro Mode, which is found at the top of that same Settings menu. Doing so will allow you to adjust the brightness via an icon on the main screen of the Camera app.
Step 4: You can also adjust camera settings in the third-party software from your webcam manufacturer. Download that from the official website and install it like you would any other app. Run it, and you should have access to a range of additional options, depending on your webcam and the software platform.
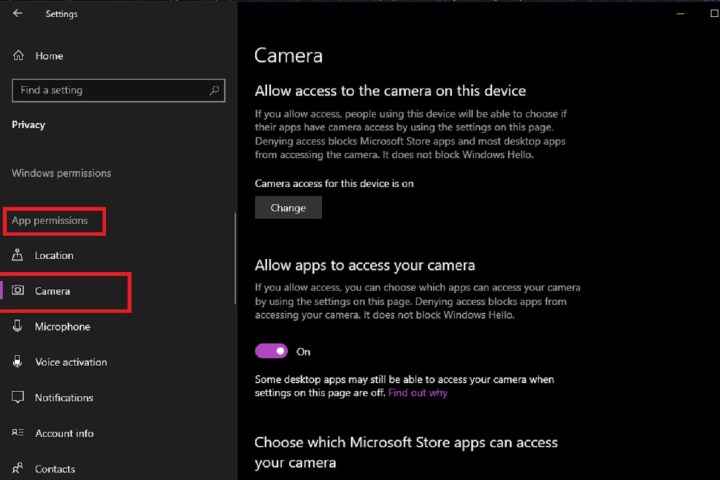
Step 5: If you want to adjust webcam privacy settings in Windows 10, navigate to Settings > Privacy > App permissions > Camera. There you'll find a few options to adjust which apps and services can make use of your webcam.
You don't just have to rely on the Windows Settings app to shore up your webcam privacy. You can ensure the privacy of your webcam by also investing in a great webcam cover and knowing the signs of webcam hacks so you can quickly spot whether or not your webcam has been compromised.