Microsoft stayed the course with the Xbox Series X and Series S, opting for raw power over a redesign of the console experience. Using an Xbox Series X is identical to using an Xbox One for the most part. Even the controller designs are nearly identical.
They’re not totally identical, however. The Xbox Series X comes with a Share button that allows you to easily capture screenshots and gameplay clips. In this guide, we’re going to show you how to take a screenshot on an Xbox Series X using the Share button, as well as how you can customize the Share button and share your screenshots to various platforms.
Further reading
- The best Xbox Series X games
- How to stream on an Xbox Series X
- How to use remote play on the Xbox Series X
How to take a screenshot using the share button
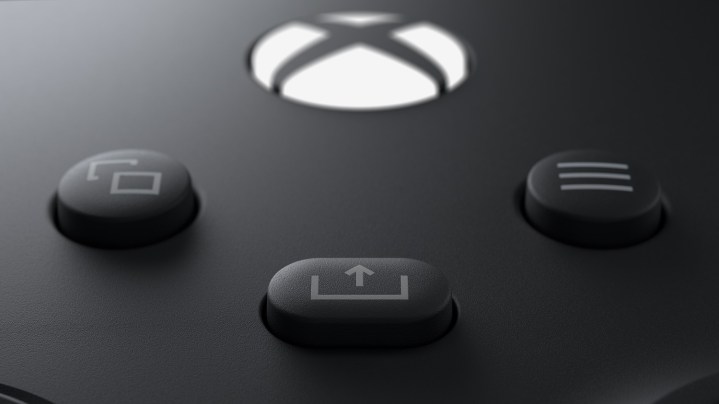
The Xbox Series X controller looks a lot like the Xbox One controller, but it has a few differences. In addition to a new D-pad and a different texturing on the back of the controller, the Xbox Series X controller comes with a Share button. This button is situated in the center of the controller, below and between the Change View and Menu buttons.
If you’ve owned a PS4, the Share button should be familiar. A single press will take a screenshot, while a long press — a couple of seconds — will record a 30-second clip. Note that the 30-second clip will include the 30 seconds leading up to pressing the button, not 30 seconds after. Immediately after taking your screenshot, hold down the Xbox button on your controller to see your sharing options. If you have Xbox Live, the screenshot will automatically start uploading, but you can also share it to your activity feed and to Twitter in this menu.
Outside of the Share button, you can also take a screenshot through the guide. Open the guide by pressing the Xbox button on your controller, then scroll over to the Capture & Share tab. Here, you can take a screenshot, start recording gameplay, and record your last 15 seconds to three minutes of gameplay, depending on your capture settings.
Customizing your capture settings

You can do more with the Share button, but you have to remap it. Open My Games & Apps and scroll down to the Apps section. Then, select Xbox Accessories (the app icon looks like a thumbstick). With your controller selected, choose Configure, then press the Edit button (it looks like a pencil). Here, you can remap all of the buttons on your Xbox Series X controller, but most importantly, the Share button. You can set a single press or long-press to take a screenshot, record a clip leading up to pressing the button, or start/stop recording gameplay.
After customizing the button, follow Settings > Preferences > Capture & Share. Here, you can set the capture location, if your screenshots are automatically uploaded to Xbox Live, and your game clip resolution and duration. The Xbox Series X captures screenshots based on your TV’s native output; if you have a 4K TV, your screenshot will be in 4K. Gameplay clips are captured using your preferences in this menu, and as you turn down the resolution, you’ll be able to capture more gameplay (up to three minutes at 720p). If you want to learn more about capturing gameplay, make sure to read our guide.
How to share your screenshots on Xbox Series X
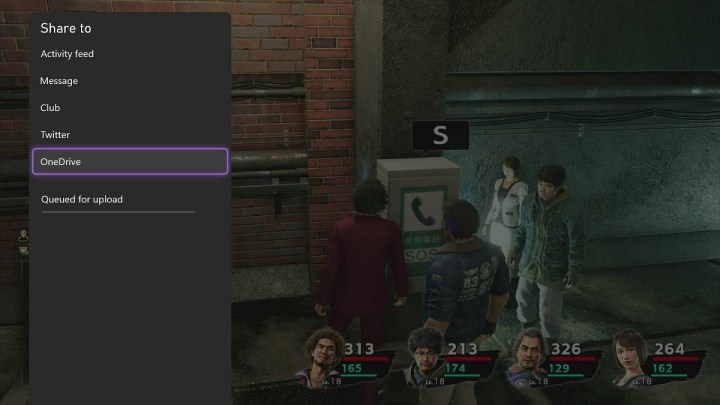
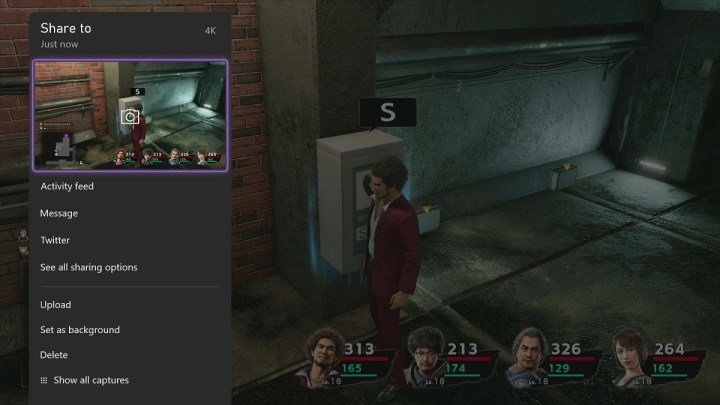
Immediately after taking a screenshot with the Share button, hold the Xbox button to bring up your capture options. Once the menu pops up, select See All Sharing Options. On the Xbox Series X, you can share your screenshots in five places: Your activity feed, a private message, an Xbox Live club, Twitter, or OneDrive. If you missed the window to bring up this menu, you can find your recent captures by pressing the Xbox button, scrolling over to Capture & Share, and selecting Recent Captures. The menu looks a little different, but you’ll find the same five share locations.
The Xbox Series X itself is limited to those five locations, but if you have an Xbox Live Gold membership, you can easily share elsewhere. Once you take a screenshot, your Xbox will automatically upload it to Xbox Live. You can view and save captures on an Android or iOS device using the Xbox app. Once you’ve downloaded the app and signed in, select the Library tab — it looks like a stack of books — to see your captures. You can share them directly on other apps — such as Snapchat and Instagram — or save them to share however you like.
There are also third-party tools to view and save your screenshots, such as GamerDVR. There isn’t much of an advantage to these tools with the Xbox app on Android and iOS, but if you’re interested in downloading your screenshots directly to your desktop, you can.


