Moving from an iPhone to an Android device can be a little jarring. You might not get the true Android experience as Google intended, and you won’t see the same messaging unification across devices. On the flip side, however, you likely won’t encounter the same in-app restrictions, giving you more purchasing freedom than you had on an iPhone.
If you’re jumping onto the Android bandwagon for the first time, there’s a lot to figure out. We’ve put together a comprehensive guide on using the platform and its various functions. You can also check out our list of the best smartphones and smartwatches if you want to get a better idea of the Android ecosystem.
Setting up your new phone
Before you can do anything on Android, you need to switch the phone on and set it up. Here is a general list of what to do after you’re greeted by the Welcome screen.
Step 1: Select a language and then tap Start.
Step 2: Connect to a mobile network by inserting the SIM card (if it’s not already). You can skip this step if you want to insert the card later or if it’s already in place.
Step 3: Connect to a local wireless network by tapping on your network and then entering the password.
Step 4: You can now set up the device as a new phone or choose to copy apps and data from an older device. If you choose the latter, there are three methods: Connecting the older phone using a USB cable, grabbing a backup stored in Google Drive, or transferring data from an iPhone. This last method leads you to android.com/switch — just follow the website’s instructions.
Please note: Some of the remaining instructions assume you’re restoring from a backup. If it’s a new device, skip to step 8.
Step 5: Sign in to your Google Account. If you don’t have one, tap Get an Account and follow the instructions.
You don’t technically need a Google account to use your phone, but it is required if you want to download apps, back up your data, or use other Google apps and services. Manufacturers such as Samsung and Huawei may ask you if you want to create an additional, manufacturer-specific account, but you don’t really need to unless you want to use that company’s services as well.
Step 6: If you’re using a cloud backup, select your service from the list (if there’s more than one). You may need to enter the PIN associated with that backup.
Step 7: Select what you want to restore: Apps Contacts, SMS Messaging, Device Settings, or Call History.
Step 8: Set the date and time.
Step 9: Agree to Google Services and the legal terms.
Step 10: Set up the Screen Lock using a PIN, pattern, or password. You’ll need this when face recognition or fingerprint scanning fails.
Step 11: Set up the fingerprint scanner or Face ID (or both). To set up the fingerprint scanner, simply place your finger on the sensor multiple times until your digit is registered.
Step 12: Set up Google Assistant.
Step 13: Set up Google Pay (optional).
Once you’ve set up your device, you should check to see if a software update is available. Here’s how to do that in stock Android 11:
Step 1: Swipe down from to top to expand the notification shade and tap the gear icon.
Step 2: Tap System.
Step 3: Tap Advanced.
Step 4: Tap System Update.
Step 5: Tap Check for Update.
Android will check to see if any updates are available. If so, you can download and install them.
Back up your phone
Once you’re fully moved in, be sure it’s backing up to Google Drive. Here’s how to check:
Step 1: Swipe down from to top to expand the Notification Shade and tap the gear icon.
Step 2: Tap System.
Step 3: Tap Backup.
Step 4: Make sure Back Up to Google Drive is toggled on.
Please note: Backing up photos and videos is a separate process using Google Photos. We provide a separate guide on how to back up your Android phone.
The navigation buttons and gestures

By default, stock Android 11 doesn’t present navigational buttons. Instead, you have a Home button (or notch) that also serves as an app drawer handle. There are times when you’ll see a back button, but generally, the Home button is the only visible tool for navigation.
However, you can toggle on the old-school three-button navigation system. Here’s how:
Step 1: Swipe down from the top to expand the Notification Shade and tap the gear icon.
Step 2: Tap System.
Step 3: Tap Gestures.
Step 4: Tap System Navigation.
Step 5: Tap the circle next to 3-Button Navigation.
Manufacturers typically equip their Android devices with the three-button navigation system at the bottom and use additional gesture controls. Here’s an explanation of each button (based on stock Android):
Back button: The back button, on the left, will take you back to the last thing you did in an app or revert to the last page in your mobile browser. Additionally, holding the button down when using your browser should automatically open up a menu that makes it easy to access your favorite bookmarks, browsing history, and the websites you visit most often.
This button resides on the right side on Samsung phones, but it can be moved to the left in Settings > Display > Navigation Bar.
Home button: The Home button, located in the middle, will simply take you back to your home screen. In the most recent version of Android, holding down the home button will also activate Google Assistant.
Overview button: Pressing the Overview button, on the right, reveals a vertical list of every open and active app on your mobile device, allowing you to quickly navigate and jump between various apps with a simple tap of the screen. Double-tap this button and you’ll jump straight back into your last-used app.
This button resides on the left side on Samsung phones, but it can be moved to the right in Settings > Display > Navigation Bar.
Finally, some phones may have gesture navigation enabled by default, eliminating all on-screen navigation controls. For instance, on stock Android 11, swiping up from the bottom takes you back home from any app. To switch apps, swipe up from the bottom, hold, and release.
On Samsung devices, you can replace the navigation buttons with gestures. Just swipe up from the bottom center to return home, swipe up from the bottom left to use the Overview function, and swipe up from the bottom right to use the Back function. You can turn on gesture controls by taking this route: Settings > Display > Navigation Bar.
The bottom line here is that you can customize your input experience across most Android phones regardless of the manufacturer.
Multiple screens

Android devices allow you to manage multiple screens — up to five before Android 4.4 KitKat and now as many as you want/need. Android used to center the Home screen (think desktop), but now the Google Feed sits to the far left and the Home screen to its immediate right. All other screens appear to the right of Home.
Users can create shortcuts, group apps together within folders, change the wallpaper, change the on-screen app spacing (grid), change the style (font, color, app shape), and so on. You can create, resize, and arrange various widgets too, which display real-time information from apps and may even be interactive. These tools are easily accessible by long pressing on any screen.
All apps are accessible through the App Drawer, which resides out of sight at the bottom of each screen (except for the Google Feed). However, if you don’t want to deal with the app drawer, you can always drag app shortcuts to the screens and stuff them into folders, like Games, Work, Music, and so on.
The Notification Shade and Quick Settings bar
Swipe down from the top and you’ll see the Notification Shade. This is where you’ll see the most activity, as apps broadcast their notifications in a stack. At the top you’ll find the Quick Settings bar, which you can also expand by dragging down its “handle.” On Samsung phones, this handle can’t be seen.
In both stock Android and Samsung phones, you’ll find a Clear link to dismiss all notifications on the shade. You’ll also see Manage (stock) or Notification Settings (Samsung) to manage these notifications. To fold the Notification Shade back to the top, just tap the Home button.
To dismiss a notification, long press and slide it left. You can also tap on the notification (which opens the parent app), or tap the Clear or Clear All link at the bottom of the shade. We provide a separate guide on how to turn off notifications in Android.
More on Quick Settings


The Quick Settings bar is a convenient way to access your most-used features on the fly and is usually the same experience across all Android phones. It’s one of the most important and most-used aspects of Android. It receives a slight update with each new version of stock Android while some manufacturers apply custom tweaks.
You can access this bar without expanding the Notification Shade by swiping down from the top using two fingers. When you fully expand the Quick Settings panel, it’s jam-packed full of tappable buttons spanning one or two pages. Just swipe left or right to navigate these pages.
The buttons are easy to use. If you want to toggle something on or off, such as Wi-Fi or Bluetooth, just tap the icon once. If you want to access the function’s settings, like accessing Bluetooth or Wi-Fi settings, long-press on the button until the respective panel appears. This saves you time by giving you direct access to those settings versus tapping through various categories.
The Quick Settings bar also provides a slider for dimming and brightening the screen. Samsung phones have an additional toggle to turn on Outdoor Mode that brightens the screen to its maximum for 15 minutes.
Finally, stock Android provides a gear icon that opens the device settings. The pencil icon allows you to edit the Quick Settings bar so you can move and remove buttons as needed. Samsung adds a search tool, quick access to the power-off screen, and means to change the button order and overall layout.
What apps should I get?
This is totally up to you. There are, however, some basic apps you should consider. Here are some possibilities:
- Social: Facebook, Facebook Messenger, Twitter, Instagram
- Music: Spotify, Pandora, Amazon Music, Apple Music
- Video: Amazon Prime Video, Netflix, Hulu, Disney+, HBO Max, Vudu
- Work: Zoom, Slack, Microsoft Teams, Asana, Grammarly Keyboard
- Cloud: OneDrive, Dropbox, Box
- Shopping: Walmart, Amazon, Sam’s Club, Target
Of course, you might want to get a few good games to play on those long flights. Additionally, Microsoft and Sony provide apps for streaming their consoles to your Android device along with other console-related related apps:
- Xbox
- Xbox Game Pass
- Xbox Game Streaming
- Xbox Family Settings
- PlayStation App
- PS Remote Play
- PS4 Second Screen
If you subscribe to a game streaming service, there are apps for those too:
- Stadia
- Nvidia GeForce Now
- Shadow
- and more
For more suggestions on some great apps, check out our guide on the best apps available on Android.
Extensive customization

Android’s customization aspect has its benefits and drawbacks. For example, manufacturers aren’t forced to use Google’s stock UI design. That’s why writing guides for Android can be difficult: Getting to a setting on one manufacturer’s phone is different on another phone maker’s device.
However, the customization aspect also means end users can tailor their experience. All manufacturers outside Google install a custom launcher, which is essentially a skin for the Home screen that changes the App Drawer interface, provides different app shortcut icons and fonts, and adds custom widgets and a few other things. It doesn’t completely change the entire Android interface — that’s baked into the manufacturer’s Android modification. Think of a Launcher as a desktop theme.
Although you’re always welcome to install a third-party launcher, the default launchers created by Google or phone manufacturers like Samsung do a pretty good job of letting you arrange your content in an attractive way.
Still, if you want a unique experience, installing a third-party launcher is the way to go. For instance, the Nova Launcher and Apex Launcher provide two vastly different ways of using the platform, each adorned with its own display aesthetics and navigation components. You can check out our favorite Android launchers here.
Aside from the default launcher, Android allows you to customize many components, like setting the default browser and swapping out the on-screen keyboard. The latter may seem like a small feature on the surface, but choosing a proper Android keyboard from Google Play is crucial to making your Android experience a productive and enjoyable one.
You can check out our list of best Android keyboard apps here.
Google Assistant integration

Google Assistant is available on all Android devices running Marshmallow 6.0 or later, and it has one major advantage over other mobile operating systems: The search engine. In many cases — though, not all — Google Assistant is a more comprehensive resource than Siri.
For example, Google Assistant will use your search history to display relevant news stories and sports scores. It will also analyze your travel habits to bring up relevant travel information, while additionally providing you with a time estimate and the best directions for driving to your next location. It will even tell you when to leave, so you don’t miss your next appointment.
To access Google Assistant, long press on the Home button. You can also activate it with your voice using the “OK, Google” or “Hey Google” voice commands. If those commands aren’t working, or if you would like to tweak the feature’s settings, open the Google app on your smartphone.
Google Pay and Google Play
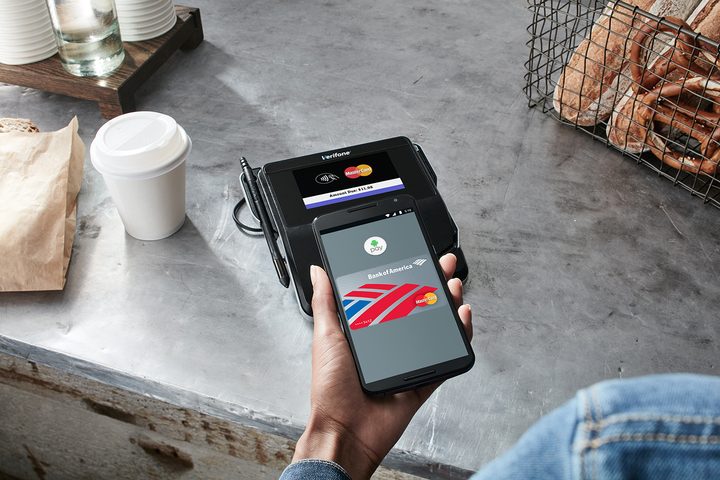
Google Pay only further unifies the Android experience. Like other mobile payment services, it allows you to store physical gift cards, use loyalty cards, pay for items in-store, and more. Here’s our guide on Google Pay and how to set it up:
- Google Pay comes preloaded on many devices, but if your phone doesn’t have the app, you can download it from the Google Play Store.
- If you already have a card in your Google Account, you just need to confirm the details to add it to Google Pay. Alternatively, you can add a new card from any participating bank by snapping a picture of your card and confirming the details.
Google Play — the Android equivalent to Apple’s App Store — operates as Google’s official digital store, allowing you to purchase apps, books, movies, and more with a few simple taps. It even lets you install apps remotely, meaning you can download an app on your tablet when you’re at work and it’ll be there when you arrive home.
A unified Google experience
Android is a diverse platform. It’s not only installed on smartphones but appears on tablets, set-top-boxes, smartwatches — even in Google Glass. You’ll also see it running in an emulator on Chrome OS, adding Android app support to Google’s web-centric operating system for laptops and desktops. Android is also supported by Windows 10, allowing users to pair their Android phones to make calls, send text messages, retrieve their photos, and see their notifications right on a Windows PC.
However, Google is the foundation. Google bridges the Chrome browser installed on multiple devices. Google bridges Android phones to smart devices like Chromecast and Google Home. Google navigates when you connect an Android phone to a car with Android Auto. Android is a major component in Google’s overall services-first initiative that’s accessible on all platforms. What Google lacks is a truly unified messaging experience across devices as seen on Apple’s products.
Android setbacks
No OS is perfect, and there are a few notable issues with Android devices. Despite all the convenience and the modular features, Android is an open platform, and there are inevitable inconsistencies given the plethora of manufacturers making Android devices. A budget Android phone running an older version of the platform offers a radically different experience than the latest Samsung flagship. Thankfully, most problems have pretty easy solutions.
Another issue can be sideloading. Unlike Apple’s devices, Android phone owners can install (or sideload) apps made available outside Google Play, like Fortnite. The problem is, installing these unsecured apps can be risky, as they could have potential malware that can steal your information, like credit card numbers and account passwords. Always be careful when sideloading Android apps.
Battery life
Long battery life hasn’t always been Android’s strong suit, but it’s getting better. Most recent devices come with power-saving modes and charge using a simple USB-C cable — the kind you can find nearly anywhere. Many of the best Android phones support wireless charging too.
Inconsistent updates
Unfortunately, every user is at the mercy of Android phone manufacturers when it comes to getting the latest updates. Consider a stock Android device, like the Pixel, if you want the latest Android flavor as soon as it’s released. The Pixel line of phones is Google’s official smartphone range, and they’re guaranteed consistent updates.
The downside to inconsistent updates isn’t just missing out on new features but the security risk. Major hacks like Stagefright and Heartbleed have prompted Google to act with monthly security patches for devices, but many manufacturers and carriers stall those updates, resulting in millions of vulnerable Android phones.
Bottom line
Android is more customizable and versatile than iOS, which makes it pretty darn irresistible if you can forgo Apple’s ecosystem. Though it may be difficult for someone who owns a fleet of Mac products at home to make the switch, it can be done with a little patience and perseverance.
We have a comprehensive tutorial on switching from iPhone to Android for you, complete with instructions for moving your music, photos, and contacts.