How to share a printer on Windows

An office with multiple people working.
Image used with permission by copyright holder

A new printer can inspire creative projects and is a great way to share moments with friends and family. You can also share the printer itself. It doesn't even need to be a wireless printer since Windows can provide a Wi-Fi connection to a USB-only or ethernet-only printer.

Recommended Videos

Difficulty

Moderate

Duration

20 minutes

What You Need

  • Windows 11 PC

  • Windows or Mac computer

  • Printer

With a few helpful tips and screenshots showing how to set up printer sharing, you can print from any computer on your Wi-Fi network, including Windows 11 and Mac machines.
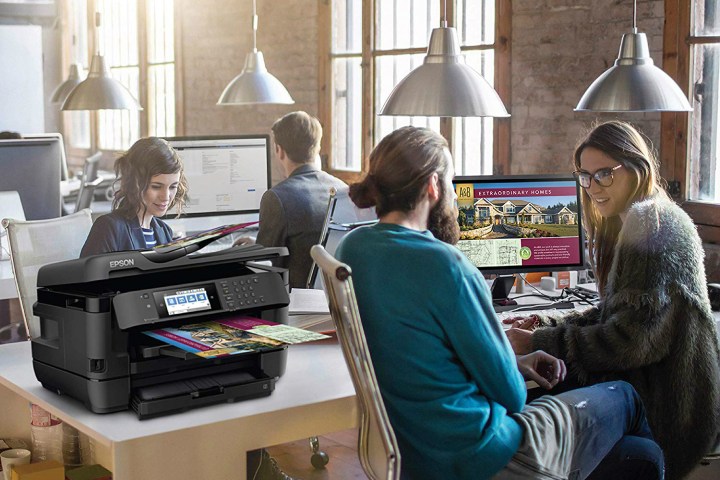
epson worfkforce wf7720 amazon deal  s workforce wireless wide format color inkjet printer wf 7720
Image used with permission by copyright holder

Set up the primary PC

The first step in network printer sharing is setting up the primary Windows PC to allow this connection. You might expect these options in printer settings, but Microsoft buried Advanced sharing settings several layers deep and in another section.

Step 1: Hit Windows-I to open the Settings app, select Network & internet in the left sidebar, then Advanced network settings at the bottom.
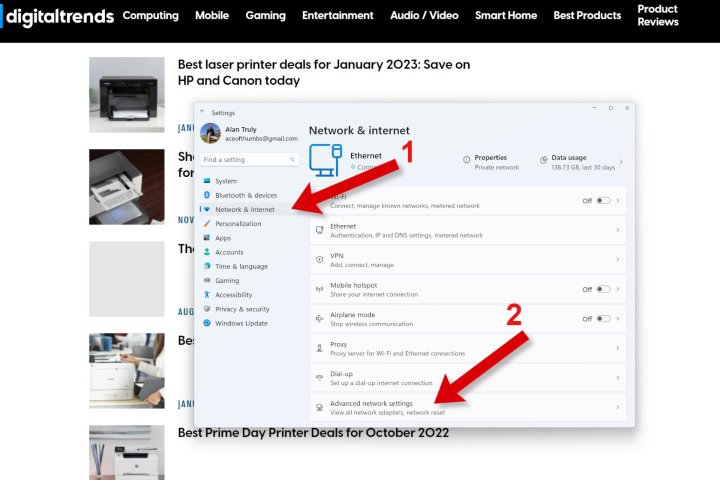
Open Settings, Network, then Advanced network settings.
Image used with permission by copyright holder

Step 2: In Advanced network settings, choose Advanced sharing settings, drilling down another layer.
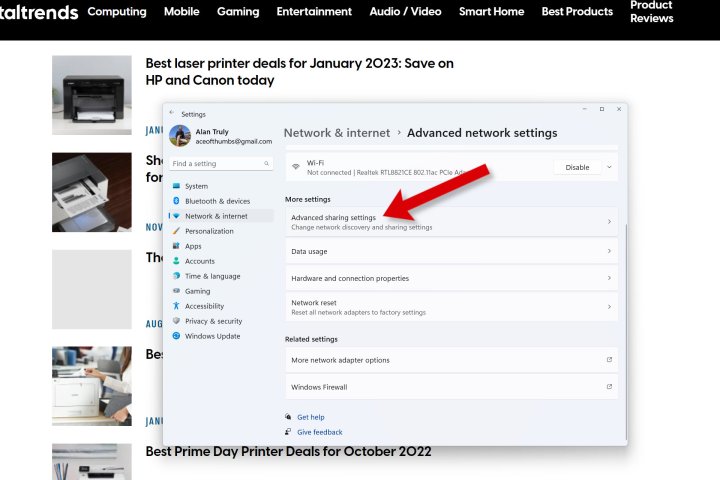
Select Advanced sharing settings.
Image used with permission by copyright holder

Step 3: Finally, you'll see the toggle switch under Private networks for File and printer sharing. If you're interested in learning more about file sharing, we have a guide devoted to transferring files PC to PC.

Switch on File and printer sharing.
Image used with permission by copyright holder

Step 4: In the left sidebar, choose Bluetooth & devices, then select Printers & Scanners on the right.
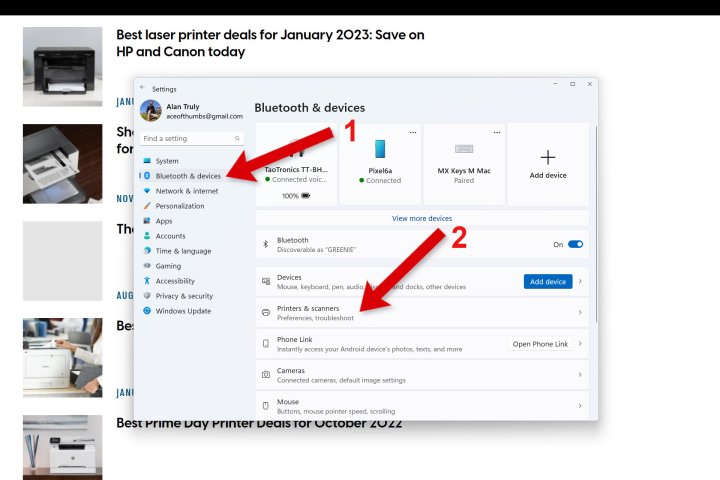
In Bluetooth settings, select Printers.
Image used with permission by copyright holder

Step 5: Select the printer you'd like to share, then choose Printer properties to open a new window with more options.
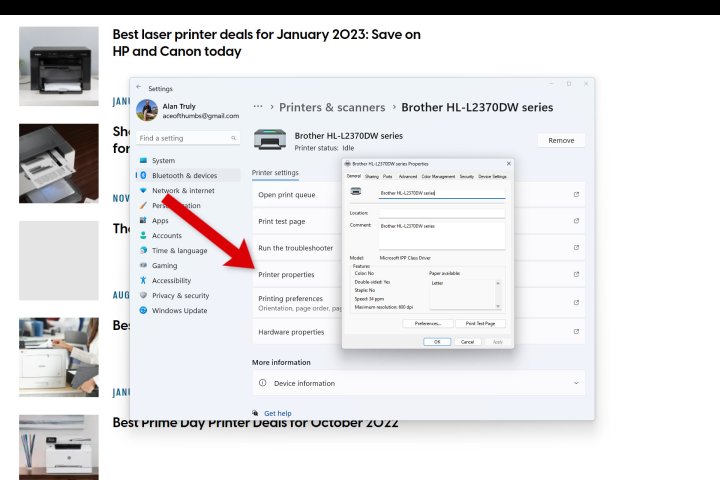
Select a printer, then choose Printer properties.
Image used with permission by copyright holder

Step 6: In the properties window, select the Sharing tab, check the box labeled Share this printer, then choose OK to proceed.

Switch this on to allow other computers on your local Wi-Fi network to see and connect to this Windows PC to access public folders and printers. If it doesn't work, see our troubleshooting guide to solve Wi-Fi problems.
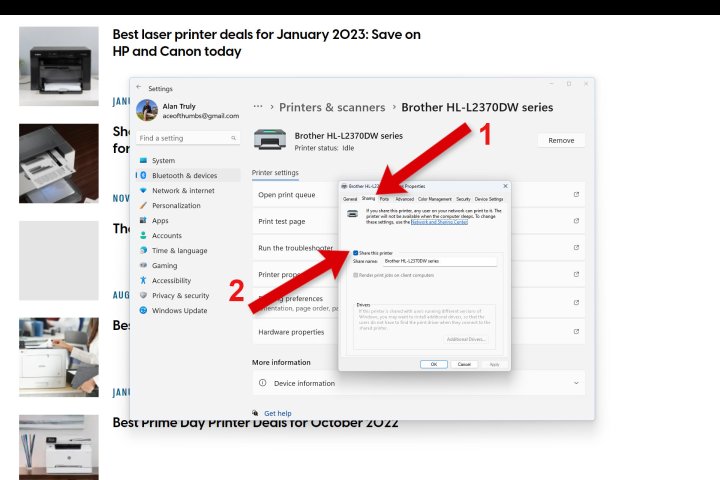
On the Sharing tab, enabling sharing of this printer.
Image used with permission by copyright holder

How to connect to a shared printer

Once you've got the primary computer setup, connecting another Windows PC to that shared network printer is relatively easy. You have to have Private networks sharing enabled on the secondary PC as well. See the steps above to set that up. Everything else happens in the File Explorer.

Step 1: In File Explorer, scroll down in the left sidebar and choose Network. It might take a moment for Windows to connect and show the primary computer. When you see the name of the computer that's connected to the printer, double-click to open it.
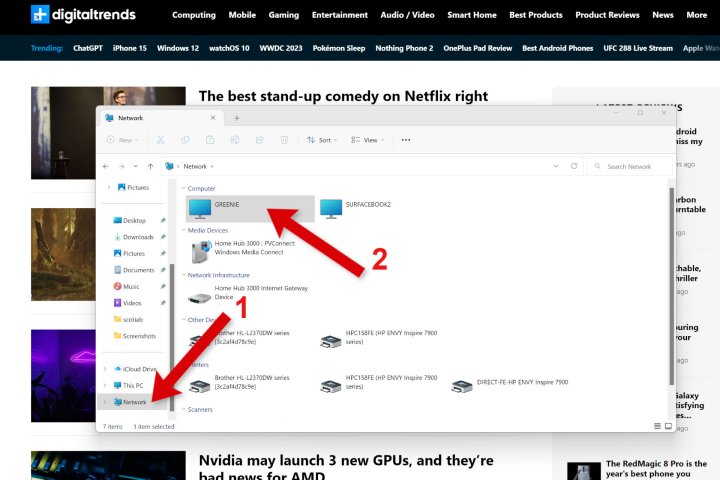
Open the Network tab, then select the computer with a shared printer.
Image used with permission by copyright holder

Step 2: You'll see shared printers and shared folders. Right-click the printer and choose Connect from the pop-up menu.
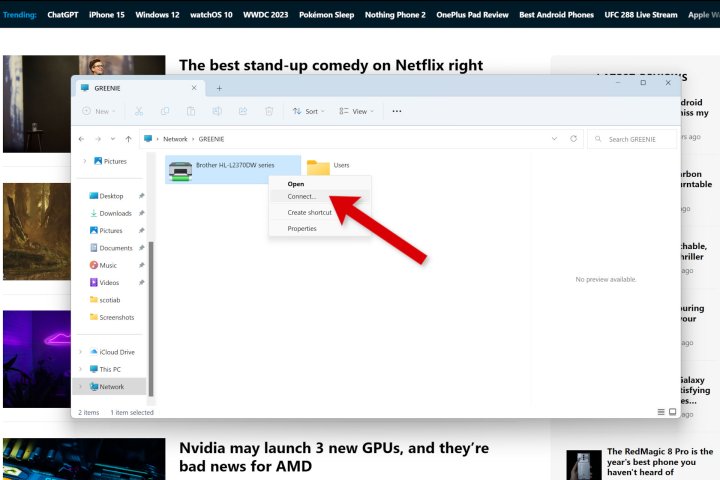
Right-click the shared printer and choose Connect.
Image used with permission by copyright holder

Step 3: You might be asked to enter a username and password that has access to the primary Windows computer depending on how the network is configured.

Afterward, the shared printer will be available in the print options window, like any other printer.
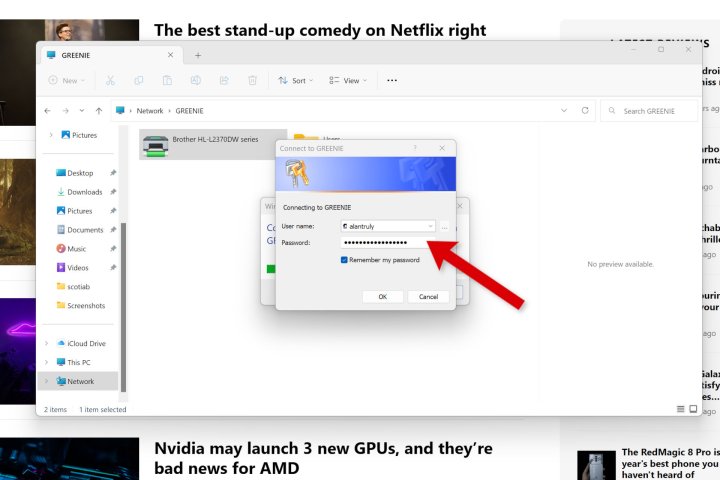
Login to the primary computer if requested.
Image used with permission by copyright holder

Connect a Mac to a Windows shared printer

A Mac computer or MacBook can also access a shared printer connected to a Windows PC. This works through a system Apple calls Bonjour.

Step 1: Open the Apple menu in the top right of the screen and choose System Settings.
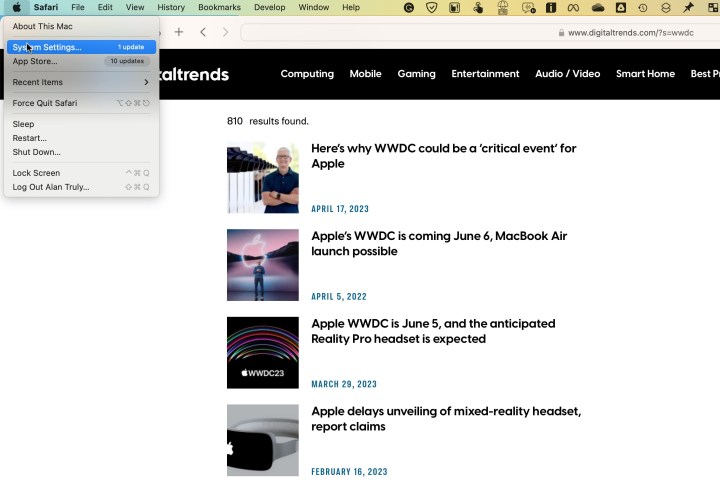
Find System Settings in the Apple menu.
Image used with permission by copyright holder

Step 2: Scroll down the left sidebar of System Settings and select Printers & Scanners. Choose Add Printer, Scanner, or Fax to get started.
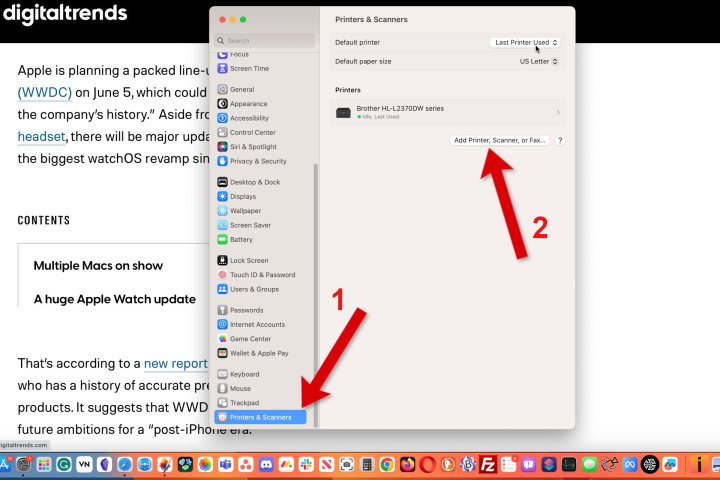
Select Printers in System Settings sidebar, then Add Printer.
Image used with permission by copyright holder

Step 3: A list of current printers will be shown in the first tab. Select the third tab to connect to a Windows PC and use its printers.
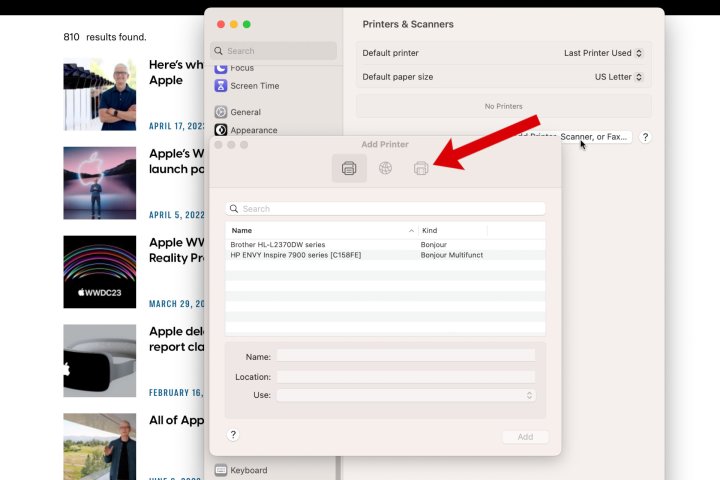
Select the third tab to connect to Windows shared printers.
Image used with permission by copyright holder

Step 4: Pick the Windows PC that you want to connect to. You might need to select Workgroup first. In this example, my Windows computer is named greenie.
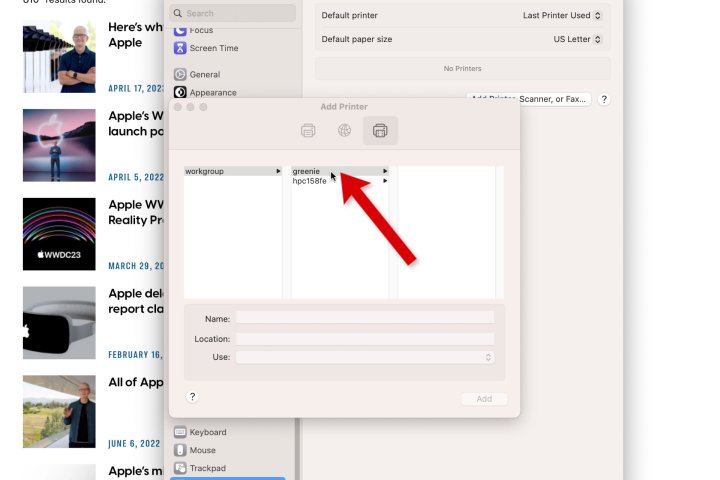
Choose a Windows PC to which you want to connect.
Image used with permission by copyright holder

Step 5: If prompted to log in, enter a username and password for an account that has access to the Windows computer.
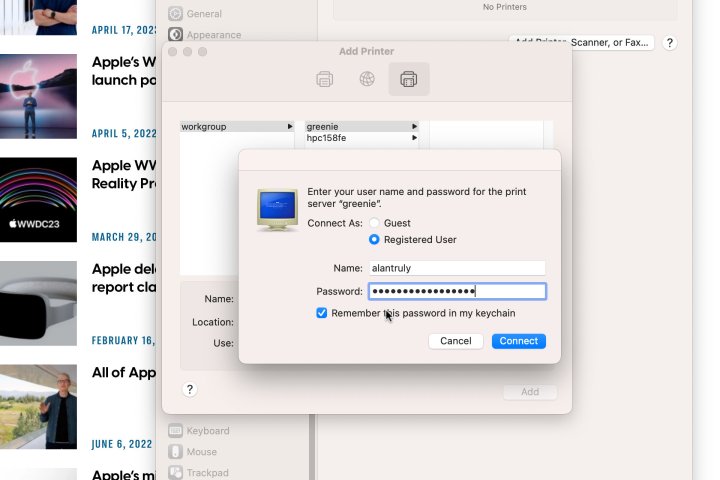
You might need to login with a Windows account.
Image used with permission by copyright holder

Step 6: A list of shared printers will be shown, so you can select the one you want. If your Mac doesn't already have a compatible driver, pick Select Software from the Choose a Driver menu.
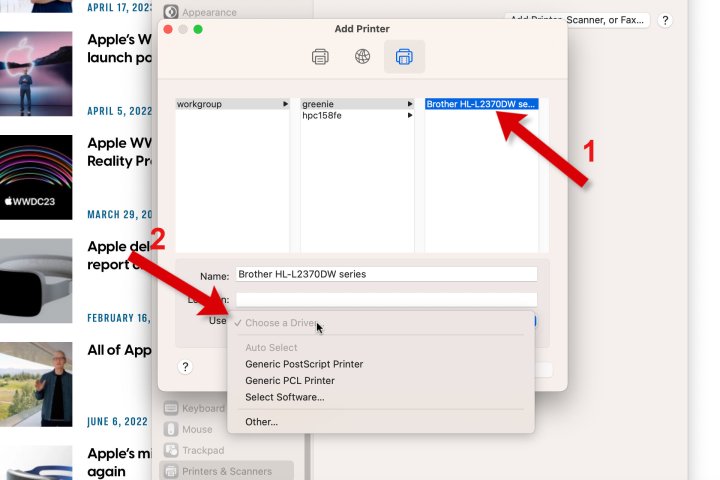
Choose a shared printer, then a driver.
Image used with permission by copyright holder

Step 7: Search or scroll down the list to find and choose the best match. In this case, Apple didn't show an ideal match, but the driver for a similar model should work for printing. If you need an exact match, you can install the driver from the manufacturer's website.
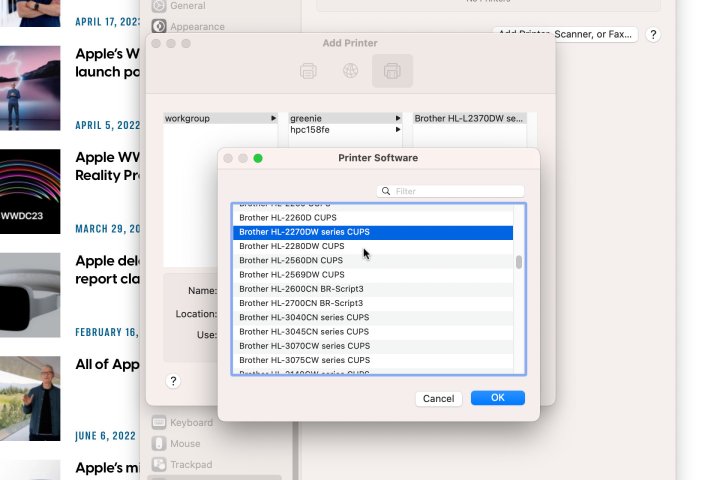
Select the driver for the shared printer or a close match.
Image used with permission by copyright holder

If the shared printer is the best, the fastest, or the most cost-effective, you might want to make it the default printer on Windows and Mac.

Many of the best new printers have wireless capabilities, making it easy to share with any computer. There are some sturdy, older models and low-cost printers that do a great job, but they could lack wireless printing. In that case, you can connect via USB or Ethernet to your PC, then share to Windows and Mac computers over your local Wi-Fi network.

Alan Truly
Alan Truly is a Writer at Digital Trends, covering computers, laptops, hardware, software, and accessories that stand out as…
Microsoft just added a secret file sharing feature to Windows 11
Drag Tray feature on Windows Insiders build.

Another secret feature has been spotted in one of the latest Windows 11 Insider preview builds. Discovered by X user phantomofearth and reported by Tom's Hardware, it appears that Microsoft is trying out a 'Drag Tray' for sharing files. When you pick up a file and drag it toward the top of the screen, a tray will drop down with different sharing options.

The feature was found in Build 22635.4805 but it's not included in Microsoft's release notes, which means there's no saying if or when it will make it to the general release of Windows 11. Anything that makes sharing files easier is a welcome feature, however, so fingers crossed that Microsoft gets it working well and decides to push it to everyone.

Read more
Microsoft’s Copilot app has a new icon, and it’s causing problems
Copilot on a laptop on a desk.

Bad news if you have a PC with a low resolution since Microsoft's new Copilot app icon is almost impossible to decipher on them, according to Windows Central. Microsoft's new logo now includes a bit of text embedded in the icon, which, depending on the resolution of your screen, might be impossible to read.

The poor design has not gone unnoticed online. Users can barely read the icon on their screens when they pin it to the Taskbar, and the lower pixel density makes it even harder to read the icon's text. If you have a Surface Laptop Go, which has a very low resolution display, there is a good chance you had no idea it said "M365." When you first saw it, you may have confused it with text such as MJEG, M366, or M355.

Read more
Microsoft is axing support for its own apps on Windows 10
The Surface Laptop 7 on a table in front of a window.

Microsoft has announced that support for Microsoft 365 apps on Windows 10 will end this year on October 14, as reported by The Verge. This is also the end-of-support date for Windows 10 as a whole, but the move is still a little surprising considering that Microsoft is now offering the Windows 10 Extended Security Updates (ESU) Program.

Anyone who joins this program for $30 can continue to safely use Windows 10 for a whole extra year -- so you might think that Microsoft would let them continue to use the Office apps too. That said, it's not like the apps will disappear, they just won't receive any more updates. According to Microsoft, this could cause "performance and reliability issues over time" but whether these issues will pop up within the ESU program's duration or not is anyone's guess.

Read more