
Fortnite season 5 week 5 challenge: Bury gnomes in Pleasant Park or Retail Row

For the final stage of Doggo’s Fortnite season 5, week 5 challenges, you’re required to bury gnomes in Pleasant Park or Retail Row. In total, you must bury two gnomes across either location at specific spots. As is typical with the challenges for this season, there are prerequisites to complete first before being able to attempt this one. Once you’re ready to attempt this challenge, you might have some trouble completing it since the game doesn’t specify where to bury the gnomes.

In this guide, we’ll show you everything you’ll need to know about burying gnomes in Pleasant Park or Retail Row in Fortnite.

Recommended reading

How to acquire gnomes

Before being able to bury gnomes across each location, you need to unlock stage 4 of Doggo’s requests. To do that, you must complete steps 1 to 3, which include:

After you’ve completed the first three stages listed above, you can move onto the fourth and final stage.

Where to bury gnomes in Pleasant Park

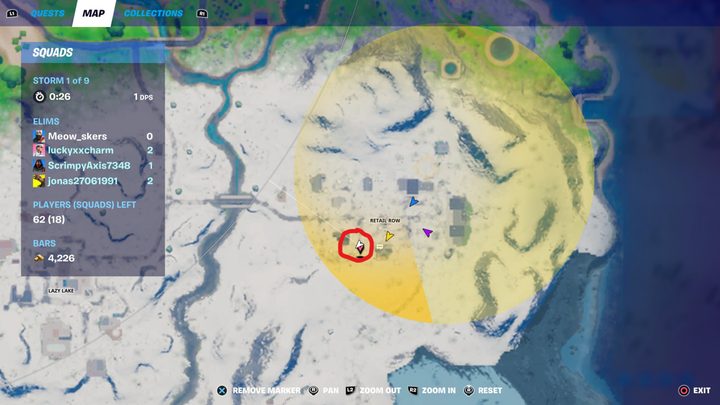
The easiest way to complete the challenge for burying gnomes is to land at one of the locations — either Pleasant Park or Retail Row. You only need to bury two gnomes, and each location features two spots for you to complete the request, four in total. In essence, this means you can land at one location and finish with the challenge without having to go to the other one. All you need to do is bury two gnomes, so visit each spot found in the area where you land to easily finish this challenge. Keep in mind that you can bury the gnomes in any order, giving you some flexibility.

Here are the spots where you can bury a gnome at Pleasant Park. Use the map images for reference.

Pleasant Park — first location

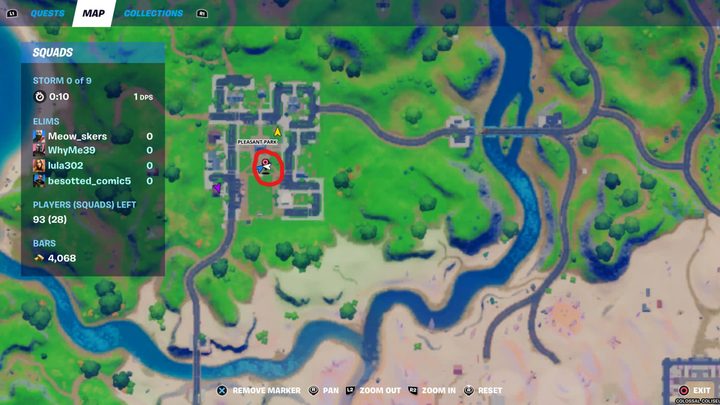
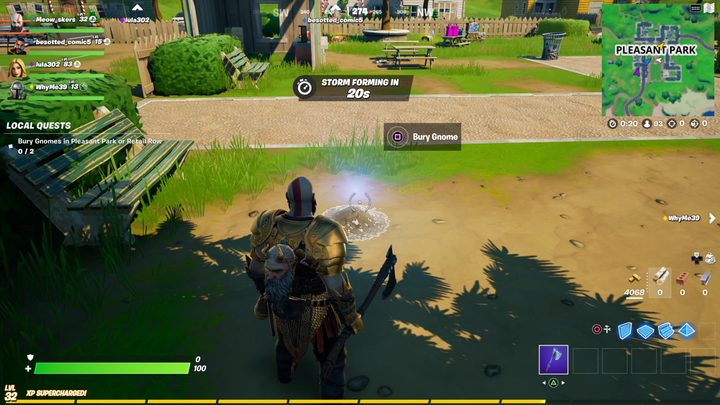
The first spot is found right in the center of Pleasant Park, to the south of the pavilion in the middle. Look for a mound of dirt on the eastern side of the center patch of grass.

Pleasant Park — second location

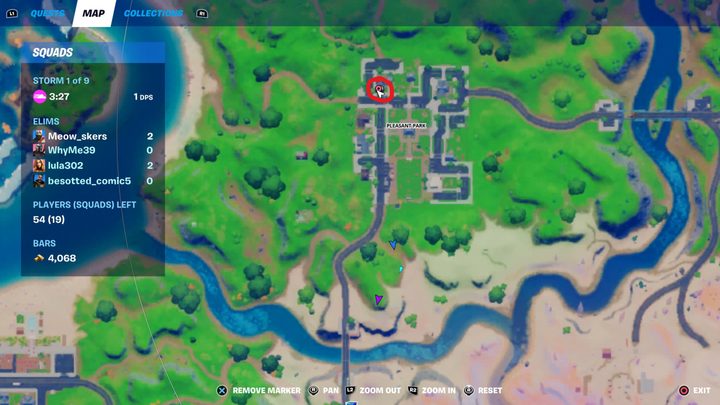
The next spot is to the north of the previous, next to a tree in front of a house. It’s found on the northwestern section of Pleasant Park next to the sidewalk.

Where to bury gnomes at Retail Row

If you decide to land at Retail Row instead, you’ll want to be aware of the spots where you can bury gnomes.

Retail Row — first location

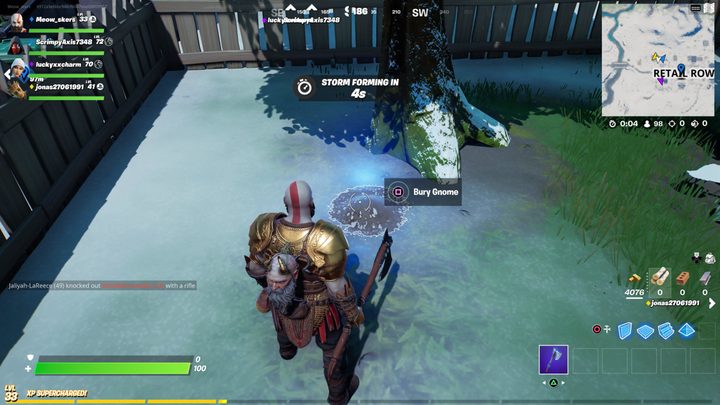
The first location is found on the northwestern side of Retail Row in the backyard of one of the houses. Look for the mound right by a tree.

Retail Row — second location

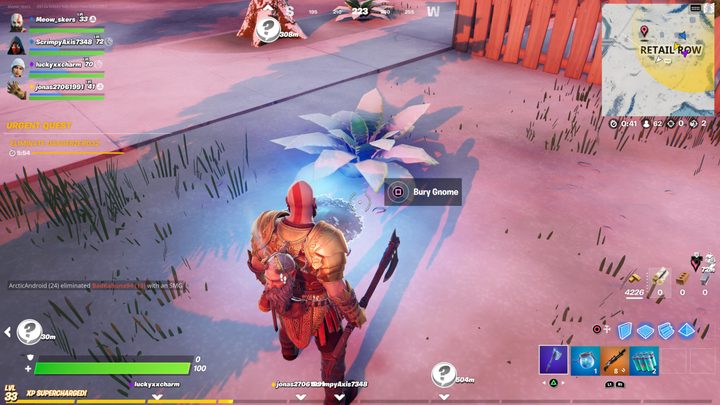
The final spot is found south of the previous location on the southeastern side of Retail Row. It’s found next to the sidewalk by a massive plant. After you’ve buried two gnomes total, you’ll gain credit for completing the challenge, along with 20,000 XP.

Editors' Recommendations

Joseph Yaden
Joseph Yaden is a freelance journalist who covers Nintendo, shooters, and horror games. He mostly covers game guides for…
How to give specialist a command in Fortnite
Character interacting with NPC in Fortnite.

As part of Fortnite's Spring Breakout Daily Quests, players are tasked with giving a hired specialist character a command. Of course, the game doesn't specify how to do this exactly, leading to some confusion amongst the community. Thankfully, we've got everything you need to know about completing this new quest with ease in Fortnite.
How to hire a specialist

Specialist Characters are specific NPCs all around the map. If you pull up the quest itself, you'll actually see a map of all the Specialist Characters. Keep in mind that not all NPCs fall into this category, so be sure to look at the map. We like the one to the very north of Breakwater Bay as it's usually out of the way. Once you find them, you'll need to pay 200 Gold Bars to hire them. If you don't have the funds, be sure to play more and complete bounties as needed.
How to give a character a command
After you've hired the Specialist Character, they'll be on your side for the duration of the match. If you look at the top left side of the screen, you'll see an icon that represents the Follower Communications wheel. Press and hold left on the D-pad on console or the middle mouse button on PC to get this menu to appear. Once it does, you can pick from a list of commands such as wait or follow. To complete the quest, you simply need to issue one command and after the NPC does what you ask, you'll earn credit for completing it.

Read more
The best weapons in Fortnite during Chapter 3, Season 4
New characters from Fortnite Chapter 4, Season 2.

Surviving in Fortnite and securing a Victory Royale takes skill and luck. Getting better at Fortnite requires a knowledge of the playing field and a drive to outlast your opponents, but none of that matters if you aren't picking up the right weapons. Building a loadout that suits your playstyle and managing your inventory as the match progresses is key to snagging a win. You don't want to be caught in a long-range battle against someone on a mountaintop without a solid rifle on hand, and you certainly don't want to find yourself inside a close-quarters building without an SMG or shotgun.

Our guide to the best weapons in Fortnite breaks down rarity types and what they mean, the most effective arms in each weapon category, and tips for how to use them. Chapter 4, Season 2 brought a lengthy list of changes to the Fortnite arsenal -- including new weapons and the return of some fan favorites.

Read more
Fortnite Guardian Shield: locations and how to use
Guardian Shield in Fortnite.

In January, Epic Games introduced a handful of new changes, including the removal of many Christmas-themed items, and its first new item of 2023: the Guardian Shield, which adds another layer of strategy when used correctly. This new item is tied to a series of in-game challenges, incentivizing players to give it a try. But where can you find the Guardian Shield and how does it work?
Where to find the Guardian Shield

Unfortunately, there isn't a way to guarantee getting a Guardian Shield, as they appear as random drops from chests across the map. With that in mind, we suggest visiting high-traffic areas that contain lots of chests -- preferably spots with Oathbound Chests. These are the large white chests that contain rarer loot and can be found in main hubs that aren't covered in snow, such as The Citadel. Regular chests yield Guardian Shields, too, though. We had luck finding them at Lonely Labs, but other areas contain the Guardian Shield, as well. You can also pick one up from eliminated enemies.
How to use the Guardian Shield

Read more