Alexa is one of the most well-rounded smart assistants you’ll find in 2023, making it easy to play your favorite music, catch up on your local news, or check the weather forecast. But beyond all the built-in functionality, did you know that you can create your own Alexa skills? In fact, you can get started today without any prior coding knowledge.
Alexa skills can be just about anything. From simple call-and-answer prompts to elaborate quiz games, the only real limit is your imagination. If you’re interested in getting started, here’s what you need to know about creating Alexa skills.
Note: Are you a developer interested in creating Alexa skills that tie into your product or service? Check out Amazon's developer guide for creating skills instead.

Log in to Blueprints
Start by going to https://blueprints.amazon.com/. Once you're there, click on Sign in at the top of the screen. You’ll then have to log in with your Amazon account details.

Choose your template
Begin by selecting a blueprint. Think of the Alexa Blueprints as a collection of templates. There are dozens of options across different categories such as Greetings and Occasions, Organizations and Businesses, Fun and Games, Learning and Knowledge, At Home, and Storyteller.
You can do things such as create a quiz game, make a fairy tale, create a workout routine, make a family chore chart, create a greeting card, or customize Alexa’s responses to your questions. Browse the Featured Blueprints to get an idea of what’s available. Then, scroll down and look for Blueprints broken down into categories.
Read the Blueprint's details
After finding an Alexa Blueprint template that strikes your fancy, click on it. Doing so opens a description of the blueprint, including the steps you’ll go through to create the skill. Notice the Play button and progress bar, too. This lets you hear a sample of a skill created with that blueprint, which can help inspire you before diving into the rest of the process and provide helpful ideas.
Confirm you want to start the Blueprint-building process by clicking on the Make Your Own link near the top of the blueprint description. For greeting cards, you'll click on Pick a Theme instead.

Populate the Blueprint's fields
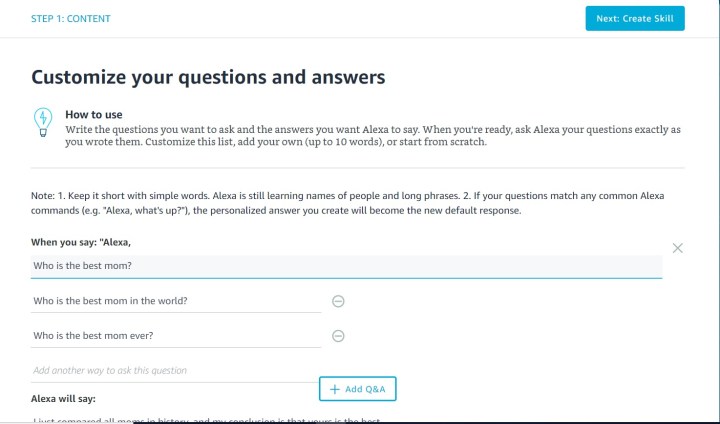
The next screen you see after clicking the Make Your Own (or Pick a Theme) features numerous form fields. All of them already have content filled in, but you can delete any of it and fill in other details to customize the content.
Use the blue Next button in the top-right corner to progress to the next step after filling out the fields or leaving them as they are.

Name your skill
Choosing a name for your skill is one of the last steps to go through. Picking one might seem very straightforward, but you should keep Alexa’s limitations in mind.
For example, Amazon’s assistant still falls short when it comes to recognizing first and last names. So, if you use blueprints to make a family quiz game, it’s best to name it something like “The Family Fun Quiz” instead of “The Alexander Family’s Quiz.” Alexa makes you enunciate certain words (like "our"), so keep that in mind when picking a name, too.
If you notice Alexa can’t understand you when you ask to use the skill, come back and pick a name that's a bit simpler. You can do that by choosing Skills You’ve Made at the top of the Alexa Blueprints homepage. Click a skill to select it, then the Edit button associated with it.
Watch for the skill readiness notification message
It only takes a few minutes until your new Alexa skill is ready to go. Look for the notification message indicating the skill is available and ready to use. Once it is, it’s possible to use the skill on any Alexa-enabled device you own that’s linked to your Amazon account.
You can also go to the Skills You’ve Made link at the top of the screen. It lists all skills created with blueprints. If you go under details, and it tells you your skill is Ready to Use and Edit, you can go ahead and launch the skill.

Launch the skill
You can start interacting with the skill by using the, “Alexa, open [skill name],” voice command. After triggering the skill, you can make sure it works as expected. If it doesn’t, you can make changes in the Skills You’ve Made section mentioned above.
Share or publish your skill
Once you've tested your skill, and you know it works the way you want it to, you can share it with friends or family members. You can share your skill via email, Facebook, Twitter, or Pinterest, or you can get a link to share. To do so, just go under Skills You've Made > Details > Share With Others.
You can even publish your skill to the Alexa Skills Store for Alexa users in the U.S. to find, use, and review. People can give your skill up to a 5-star rating, just like any other skill in the store.
To publish your skill, it will need to go through a review process. Here's how to publish your Alexa skill.
- Go to Skills You've Made and click on the skill you want to publish.
- Click on Publish to Skills Store (if you've shared your skill, you'll need to revoke sharing).
- Enter your Alexa Skills Store name, which is how customers will find you in the Alexa Skills Store. The name of your Skills Store can be different from the name of your skill and your opening phrase. You'll also have to fill in the Created by field, indicating your name or company name.
- Go to the next page and choose which category your skill fits into, choose relevant keywords that will help people find your skill, then add a short description and detailed description of your skill.
- On the next page, fill out the policy details about your skill and its intended audience.
- On the following page, review the information and submit your skill to be reviewed by Amazon for approval.
- Await an email notification letting you know whether your skill has been approved or rejected.
Delete a skill
There may come a time when you make some skills that aren’t as helpful or entertaining as you’d suspect. The Skills You’ve Made section lets you edit your skill. As an alternate option, you can remove a skill to take it off of your account. You can also delete skills you’ve previously published from the Alexa Skills Store by clicking Remove from Store under the menu choices.
With its impressive Blueprints region, Amazon makes it simple enough for even technologically-challenged users to create Alexa skills and publish their own Alexa skill concepts. As a result, you can personalize your smart speaker device with the type of content that’s important to you and the other people in your house. And, you can easily share your creations with the rest of the world.


