How to share your screen on Skype

Skype is one of the best free internet calling apps there is. If you are an avid Skype user, then you can attest to its greatness. But there are many more additional features to take advantage of other than video chatting.

One of the most useful features of Skype is the ability to share your screen on the app. All it takes is a click of a button, and you can invite multiple family members and friends to the conversation.

Recommended Videos

How to share your screen on Skype (PC)

You’re most likely using the Classic Desktop software if you’re running an OS that’s anything other than Windows 10. Fortunately, Microsoft gives us a unified experience, even between both versions. They look and act the same, so deciding on one version over the other really just comes down to our personal preferences.

With that in mind, this guide applies to both Skype versions that Windows offers, even though the screenshots included represent classic desktop software.

Step 1: Start your call by selecting a contact on the Recent Chats list and clicking the phone icon in the top-right corner.

Step 2: The next step depends on your video call. With the Recent Chats panel hidden, you’ll see a double-square Share Screen icon on the hideaway toolbar. Click that icon to proceed.

Skype Desktop Share Screen Icon
Image used with permission by copyright holder

If the Recent Chats panel remains open during your call, click the three-dot More Options icon on the hideaway toolbar. Select the Share Screen option on the pop-up menu.

Skype Desktop Share Screen Recent Chats Off
Image used with permission by copyright holder

Step 3: The Share Screen interface temporarily replaces your call screen. If you have just one screen, then you’ll likely only see one window. For PCs with two or more screens, click on the screen you want to share and then click the Start Sharing button. You’ll also see a toggle to stream the PC’s sound.
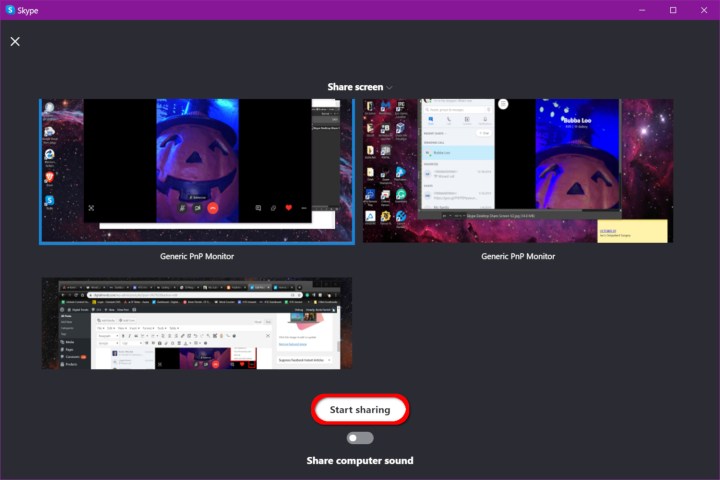
Skype Start Sharing Screen Button
Kevin Parrish

Step 4: You are now sharing your screen! A small red line appears around the bounds of your selected screen, indicating it’s currently streaming to your contact.

For PCs with multiple screens, you can switch between screens. Click the Screen Sharing Options or More Options button — depending on your current view —  and then select the Switch Screen or Window entry on the pop-up menu (see the screenshot in Step 5).

Step 5: To stop sharing, click the double-screen icon, and select the Stop Sharing option on the pop-up menu. Use this method during calls with the Recent Chats panel closed.

Skype Desktop Stop Sharing Screen
Image used with permission by copyright holder

If the Recent Chats panel remains open during your call, click the three-dot More Options icon and select the Stop Sharing option on the pop-up menu.

How to share your phone screen on Skype

Screen sharing is available on most modern devices, including iPhones, iPads, and Android hardware, but this guide focuses on the screen sharing process using an iPhone X.

Step 1: Call contact by clicking their name on your contact list. Press the phone icon located at the top right corner of the window.

Step 2: While the call is streaming, tap the screen, and an icon will appear in the screen’s bottom right corner. Tap it, and a menu will open.

Step 3: Select the Share Screen icon from the menu, and a screen will pop up.

Skype iPhone Share Screen
Image used with permission by copyright holder

Step 4: Tap on the Skype listing, then the Start Broadcast button.

Step 5: Your contact can now see your screen. You can broadcast what you wanted to share by switching to the appropriate app. Open Skype again and tap on Stop Broadcast, and the broadcast will cease.

Skype iPhone Start Stop Broadcast
Image used with permission by copyright holder

Once you get a little more comfortable sharing your screen on Skype, you might be interested in learning how to record your favorite calls.

Jon Martindale
Jon Martindale is a freelance evergreen writer and occasional section coordinator, covering how to guides, best-of lists, and…
These are officially the brightest smart glasses ever made
A render simulates what you see when wearing Viture One Pro smart glasses.

Viture just announced a new smart glasses model that's brighter and better in every way. Like the original model, the new Viture Pro fully supports the iPhone, while other next-gen smart glasses require Android devices to access every feature.

The improvements over the original Viture One include larger 4,000-nit micro-OLED panels with up to a 120Hz refresh rate that deliver an image with a perceived brightness of 1,000 nits to your eyes. Viture says this is 120% brighter than the original, while the increased panel size results in a sharper edge-to-edge image.

Read more
The most common Skype problems and how to fix them
best mac apps for small business skype

Skype is an excellent option for video chats with your friends and family or conducting a videoconference call with your colleagues.  However, Skype is not without its bugs, hiccups, and issues that can make getting face-to-face with someone seem like an ordeal. To make things easier on everyone, we've compiled a selection of the most common Skype problems and how to fix them.
Video not working
If you can't get your camera to work or experience issues seeing other's connections, you might as well be using an actual telephone instead of Skype. Thankfully, these issues can usually be resolved with a bit of tinkering on your end, or they may just be service disruptions on Skype's end.

One of the more common problems that crop up is visual issues due to Skype not having access to your PC or phone's camera. For desktop users, open the Skype application and select the Three horizontal dots near the notification bell icon to access the Skype menu. Select Settings > Audio and video. If your picture fails to appear in the Skype camera preview window, you'll know there's a connection issue.

Read more
How hot is too hot for your CPU?
AMD Ryzen 7 7800X3D sitting on a motherboard.

Your CPU can probably run hotter than you think. In the past, 70 degrees might have set off some warning bells in your mind and within the confines of your PC. But modern processors are designed to run much closer to their thermal maximums when working on demanding tasks, and they can quite comfortably sit there for extended periods of time without it causing any problems.

That's not to say you want to redline your CPU all day every day, and there are definitely some advantages to running your CPU cooler than it can technically reach. But to do that, you need to know how hot your CPU can run, and ultimately, how hot is too hot for your CPU.
How hot can your CPU run?
While we can't provide an exhaustive list of every processor and their maximum temperatures, the good news is, we don't have to. Both AMD and Intel publish maximum safe temperatures for their processors on their respective websites, so we can look at a few examples, and if your CPU isn't covered, you can easily look it up yourself.

Read more